Great Plains 3PD20 Assembly Instructions User Manual
General information, Marker assembly, Flat-fold markers
1
Installation Instructions
Great Plains Mfg., Inc.
© Copyright 1998 Printed 4/9/04
Used with:
•
•
113-380M
Three-Point Drill
Flat-Fold Markers
3PD27 and 3PD30
3PD15 and 3PD20 (Old-Style Drill)
General Information
These instructions explain how to install the flat-fold markers.
These instructions apply to:
113-211A
15-Foot Left-Hand Marker
113-212A
15-Foot Dual Markers
113-208A
20-Foot Left-Hand Marker
113-209A
20-Foot Dual Markers
113-199A
27-Foot Dual Markers
113-195A
30-Foot Dual Markers
Manual Update
Refer to the drill operator’s manual for detailed information on
safely operating, adjusting, troubleshooting and maintaining the
flat-fold markers. Refer to the parts manual for part identification.
• 3PD27 and 3PD30 Operator’s Manual. . . . . . . . 118-365M-A
• 3PD27 and 3PD30 Parts Manual . . . . . . . . . . . . . . 118-365P
• 3PD15 and 3PD20 Operator’s Manual. . . . . . . . . . 118-262D
• 3PD15 and 3PD20 Parts Manual . . . . . . . . . . . . . . 118-365P
Marker Assembly
15- or 20-Foot Markers
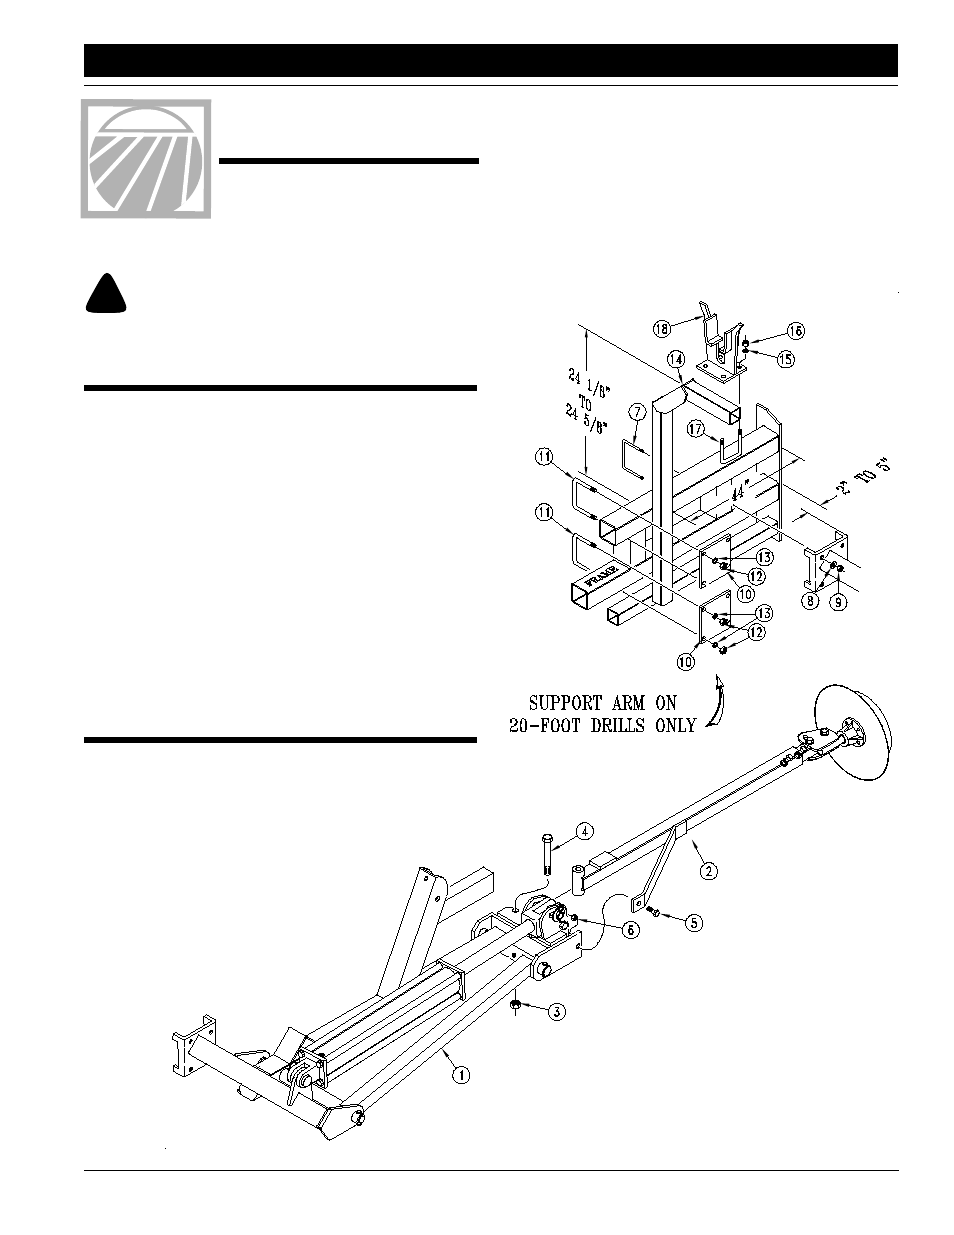
1.
Lower drill into field position. From end of each drill box, al-
low 9 feet of clearance on a 15-foot drill or 11 feet of clear-
ance on a 20-foot drill for marker assembly.
2.
Mount first marker section (1) on lower 3 1/2-inch frame
tube. Mount marker as close to end of frame as
possible. Mount with 5/8-inch u-bolts (7), hex
nuts (9) and lock washers (8).
3.
Remove port plugs from cylinder so you can
extend fold cylinder. Unfold first section and
lift hinge.
4.
Align holes in second section (2) with
holes in lift hinge. Bolt sections together
with 5/8-inch bolt (5), lock nut (6), 3/8-inch
shear bolt (4) and lock nut (3). Assemble
sections so stop block on second section
faces up.
5.
On 20-foot drills,
mount support arm (14) at dimension
shown using clamp plates (10),1/2-inch u-bolts (11), hex
nuts (12) and lock washers (13).
6.
Mount support-arm saddle (18) to support arm with 1/2-inch
u-bolts (17), lock washers (15) and hex nuts (16). To prevent
wear when folded, center saddle under the square tube of
second section.
7.
Adjust support arm and saddle so second section is parallel
with seed-box lid when marker is folded.
8.
If necessary, repeat steps
to mount other marker.
After assembling markers, proceed
to Hydraulic Setup, page 3.
11010
When you see this symbol, the subsequent instructions and
warnings are serious - follow without exception. Your life and
the lives of others depend on it!
!!