Shr series woodburning fireplace, Straight-up chimney installation, Offset installation – Vermont Casting SHR36 User Manual
Page 10: Ceiling chimney hole/ possible obstructions, Cutting the hole, Framing the ceiling hole
10
SHR Series Woodburning Fireplace
20001384
FP556SHR
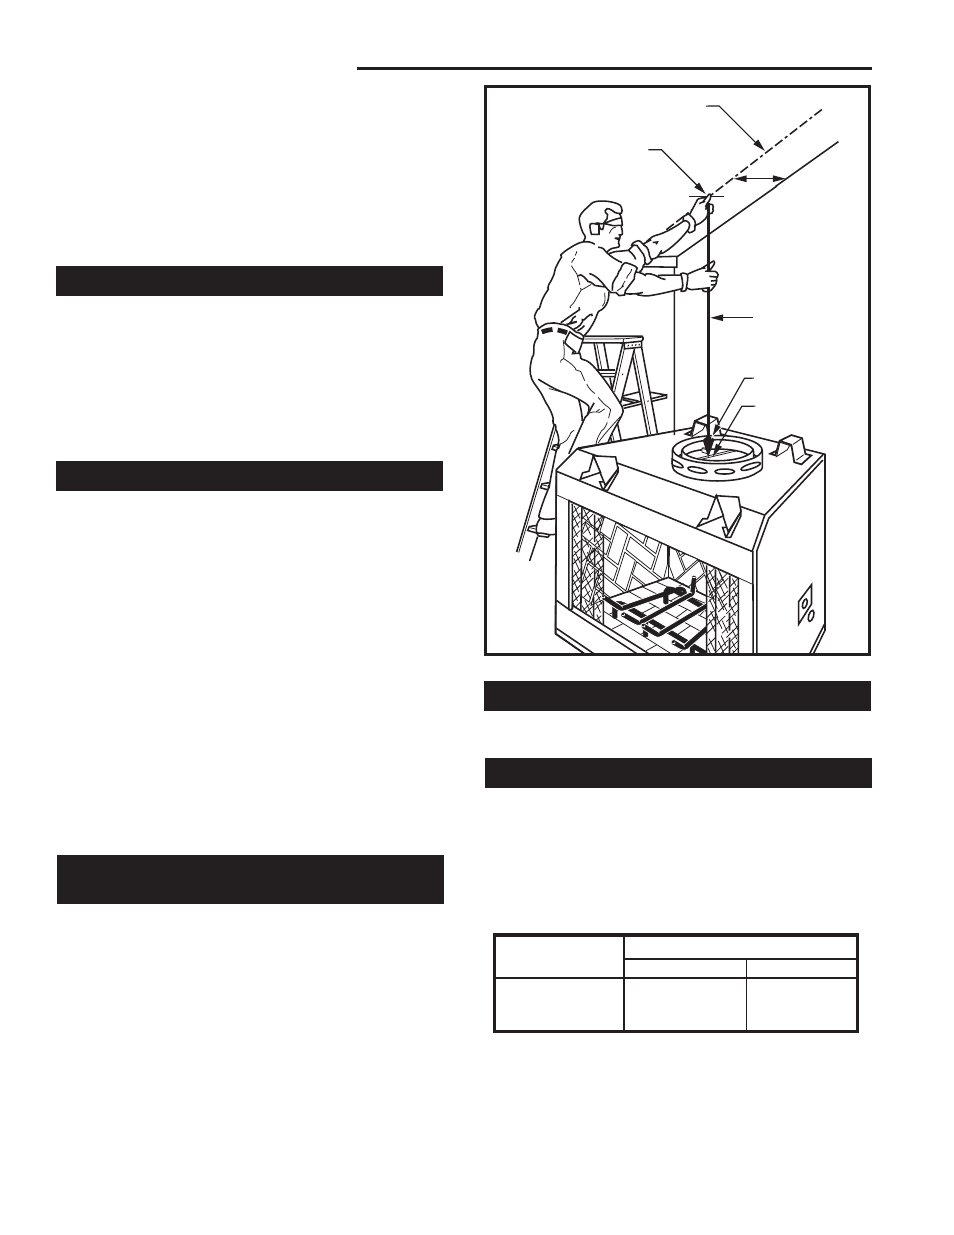
Fig. 13 Locate centerline of chimney with plumb line.
FP556SHR
SHR
LOCATE CENTER LINE
5/11/99 djt
Chimney Centerline
Actual Centerpoint
Plumb Line
Plumb Bob
Imaginary
Centerpoint
11¹⁄₈"
(283 mm)
FP 548b
SHR
5/11/99 djt
Angle of Chimney at Ceiling
Size of Chimney
Vertical
30˚
11" CF 2-Wall
FS2A
17���" x 17���"
(445 x 445 mm)
FS6A
17���" x 29���"
(454 x 753 mm)
CHIMNEY HOLE SIZE
Fig. 14 Ceiling chimney hole size necessary for installing
firestop spacer.
CAUTION: REPORT TO YOUR DEALER ANY PARTS
DAMAGED IN SHIPMENT, SPECIFICALLY CHECK
THE END CONNECTION OF CHIMNEY SECTIONS
AND ELBOWS.
NOTE: SHR Series Fireplaces must use CFM Corpora-
tion model 11CF, 11 inch, 2 wall chimney systems. The
installation procedure described in this manual applies
only to the 11CF system, chimney components may
not be mixed.
Straight-Up Chimney Installation
To mark the centerline of the flue, put the fireplace in
final position and measure out from the wall 11¹⁄₈". Mark
a spot on the ceiling directly above the fireplace. Draw
a line parallel to the back wall through this mark. (Fig.
13)
Using a plumb bob positioned directly over center point
of fireplace flue collar, mark the ceiling to establish the
chimney center point. (Fig. 13)
Offset Installation
In order to clear an obstruction, it may be necessary
to offset chimney from vertical. This is accomplished
by using CFM Corporation elbows. Use the 30˚ Offset
Elbow table on Page 6 to determine proper offset and
parts required.
Each offset requires two (2) elbows. The second elbow
is equipped with support straps. It is very important to
install the second elbow in each offset as close to the
ceiling or support as possible so the elbow straps can
be secured to framing members to help support the
weight of the chimney.
Determine offset distance of your chimney arrangement
from centerline of fireplace to centerline of chimney
where it is to pass through ceiling.
Locate center point of the chimney on ceiling as though
a straight up chimney arrangement is to be used. Mea-
sure your offset dimension from straight up chimney
center point on ceiling.
Ceiling Chimney Hole/
Possible Obstructions
The size of the hole in ceiling will vary with the angle at
which the chimney passes through ceiling.
Drive a nail up through ceiling at marked chimney
center point. Go to floor above and see where hole
will be cut. Check to see where existing ceiling joists
and other possible obstructions are located...i.e. wiring,
plumbing etc... If necessary, reposition chimney and/or
fireplace to avoid obstructions.
Cutting the Hole
Cover fireplace collar opening and cut proper sized
chimney hole in chimney. (Fig. 14 & 15)
Framing the Ceiling Hole
Frame the ceiling chimney hole as shown in Figure
15. It is good practice to use framing lumber that is the
same size as the ceiling joists; this is a requirement at
attic level.
The following table gives firestop spacer model num-
bers: