Revel F208 User Manual
Page 11
11
Revel Performa3 F208/F206 Floorstanding Loudspeaker
Owner’s Manual
OPtimiZinG PerFOrmanCe
POrt PLUGS
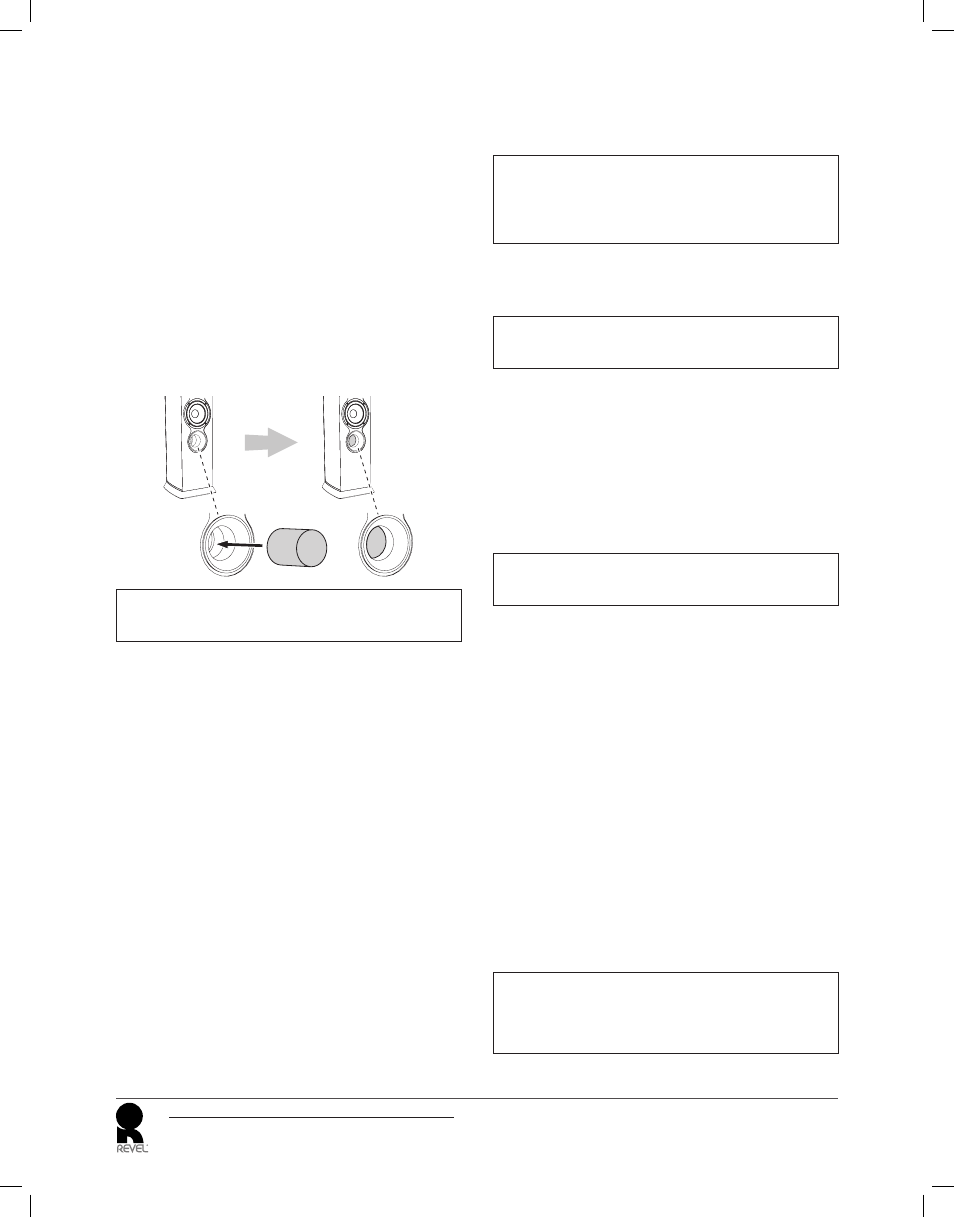
Revel Performa3 fl oorstanding loudspeakers include a pair of foam
port plugs that can be used to adjust the loudspeaker’s low-frequency
performance in certain installation situations.
If your loudspeakers are built into an entertainment center or shelving unit,
or if the loudspeaker is located less than about two feet (0.61m) from walls
or other large objects, inserting the port plugs into the loudspeaker’s port
openings can reduce the overly-aggressive bass output that can be created
by the speaker’s proximity to large surfaces that refl ect bass energy.
• In the F208 you can experiment with the port plugs in conjunction
with the loudspeaker’s Low-Frequency Compensation adjustment to
fi ne-tune the low-frequency performance even further.
Insert the port plug into the loudspeaker’s port tube opening far enough
so that the end of the plug is fl ush with the inside end of the port tube’s
fl ared section.
CAUTION: Be careful not to insert the port plug so far into
the port tube that it falls inside of the speaker.
F208 adJUStmentS
As discussed in the F208/F206 Overview section on page 5, the F208
has Low-Frequency Compensation and Tweeter Level adjustments that
allow you to tailor its performance for your individual listening situation
and personal preferences.
Once you have installed and connected your loudspeakers follow these
steps the fi rst time you turn you new F208 loudspeakers on:
1. Set the Tweeter Level switch to 0. (Different installation situations
may require other settings.)
2. Set the Low Frequency Compensation switch to the appropriate
position.
• Select the Normal setting if the loudspeaker is located at least 3
feet (0.91m) from walls.
• Select the Boundary setting if the loudspeaker is built into an
entertainment center or shelving unit or if the loudspeaker is
located less than about 2 feet (0.61m) from walls and other objects.
3. Begin playback of a familiar music or fi lm source.
4. Listen from the primary listening position, increasing volume to a
comfortable level.
5. Experiment with the loudspeakers’ placement to achieve the
best overall tonal balance, stereo image precision, and sense
of spaciousness in the listening room. Refer to the Installation
Considerations section on page 5 for additional information about
loudspeaker placement.
6. Adjust the Tweeter Level switch on each loudspeaker to change
the high-frequency level and fi ne-tune the overall tonal balance.
CAUTION: Do not operate the switch while audio is playing
through the speaker.
NOTE: For best results, set the Tweeter Level switches on both
loudspeakers to the same position.
7. Experiment with the Low-Frequency Compensation switch and the
port plugs to achieve the best low-frequency performance for your
particular listening room and installation.
CAUTION: Do not operate the switch while audio is playing
through the speaker.
LOUdSPeaKer VOLUme LeVeLS
The high-order fi lters employed in Revel Performa3 series loudspeakers
include steep cut-offs to reduce potential transducer damage from “out-
of-band” frequencies. Combined with carefully selected transducers
and fi lter network components, this approach helps the Performa3
fl oorstanding loudspeakers maintain their performance under extreme
operating conditions.
However, all loudspeakers have limits when it comes to continuous
playback. To avoid exceeding these limits, avoid playback at volume
levels that distort or strain the sound.
CAUTION: To avoid damage, reduce the volume level
immediately if the loudspeaker sound is not clean and clear.
CarinG FOr yOUr LOUdSPeaKerS
GriLLeS
Revel Performa3 fl oorstanding speakers feature grilles with a magnetic
attachment method that eliminates unsightly attachment hardware from
the speaker baffl e, so if you decide to use your speakers with the grilles
removed they will retain their elegant appearance.
When installing the grilles on the speakers, orient them so that the
"TOP" markings (embossed in the rears of the grille frames) are towards
the tops of the speaker cabinets.
CaBinet FiniSH
The cabinet’s wood veneer fi nish does not require routine maintenance.
Cabinet surfaces that have been marked with dust, fi ngerprints, or other
dirt can be cleaned using a soft cloth – preferably micro-fi ber, and high
quality auto wax. Take care not to come in contact with the transducers.
• Use caution to avoid contacting the rubberized trim on the top of the
loudspeaker with auto wax. If necessary, the rubberized trim can be
cleaned with denatured alcohol on a microfi ber cloth.
To clean the grille, gently vacuum it using a soft-bristled brush vacuum
attachment with the vacuum cleaner set to the lowest possible suction.
CAUTION: To prevent cabinet damage, do not use a cloth
made with steel wool or metal polish to clean the cabinet.
To prevent possible transducer damage, do not apply
furniture polish directly to the cabinet.