Kenco Engineering Valve Replacement Kit User Manual
Page 3
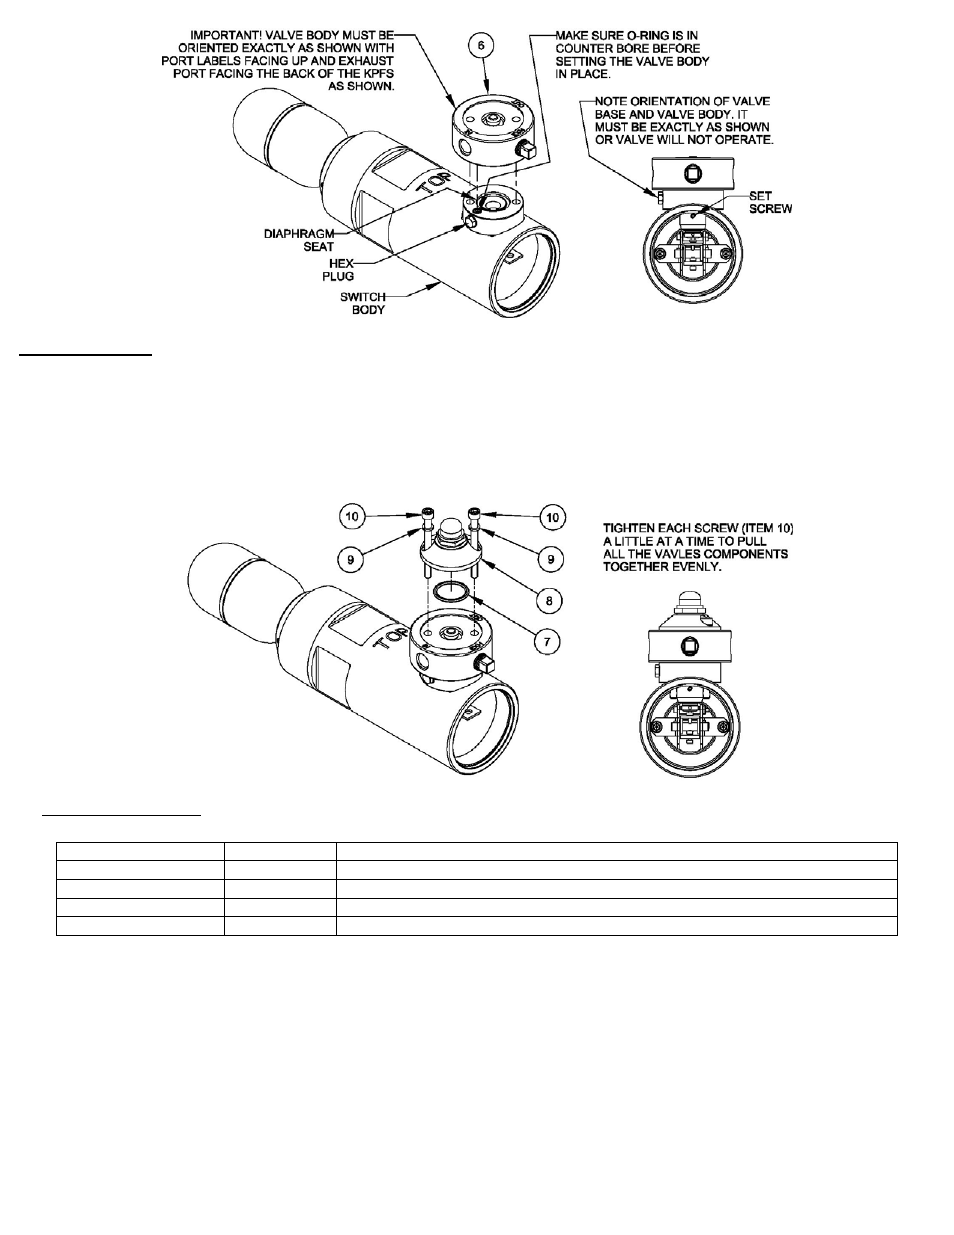
Figure 3
Install Valve Body
1.
Locate the parts bag that contains the Valve Body. The Valve Body will be the only part in the bag.
2.
Check the orientation of the Valve Base from the previous section. Make sure the hex plug is to the left of the Switch Body
when viewed from the open end of the switch enclosure as shown in Figure 3. The set screw on the Valve Base should also
be
visible.
3. Now place the Valve Body on top of the Valve Base exactly as shown. The text on the Valve Body should be facing up and
the exhaust port with the square plug should be facing the rear of the KPFS as shown in Figure 3. There is a diaphragm on
the bottom of the Valve Body (not visible in figure 3). The diaphragm will fit into the diaphragm seat on top of the Valve Base.
Make sure the diaphragm is fully seated into the Valve Base and that the Valve Base and Valve Body are properly oriented.
Figure 4
Valve Final Assembly
1.
Locate the parts bag that contains the Valve Cap. It will contain the following parts.
ITEM NUMBER
QUANTITY
DESCRIPTION
7
1
O-RING, 13/16” DIAMETER
8 1
VALVE
CAP
ASSEMBLY
9
2
LOCKWASHER, STAINLESS STEEL
10
2
CAPSCREW, NO. 8 X 1-3/4” LONG STAINLESS STEEL
2.
Verify the orientation of the Valve Base and Valve Body. Make sure the bolt holes in the Valve Body are lined up with the
bolt holes in the Valve Base.
3.
Insert the o-ring (item #7) into the o-ring groove on the bottom of the Valve Cap. Note: O-ring groove not visible in figure 4.
4.
Place the Valve Cap on the Valve Body and line up the bolt holes as shown in Figure 4.
5. Install the Lock Washers (item #9) onto the Capscrews (item #10).
6.
Loosely install the Capscrews into the bolt holes on the Valve. Start the threads on the Capscrews but do not tighten them.
7.
The object of the next step is to make sure the two Capscrews are tightened down evenly. If one is tightened before the
other it can create an uneven load on the diaphragm and the Valve will not function properly. While holding onto the Valve
Cap with one hand, use a 9/64” hex key wrench in your free hand to turn one of the Capscrews until it just comes into
contact with the Valve Cap.
8.
Now move the 9/64” hex key wrench to the other Capscrew and tighten it until it just contacts the Valve Cap.
9. At this point, both Capscrews should just be touching the Valve Cap. Moving back and fourth between the two Capscrews,
tighten each one approximately ½ turn at a time until they are both securely tightened.
[3]