51 general information, 2 components, Español • english • deutsch • français • italiano – HK Audio E 435 INSTALL KIT User Manual
Page 5
Install Kit E 435/E 435 A 1.0
5
1 General Information
The two E 435 and E 435 A ELEMENTS INSTALL KITs consist of
ELEMENT modules that have been modified for installation. Wall
mounts are included. The INSTALL KIT may be extended with
standard ELEMENTS E 435 and E 835 mid/high units. The mounting
fixture lets you aim the speakers horizontally at any angle +/-90°.
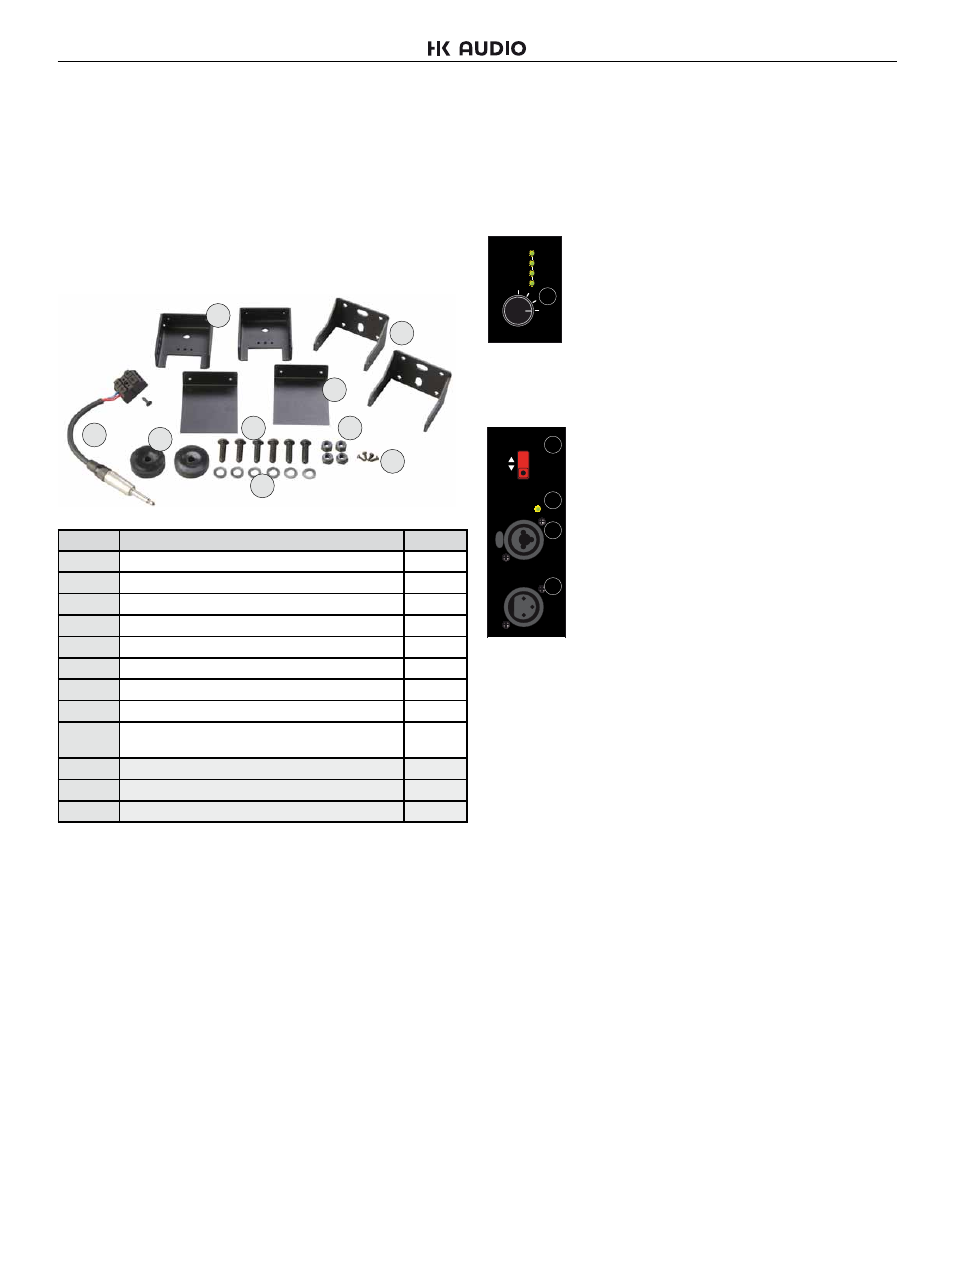
1.1. Inventory
The table below lists the parts that come with the ELEMENTS INSTALL
KIT for passive and active ELEMENT modules:
1
2
3
4
6
7
8
9
*
5
Item no.
Name
Quantity
1
Cover plate
2
2
Mounting bracket
2
3
Retaining plate
2
4
M3 screws
4
5
Spacer sleeve
2
6
Locknut
4
7
Washers
6
8
M8 bolt
6
9*
Terminal block with 1/4“ (6.3 mm) jack plug
+ 3.5 mm x 13 mm screw *
1
10
ELEMENTS E 435 IL-U (pictured on page 2)
1
11*
ELEMENTS E435 IL-O (pictured on page 2)
1
12**
ELEMENTS EA 600 IL (pictured on page 2)
1
*) in Install Kit for passive units only **) in Install Kit for active units only
1.2 Application
The ELEMENTS INSTALL KIT is designed for one purpose only –
attaching Elements components to a wall. It is the responsibility of the
person installing the units to ensure the given walls and selected pick-
points are solid and able to handle the load, and that suitable screws and
dowels are used.
2 Components
2.1 The E 435 Mid/High Unit
The E 435 mid/high unit is loaded with four 3.5" high-performance
speakers developed specifically for ELEMENTS. These four vertically
arrayed speakers achieve a very even pattern of throw, with the volume,
frequency spectrum, and audio image remaining uniform throughout the
audience area. One column made up of passive units may comprise up
to six E 435 mid/high units (and four E 435s with the Install Kit for active
units), which are quickly and reliably connected via the E-Connect coupler.
2.2 The EA 600 IL Amp
Housed in an enclosure that shares the same design as the E 435 mid/
high unit, the EA 600 IL amp module delivers 600 watts at 4 ohms. You
can use it to drive up to four E 435 mid/high units. The power amp
module is ventilated from the front.
Connections and Control Features:
1 Mid/ High Filter with four LED indicators
Twist this rotary selector to select the correct EQ setting
for one to four connected E 435 mid/high units. Set the
switch to 2 when connecting two E 435 mid/high units; set
it to 4 when connecting four mid/high units. The four LEDs
indicate the selected EQ setting - one LED lights up to
show the EQ setting for one mid/high unit; two LEDs light
up for the EQ for two mid/high units, and so forth. The unit of measure
for this display is the smaller of the ELEMENTS mid/high units; that is, the
E 435. The E 835 mid/high unit is twice as large and therefore counts as
two E 435s.
2 Sensitivity Switch
Use this selector to match the preamp’s input gain to the
mixer’s output signal level. Engage it to select either -10
dBu, for example, for unbalanced ¼” (6.3 mm) jacks and
consumer level devices, or + 4 dBu, which is standard
for balanced XLR ports, professional mixers, and the
like. Our recommendation: Select +4 dB when using a
mixer equipped with balanced outputs. This lets you take
advantage of console faders’ full control range and helps
prevent overloads. Opt for -10 dB when using a console
with a lower output level (such as an unbalanced ¼” (6.3
mm) output).
Heads up: When using several amps in the same system,
be sure to set all their Sensitivity switches to the same
position; that is, +4 dBu or -10 dBu.
3 Status LED
This dual-color LED shows the signal’s status: green = signal; red =
limiter. The LED lights up red when amp’s incoming signal level is too high
or there is an error. If it lights up red briefl y or intermittently, this simply
indicates that the limiter is responding to signal peaks.
Caution!
The system is being overloaded if the Status LED is constantly
in the red. If the LED remains red but no audio signal is audible, there is
an error.
4 Combination XLR/¼” (6.3 mm) jack
This dual-purpose port accepts both XLR and ¼” (6.3 mm) jack plugs.
Use a mic cord equipped with XLR connectors to route the signal from
your mixer (via master left/right, line out, or a similar circuit) to the
balanced inputs. The XLR connectors’ pin assignments must be as
follows: 1= ground, 2= +, 3= -. You may also use a ¼” (6.3 mm) stereo
jack plug to route signals via balanced circuits. Unbalanced signals can
be patched in via a mono plug.
5 Through Port
This parallel output routes the line signal on to further EA600 IL amps or
other components such as active monitors, monitor power amps, and the
like via a cord equipped with XLR connectors.
6 Speaker Out
This Speakon NL4 output is not used in conjunction with the Install Kit E
435 A.
7 Power Switch
When you switch the system’s amp on, the Signal LED lights up red for
about five seconds and then changes to green, indicating the amp is
ready to operate.
• Español
• English
• Deutsch
• Français
• Italiano
Mid/High
Filter
Select the
number of
mid/high units
in ONE column
1
2
3
4
1
Sensitivity
Through
Input
Green = On
Red = Limit/Error
+4 dB
-10 dB
2
3
4
5