Rohs, Weee disposal guidelines, Tuning switch settings – ClearCube C7130 User Manual
Page 2
ClearCube Technology 8834 Capital of Texas Hwy N Austin, Texas 78759 voice 512 652 3500 www.clearcube.com
G020074-B rev 8/14/2006
RoHS
WEEE Disposal Guidelines
In the European Union, this electronic
product falls under the European
Directive (2002/96/EC) WEEE. When it
reaches the end of its useful life or is
no longer wanted, it should not be dis-
carded with conventional waste, but
disposed of at an approved designated
recycling and/or treatment facility.
Laws are different in each country, so
please check with your local authori-
ties for proper disposal instructions.
For assistance, contact ClearCube at
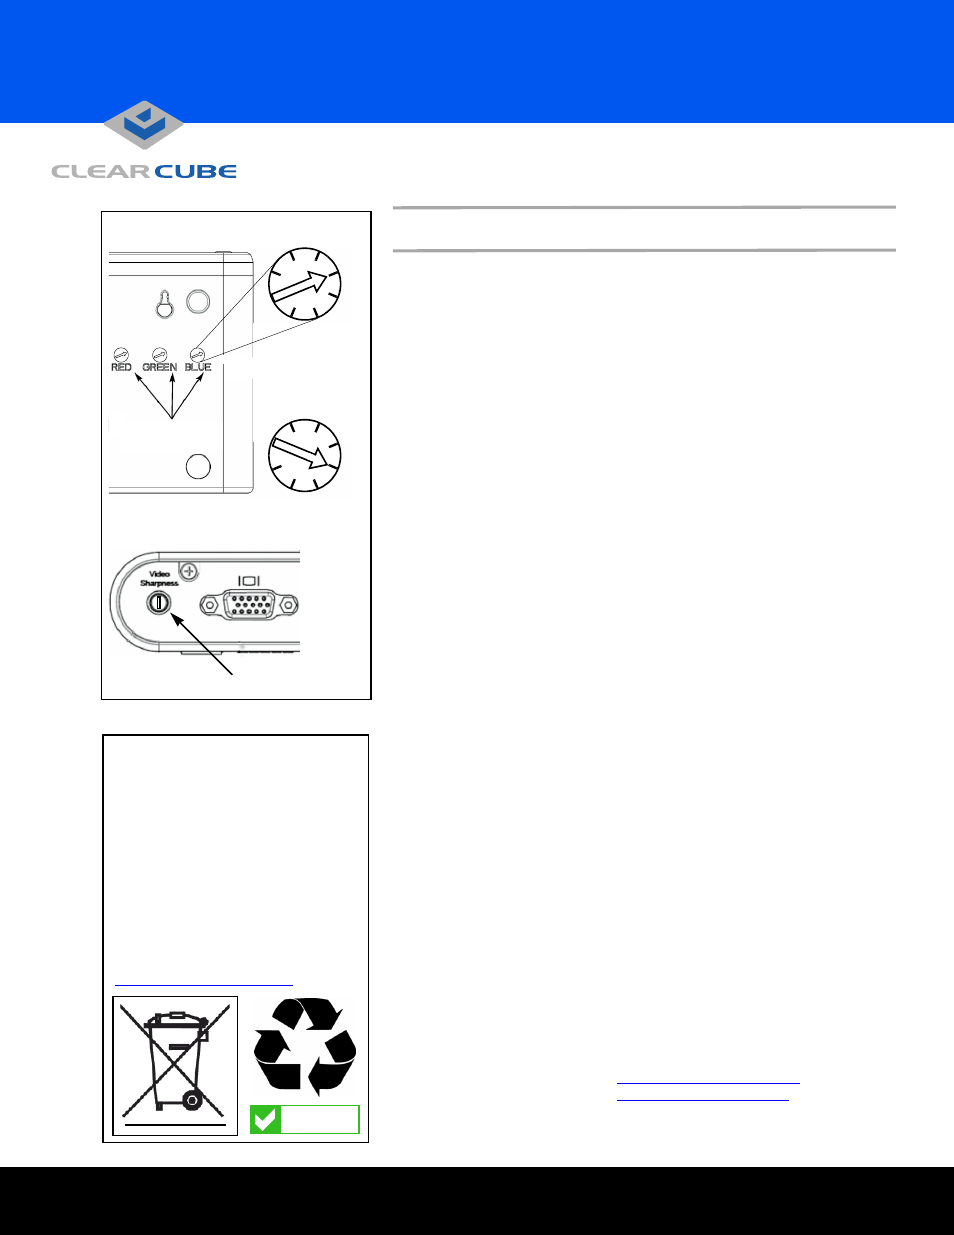
VIDEO TUNING NOTES
When connected to an R4300 Chassis, the C7130 provides an Auto-tune
function to deliver superior video performance with simplified tuning.
Mis-aligned colors on the display indicate that Auto-tune is not available,
or the switches are set incorrectly. Use the C/Port tuning tool (included in
the R4300 Chassis Accessory Kit) or a small flat-blade screwdriver to
change the color tuning switches.
Tuning the C7130 C/Port
The C/Port has three color tuning switches on its underside marked Red,
Green, and Blue that control color alignment. These switches are preset
at the factory to position F, the correct position for Auto-tune. Verify that
the switches are set to F. Additionally, verify that the Video Sharpness
Control is set to the 12 o’clock position. On power-up, the C7130 per-
forms an Auto-tune check. Sharpness is set automatically, and can be
fine-tuned later. Color is Auto-tuned if the C/Port is connected to an
R4300 Chassis.
Use these instructions if more tuning is needed:
1. If the colors on the screen are mis-aligned, set the three color tuning
switches to position 1.
2. Open the C/Port Tuning Guide (downloadable from the ClearCube
Technology Support website) and view the black-and-white test patterns.
Adjust the Video Sharpness control for the clearest picture.
3. View the color bar patterns. Turn the switches one click at a time until
the vertical color bars are in the best alignment, or the desired video qual-
ity has been obtained. If the colors become mis-aligned during tuning, set
one of the switches back to position 1, and re-tune.
Video quality may be subjective, based on user preferences and the limi-
tations of the monitor.
4. To fine-tune video sharpness, open a screen having dark characters
on a white background. If dark trailing edges are present, turn the Video
Sharpness control clockwise to reduce the trailing edges. If light trailing
edges are present, turn the Video Sharpness control counterclockwise to
reduce the trailing edges.
For more details on C7130 video tuning, please see the C/Port and Multi
Video Expander User’s Guide, available on the ClearCube Technology
website.
For more information, please contact ClearCube Technical Support.
Email:
Website:
support.clearcube.com
In the US
(866) 652-3400
Outside the US
+1 (512) 652-3400
0
E
C
A
2
4
6
8
0
E
C
A
2
4
6
8
C7130 Auto-Tune
Default Setting
(F, not marked)
C7130 Manual Tune
Default Setting
(1, not marked)
Color Tuning
Switches
Tuning Switch Settings
Video Sharpness Control
set to 12 o’clock position