Calibration, Specifi cations, Operation – Bacharach 50 User Manual
Page 2: Checking for co, Backlight, Overrange, Low battery, Ppm co, Snifit, Turning the snifi t on & off
- 2 -
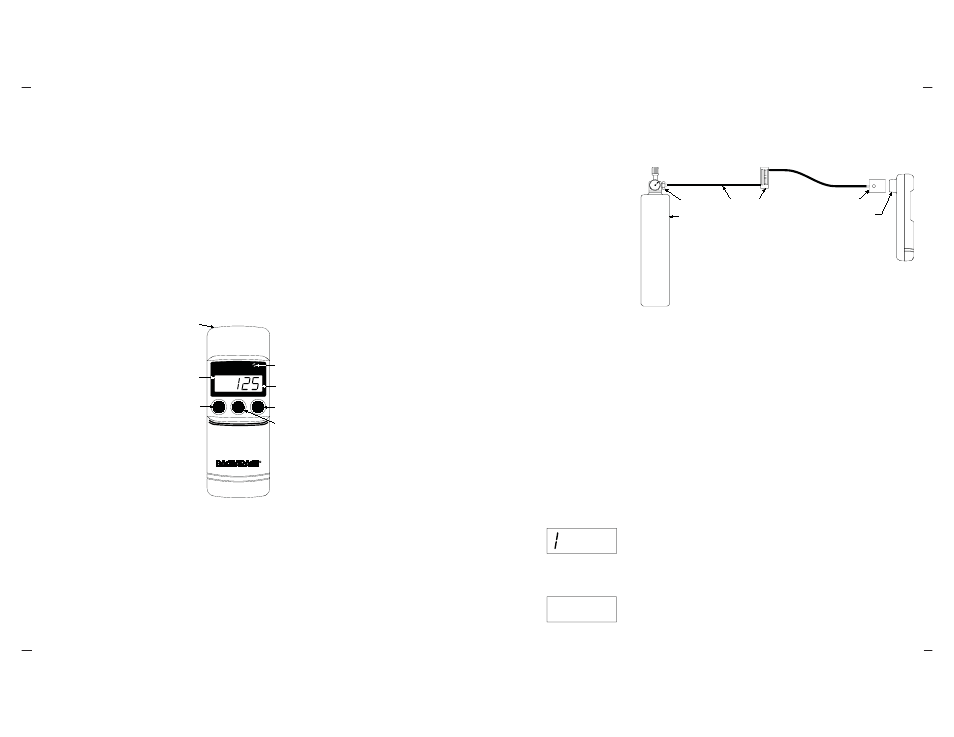
Figure 1. Snifi t 50
- 3 -
Figure 2. Calibration Equipment Setup
- 4 -
If you’re not sure about the quality of the surrounding
air, you can apply a blend of Oxygen/Nitrogen gas to
the sensor as described under Calibration.
If rapid temperature changes are encountered (such
as from freezing to room temperatures) during the
operation of the analyzer, the operator must allow the
analyzer to stabilize at the ambient temperature for at
least 2 minutes before taking a measurement.
Checking for CO
Important! Ensure that the sensor grille at the rear of
the instrument is unobstructed and open to the atmo-
sphere. A quick instrument check can be performed by
allowing the smoke of a blown-out match to enter into
the sensor grille. This should cause the indicated CO
level to increase.
After zeroing the Snifi t, simply hold the instrument in
the area that you suspect the presence of CO gas. If CO
is present, the instrument will indicate the concentrA-
tion of CO in ppm on its display.
For more extensive CO investigations and testing in
areas of higher temperatures, the Monoxor
®
II is the
preferred instrument.
Backlight
Pressing the Backlight button will illuminate the
display for a period of 8 minutes, or until it is manually
turned off by again pressing the Backlight button.
Overrange
If the CO level exceeds 1999 ppm, the
displayed reading is replaced by the
number “1”.
Low Battery
When the Snifi t’s 9V battery is nearing
the end of its useful life,
LO BAT
will
Calibration
Important! For accurate Snifi t operation, calibration
every 6 months is recommended.
To calibrate the CO sensor, you will need the equip-
ment listed under Accessories. Note that the Zero Gas
Cylinder is needed only if you’re unsure about the qual-
ity of the surrounding air for zeroing purpose.
Calibrate the sensor to a known concentration of CO
gas as follows:
1. Assemble the calibration equipment per Figure 2.
2. Zero the instrument as previously described under
Zeroing the Sensor.
If necessary, you can use the calibration cup to apply
a blend of Oxygen/Nitrogen gas directly over the sen-
sor by attaching a zero gas cylinder to the regulator
and adjusting the regulator knob for a fl ow rate of 2
SCFH.
MONOXIDE ANALYZER
MONOXIDE ANALYZER
ppm CO
CARBON
CARBON
Snifit
model 50
model 50
Backlight
On
Off
Span Adjust
-Power-
ZERO
ADJUST
(Recessed)
SPAN
ADJUST
POT.
BACKLIGHT
ON/OFF
POWER ON
POWER OFF
DISPLAY
LO BAT
LOW
BATTERY
INDICATION
1
2
3
4
Parts Shown:
1. CO Span Gas Cylinder, 51-1994
2. Regulator, 03-4318*
3. Tubing, 03-6351*
4. Flowmeter, 06-6163*
5. Calibration Cup Assembly, 23-2156**
* Part of Calibration Kit 24-7059
** Part of Tool / Cup Kit 19-3242
5
PUSH CALIBRATION CUP
OVER SENSOR HOUSING
LO BAT
Specifi cations
Gas Monitored .............Carbon Monoxide (CO)
Range ...........................0 to 1999 ppm
Resolution ....................1 ppm
Accuracy ......................± (5% of reading + 5 ppm)
Response ......................
30 sec. to 90% of fi nal value
Power ...........................9V battery
Battery Life .................1500 hours minimum
Temperature Range ....32 to 104 °F (0 to 40 °C)
Case Material ..............High impact plastic
Weight ..........................0.25 lb (0.11 kg) without battery
Dimensions ..................5.5" L x 2.0" W x 1.6" H
(140 x 51 x 41 mm)
Operation
Turning the Snifi t
On & Off
The Snifi t is turned on
and off by pressing the
Power On
and Power
Off
buttons, respec-
tively. If the instru-
ment is not manually
turned off, it will au-
tomatically shut itself
off after approximately
35 minutes.
Zeroing the
Sensor
Turn on the Snifi t and allow the displayed reading to
stabilize before proceeding – approximately 30 seconds.
Then with the instrument sampling fresh air (air that
is free of CO), use a screwdriver to adjust the Zero
Adjust
potentiometer at the top of the instrument for a
reading of 0 ±1 ppm.
appear in the upper left hand corner of the display.
Although you can continue using the instrument under
this condition, you should replace the battery as soon
as possible to ensure accurate CO readings.