Page 13, Page 14, Stand-alone mode (auto or sound active) – Blizzard Lighting COLORStorm PAR LED Wash User Manual
Page 7: Master/slave mode (auto or sound active), Dmx mode, Dmx channel values (7 channel)
Page 13
COLORStorm™ PAR Manual Rev. A
Copyright (c) 2010 Blizzard Lighting, LLC
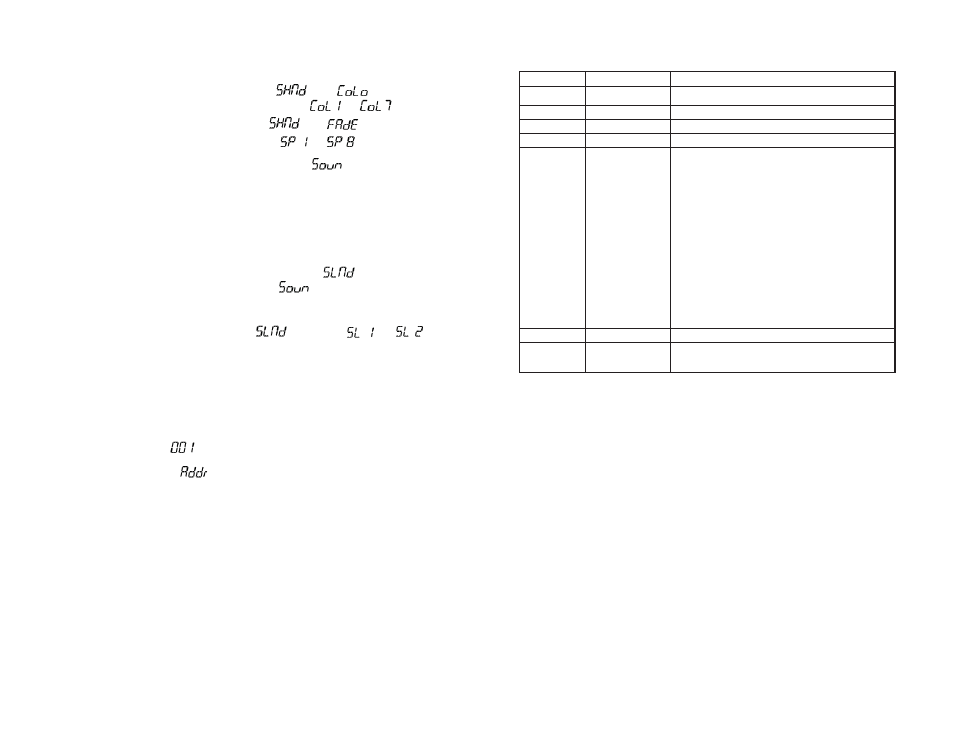
Stand-Alone Mode (Auto or Sound Active):
Allows a single unit to run to a factory installed programs with various options.
1.) To set the fi xture in auto mode, select
, then
.
Once confi rmed, select from built in patterns from
to
.
2.) To set the program fade time, select
then
.
Once confi rmed, select the fade time from
to
.
3.) To set the fi xture in Sound Active mode, select
then hit
Master/Slave Mode (Auto or Sound Active):
Allows you to link up to 32 units together without a controller.
1.) Use standard DMX cables to daisy chain your units together via the DMX con-
nector on the rear of the units. It may be necessary to use a terminator at the
last fi xture. For more information about terminators, see page 8.
2.) Choose a unit to function as the Master. From the
menu, Select
MAST (see below for readout), then select
ON or OFF depending upon
which master mode you want. The master unit must be the fi rst unit. Finally,
chain the units together using DMX cable.
3.) Select slave function by selecting
, then either
or
SL 1 mode will cause all slave fi xtures to react the same as the master. SL 2
mode will create a “two light” show, where SL 1 and SL 2 fi xtures compliment
each other in a show while still maintaining master/slave confi guration. This
gives additional fl exibility in running shows in master/slave confi guration.
DMX Mode
Allows the unit to be controlled by any universal DMX controller. If you are unfamiliar with
DMX, please read the DMX Primer on page #17.
1.) The default mode for the fi xture is DMX, which appears as the adress num-
ber, for instance
on the LED Readout.
2.) To set DMX mode after previously using the fi xture in master/slave or stand-
alone mode, select
from the menu, then using the
buttons, select the appropriate DMX address. Hit
channel, then hold down the key for approximately 3 seconds to lock
the assignment into the fi xture. After the address is locked into the fi xture, it
will appear on the LED panel.
Page 14
COLORStorm™ PAR Manual Rev. A
Copyright (c) 2010 Blizzard Lighting, LLC
DMX Channel Values (7 Channel)
Channel
Channel Value
Does...
1
000 <-> 255
Red Intensity
2
000 <-> 255
Green Intensity
3
000 <-> 255
Blue Intensity
4
000 <-> 255
Dimmer (0-100%)
5
000 <-> 009
010 <-> 024
025 <-> 033
034 <-> 040
041 <-> 047
048 <-> 054
055 <-> 063
064 <-> 070
071 <-> 078
079 <-> 093
094 <-> 101
102 <-> 111
112 <-> 118
119 <-> 124
125 <-> 132
133 <-> 140
141 <-> 147
148 <-> 155
156 <-> 163
164 <-> 171
172 <-> 179
180 <-> 186
187 <-> 195
196 <-> 201
202 <-> 209
210 <-> 216
217 <-> 225
226 <-> 233
234 <-> 240
241 <-> 248
249 <-> 255
Color Macros
No Function
(Simply) Red
Orange (Crush)
Orange Yellow
Yello (Oh Yeah)
Yellow (Submarine)
Green (Day)
Green (Onions)
Green #3 (River)
Green Cyan
Cyan
Powder Blue
Light Blue
Royal Blue
Blue (Eiffel 65)
Blue (Hawaii)
Blue (Rondo A La Turk)
(Behind) Blue (Eyes)
True Blue
UV Purple
Deep Purple (Highway Star)
Deep Purple (Smoke On The Water)
Magenta #1
Magenta #2
Pink (Cadillac)
Pink (Houses)
Pink (Just Pink, OK?)
Red (Barchetta)
Red (Light... ROOOOOXXXXXXXXANNNNNNNEEEE)
White (Rabbit)
6
000 <-> 255
Strobe (Slow <-> Fast)
7
000 <-> 127
128 <-> 187
188 <-> 255
Sound Active
No Function
Color Snaps
Color Fades