Fig. 1-3 – Bell'O TP4444 User Manual
Page 10
10
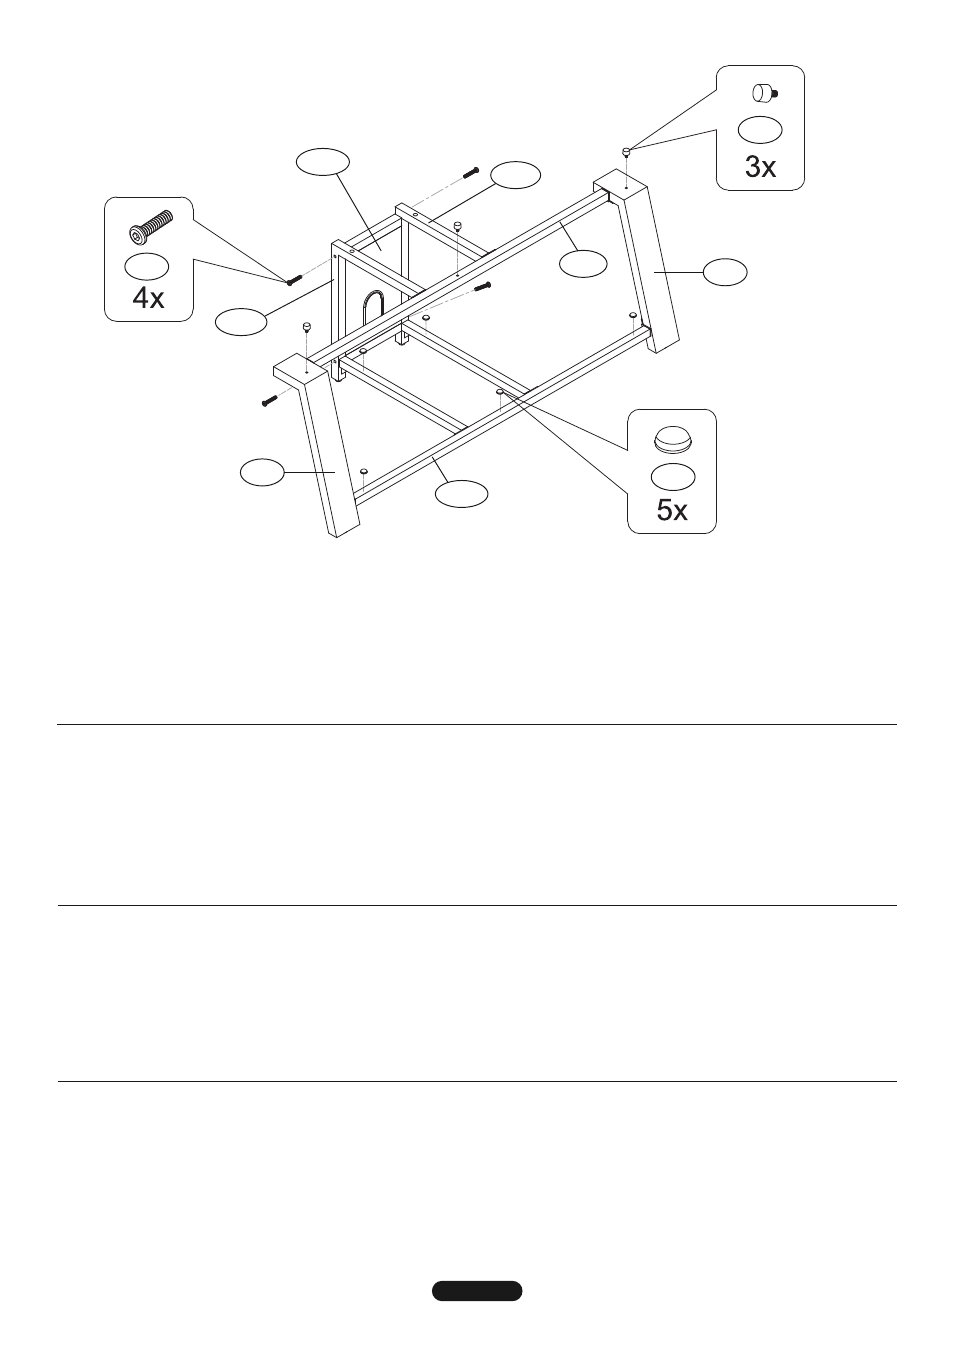
Fig. 1-3
yF4
1-5. ATTACh the CMS
®
(Cable Management System) Panel (YF17-1) to the Left and Right Rear Support Frames (YF15-1, YF16-1) using four
35 mm Screws (YF4) as shown above. Tighten Screws fully.
1-6. SCreW three Adjustable Glass Pads (YF7) into the threaded holes at the tops of the Top Crossbar (YF13-1) and Right and Left Legs (YF11, YF12).
Note: when the top Glass shelf is installed later, you can turN these adjustable Glass pads to ensure level support for the top shelf.
1-7. APPly five Soft Glass Pads (YF8), evenly distributed, along the Bottom Crossbar (YF14-1) and Left and Right Rear Support Frames
(YF15-1, YF16-1) as shown.
1-5. ПРИКРЕПИТЕ панель (YF17-1) системы укладки кабелей (CMS
®
) к левой и правой задним опорным рамам (YF15-1, YF16-1), используя
четыре 35-мм винта (YF4), как показано выше. Полностью затяните винты.
1-6. ВВИНТИТЕ три регулируемые прокладки (YF7) для стекла в готовые просверленные под винт отверстия в верхних частях верхней
поперечины (YF13-1) и правой и левой ножек (YF11, YF12). ПРИМЕЧАНИЕ. Затем, когда будет установлена верхняя
стеклянная полка, вы сможете ПОВЕРНУТЬ эти регулируемые прокладки для стекла так, чтобы обеспечить
горизонтальное положение верхней полки.
1-7. РАЗМЕСТИТЕ пять мягких прокладок (YF8) для стекла, равномерно распределив их вдоль нижней поперечины (YF14-1) и левой и
правой задних опорных рам (YF15-1, YF16-1), как показано на рисунке.
1-5. FIJe el panel del CMS
®
(sistema de administración de cables) (YF17-1) a los marcos de soporte trasero derecho e izquierdo (YF15-1, YF16-1)
con cuatro tornillos de 35 mm (YF4), tal como se muestra arriba. Apriete los tornillos por completo.
1-6. ATOrNIlle las tres almohadillas para vidrio ajustables (YF7) en los orificios roscados en la parte superior del larguero superior (YF13-1) y
de las patas izquierda y derecha (YF11, YF12). Nota: Más adelante, cuando instale el estante de superior vidrio, puede Girar estas
almohadillas ajustables para vidrio para asegurar el nivel de soporte del estante superior.
1-7. APlIQue cinco almohadillas blandas para vidrio (YF8), distribuidas de forma pareja sobre el larguero inferior (YF14-1) y los marcos de
soporte trasero izquierdo y derecho (YF15-1, YF16-1), tal como se muestra.
1-5. ATTACher le panneau passe-fil CMS
®
(YF17-1) aux cadres supports arrière droit et gauche (YF15-1, YF16-1) à l'aide de quatre vis de 35 mm
(YF4) comme sur l'illustration ci-dessus. Serrer les vis complètement.
1-6. VISSer trois tampons d'appui réglables (YF7) dans les trous taraudés sur le dessus de la barre transversale supérieure (YF13-1) et des pieds
droit et gauche (YF11, YF12). reMarQue : lors de la pose du plateau en verre supérieur ultérieurement, ces tampons d'appui
réglables pourront être tournés pour assurer un soutien de niveau du plateau supérieur.
1-7. POSer cinq tampons d'appui souples (YF8), régulièrement espacés, le long de la barre transversale inférieure (YF14-1) et des cadres
supports arrière gauche et droit (YF15-1, YF16-1) comme sur l'illustration.
yF8
yF7
yF17-1
yF15-1
yF14-1
yF13-1
yF11
yF12
yF16-1