Fig. 2 – Bell'O CW356 User Manual
Page 5
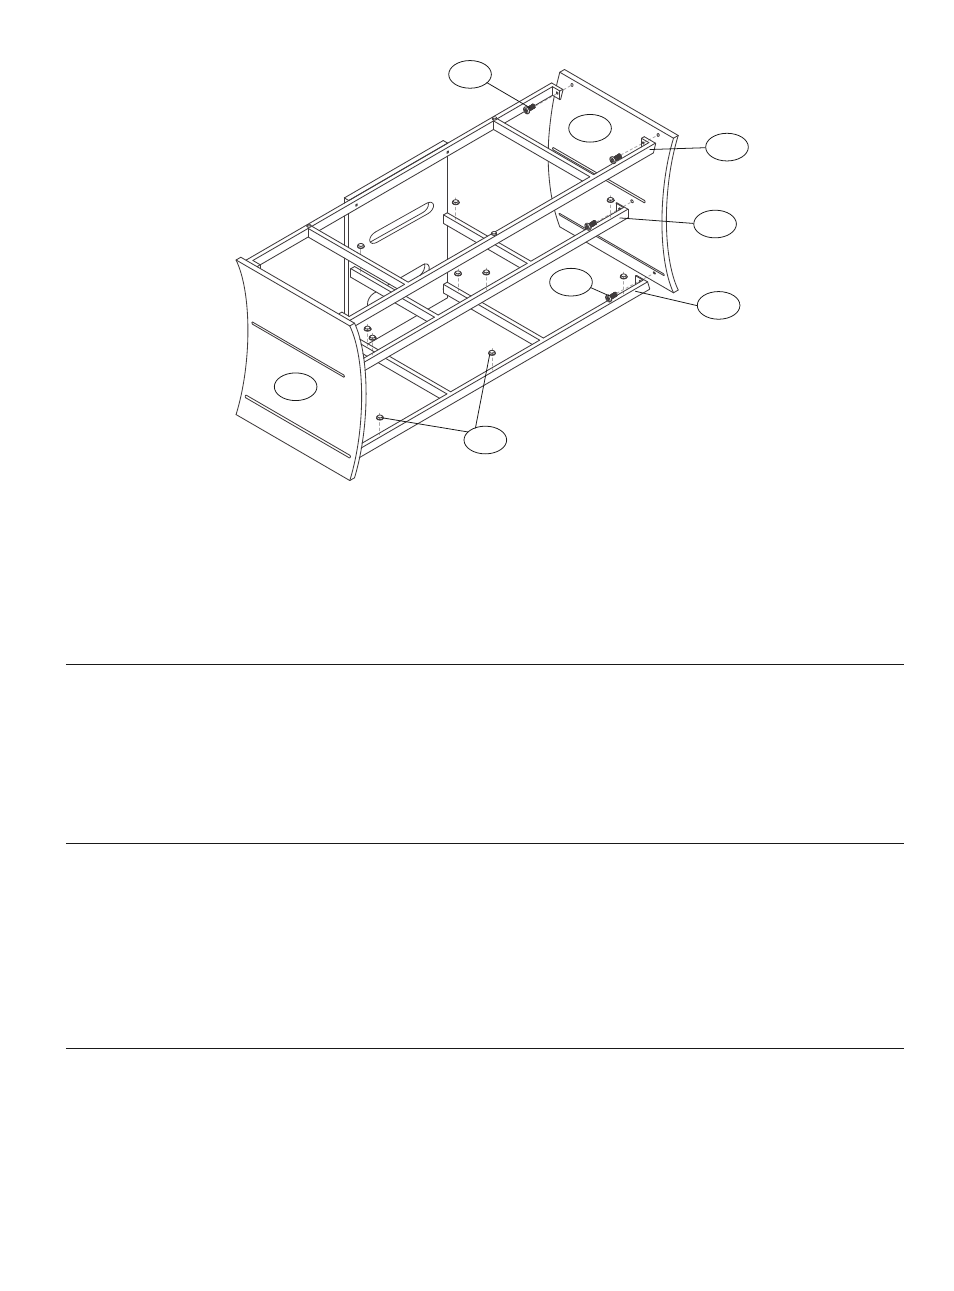
Fig. 2
M2
M10
M5
M3
M10
M1
M13
M4
5. ATTACH the Right Wood Side Panel (M2) to the the Shelf Support Bars (M3, M4, M5) as shown above using four 12 mm Screws (M10).
Do not yet fully tighten.
6. Make sure the Wood Side Panels (M1, M2) are correctly attached to all parts, and that the stand is sitting level on a flat surface, then go
back and fully tighten all 12 mm Screws (M10). BE CAREFUL NOT TO OVER TIGHTEN SCREWS.
7. PLACE five Glass Pads (M13), evenly distrubuted, on the top edge of the Bottom Shelf Support Bar (M5) as shown.
8. PLACE five Glass Pads (M13), evenly distrubuted, on the top edge of the Middle Shelf Support Bar (M4).
5. FIXER le panneau latéral droit (M2) à les barres de support d'étagère (M3, M4, M5) à l’aide de quatre vis 12 mm (M10), comme sur
l’illustration. Ne pas visser complètement.
6. S’assurer que les panneaux latéraux en bois (M1, M2) sont bien fixés à toutes les pièces et le meuble est déposé sur une surface au niveau.
Visser ensuite toutes les vis 12 mm (M10). NE PAS TROP VISSER.
7. DÉPOSER cinq tampons d’appui en verre (M13), également espacés, sur le dessus de la barre de soutien inférieure (M5), comme sur
l’illustration.
8. DÉPOSER cinq tampons d’appui en verre (M13), également espacés, sur le dessus de la barre de soutien centrale (M4).
5. ADOSE el panel lateral derecho (M2) a las barras de soporte del estante (M3, M4, M5) como se muestra arriba con cuatro tornillos de
12 mm (M10). No los ajuste por completo aún.
6. Asegúrese de que los paneles laterales de madera (M1, M2) son adosado correctamente a todas las piezas y el soporte se encuentra
nivelado sobre una superficie plana, luego ajuste por completo todos los tornillos de 12 mm (M10). TENGA CUIDADO DE NO AJUSTAR
LOS TORNILLOS DEMASIADO.
7. COLOQUE cinco almohadillas para vidrio (M13), distribuidas uniformemente, sobre el borde superior de la barra de soporte del estante
inferior (M5), como se muestra arriba.
8. COLOQUE cinco almohadillas para vidrio (M13), distribuidas uniformemente, sobre el borde superior de la barra de soporte del estante
del medio (M4).
5. прИкрепИте правую деревянную боковую панель (M2) к опорным планкам полки (M3, M4, M5) с помощью четырех винтов длиной
12 мм (M10), как показано на рисунке выше. Не затягивайте винты до конца.
6. Убедитесь в том, что деревянные боковые панели (M1, M2) правильно прикреплены ко всем деталям, и что подставка параллельна
плоской горизонтальной поверхности, после чего полностью затяните все винты длиной 12 мм (M10).
БУДЬТЕ ОСТОРОЖНЫ, НЕ ЗАТЯГИВАЙТЕ ВИНТЫ СЛИШКОМ ТУГО.
7. поМестИте пять прокладок для стекла (M13), распределив их равномерно вдоль верхней грани опорной планки нижней полки
(M5), как показано на рисунке.
8. поМестИте пять прокладок для стекла (M13), распределив их равномерно вдоль верхней грани опорной планки средней полки (M4).