Front hubs- loose ball, Disassembly, Assembly – Bontrager 231793 User Manual
Page 3
2
2003 Bontrager Service Manual
Recommended tools
13mm cone wrench
17mm cone wrench
Small slot screwdriver
Hammer (soft faced)
DISASSEMBLY
Hub parts and names are referenced on next page.
Remove the axle
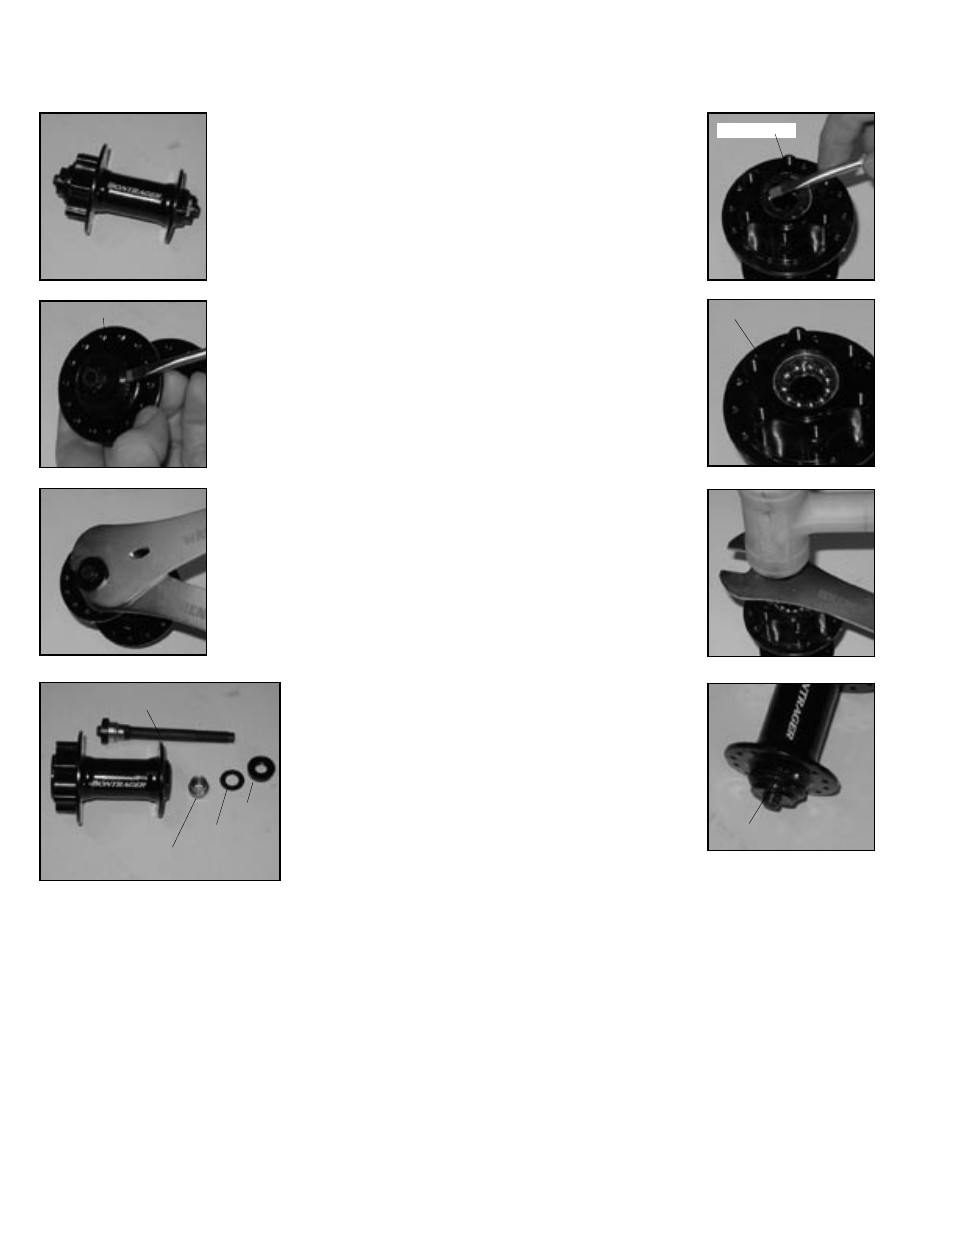
1. Remove external seals
(Fig. 2A) with a screwdriver. Be
careful not to tear or mar the
rubber.
2. On one side (either) of the
hub place a 13mm cone wrench
on the ball cone. Place a 17mm
cone wrench on the end nut (Fig.
3A). Loosen the end nut.
3. Remove the end nut,
washer, and ball cone from the
axle (Fig. 4A).
4. Slide the axle, with the
other end nut, washer, and ball
cone still attached, out of the
hub (Fig. 4A).
5. Gently insert a thin
screwdriver blade under the
shell shield (Fig. 5A) and lift to
remove the shield from the hub.
Pry off the shell shields from
both sides of the hub.
6. If inspection
shows it necessary,
remove the other end
nut and ball cone.
Clean and inspect the parts
1. Use solvent to completely remove all old grease and
debris from the hub, axle, and axle parts.
2. Inspect the bearing running surfaces of both the
ball cones and the ball cups (inside the hub). Replace any
cones. If the cups are worn, replace the hub shell.
Lubricate bearings and threads
1. Lubricate the threads on the axle with Wrench
Force™ synthetic grease, or a similar product.
2. Place a bead of grease all the way around each ball
cup, sufficient to hold the balls.
ASSEMBLY
1. Place eleven 3/16” balls in
the ball cup on one side of the hub.
2. Place the shell shield, with
its sharp edges facing out (Fig.
6A), into the hub. The shell shield
is a press fit, so must be tapped
lightly to fully seat. Lay a cone
wrench over the shell shield and
tap the wrench with a hammer
(Fig. 7A) to protect the shield
and ensure that it is flush with
the shell.
3. Repeat Assembly steps 1-2
for the other side of the hub.
4. Tighten the end nut
against the ball cone on the axle.
Hold the ball cone with a 13mm
cone wrench on the axle flats
while turning the end nut with a
17mm cone wrench.
5. Insert the axle through the
hub from either side.
6. Thread the ball cone, wash-
er, and end nut onto the axle in
that order. The serrated surface
of the end nut faces out.
7. Hold the ball cone with a
13mm cone wrench and tighten
the end nut with a 17mm cone
wrench.
8. Check the bearing adjust-
ment by turning the axle with
your fingers. The axle should
spin smoothly without binding or
feeling gritty. There should be no
lateral play of the axle in the hub.
Readjust the hub as necessary,
and re-lock the end nut.
9. Install the external seals,
and apply grease where the seals
contact the hub shell and axle
parts. Make sure the seals prop-
erly seal against both the end nut and the hub shell. There
should be a smooth transition from seal to sealing surface.
An improperly installed seal (Fig. 8A) will allow rapid con-
tamination of the bearings.
After completing assembly of the hub, check its function by spinning the axle with your fingers. It
should rotate freely without irregular friction. A small amount of lateral play is acceptable if the play is
eliminated when the wheel is installed with the quick release properly closed.
Fig. 1A
Fig. 3A
Fig. 7A
Front hubs- Loose ball
Bontrager Superstock, Superstock Disc, Select ATB, Select ATB Disc, Select Road, and Select Hybrid front wheels;
plus Bontrager Comp II front hub
Fig. 2A
External seal
Fig. 5A
Shell shield
Fig. 8A
Seal not seated
Fig. 6A
Bearings in bearing cup
Fig. 4A
End nut
Washer
Ball cone
Axle