Acuum, Aintenance – Wood’s Powr-Grip MTA8LP6FAC User Manual
Page 21
Rev 5.1/4-12
19
MTA8LP6FAC: #35095
V
ACUUM
P
UMP
M
AINTENANCE
(for Gast pump nos. 3032-101A-G609X and 2032-101-G616X)
WARNING: Before proceeding with any maintenance, disconnect power source;
allow pump to cool; and vent any vacuum or pressure remaining
in vacuum system.
If the vacuum pump takes too long to attain full vacuum, it may require maintenance, as directed in the
following disassembly/reassembly procedure. Service or replace foam filters and vanes as necessary to
obtain acceptable pump performance (see service kit in REPLACEMENT PARTS LIST). Note: Inspect filters
after no more than 500 hours of operation; dirty filters must be cleaned or replaced.
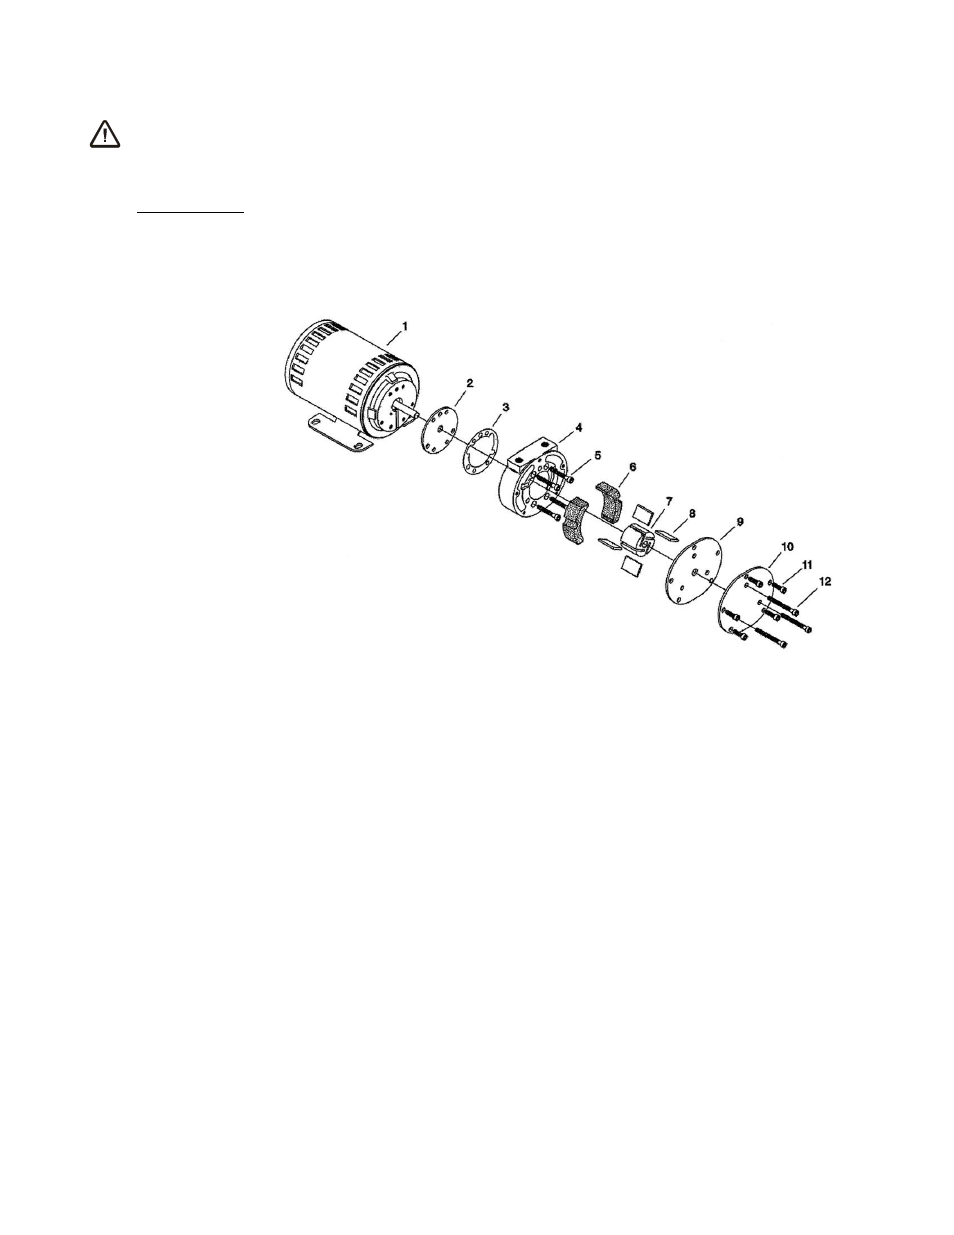
1) Remove the retainer plate screws (11 & 12) from the vacuum pump.
2) Remove the retainer plate (10) and insert plate (9) by lightly tapping on them with a small hammer.
Note: Do not use a screwdriver to remove these plates, because it could damage them.
3) Before removing the existing vanes (8), note the direction of the beveled edge, in order to install the
new vanes in the same orientation. Do not try to remove the rotor (7), because it can only be
serviced by the manufacturer.
4) Spray the body (4) bore and rotor (7) with a suitable, nonpetroleum-based flushing solvent. Use a
clean, dry cloth to remove flushing solvent from these parts.
5) Place the new vanes (8) in the rotor slots with the beveled edge in the correct orientation (see step
3). Note: Vanes may become damaged or broken if installed incorrectly.
6) If the foam filters (6) appear dirty, they should be cleaned with soapy water or replaced all together,
depending on their condition. After cleaning the filters, dry them with compressed air. Since moisture
can damage the pump, be sure to avoid introducing any moisture into the pump. When the filters are
completely dry, reinstall them in the pump body (4). Otherwise, install new filters.
7) Place a sheet of fine emery cloth on a smooth flat surface and rub both sides of the insert plate (9) on
the emery cloth to remove any burrs. Use a clean, dry cloth to remove any dust from the insert plate.
Reinstall the insert plate, placing the unused side facing the pump vanes.
8) Repeat step 7 with the face of the retainer plate (10). Use a clean, dry cloth to remove any dust from
the retainer plate and reinstall it.
9) Reinstall the retainer plate screws (11 & 12) and tighten them to 28-36 in-lbs [3.1-4.1 N-m] of torque.
1 MOTOR
5 BODY SCREW
9 INSERT PLATE
2 INSERT PLATE 6 FOAM (AIR FILTER) 10 RETAINER PLATE
3 GASKET
7 ROTOR
11 RETAINER SCREW
4 BODY
8 VANES
12 RETAINER SCREW