Installing the drive – Western Digital My Book Premium Edition II Quick Install Guide User Manual
Page 3
My Book Premium Edition II | 2
Installing the Drive
Windows
1. Turn on your computer.
2. Insert the software CD into the CD-ROM drive.
3. The CD autoruns and drive utilities are installed automatically. If a security alert is displayed during this
installation, click Accept or Continue.
Note: If AutoPlay is disabled on your computer, you must run the CD manually.
4. A menu displays a list of options including software, documentation, and a registration link. Click My Book
RAID Manager to install this utility.
5. When finished, click any other selection of your choice; otherwise, click Quit to close the menu.
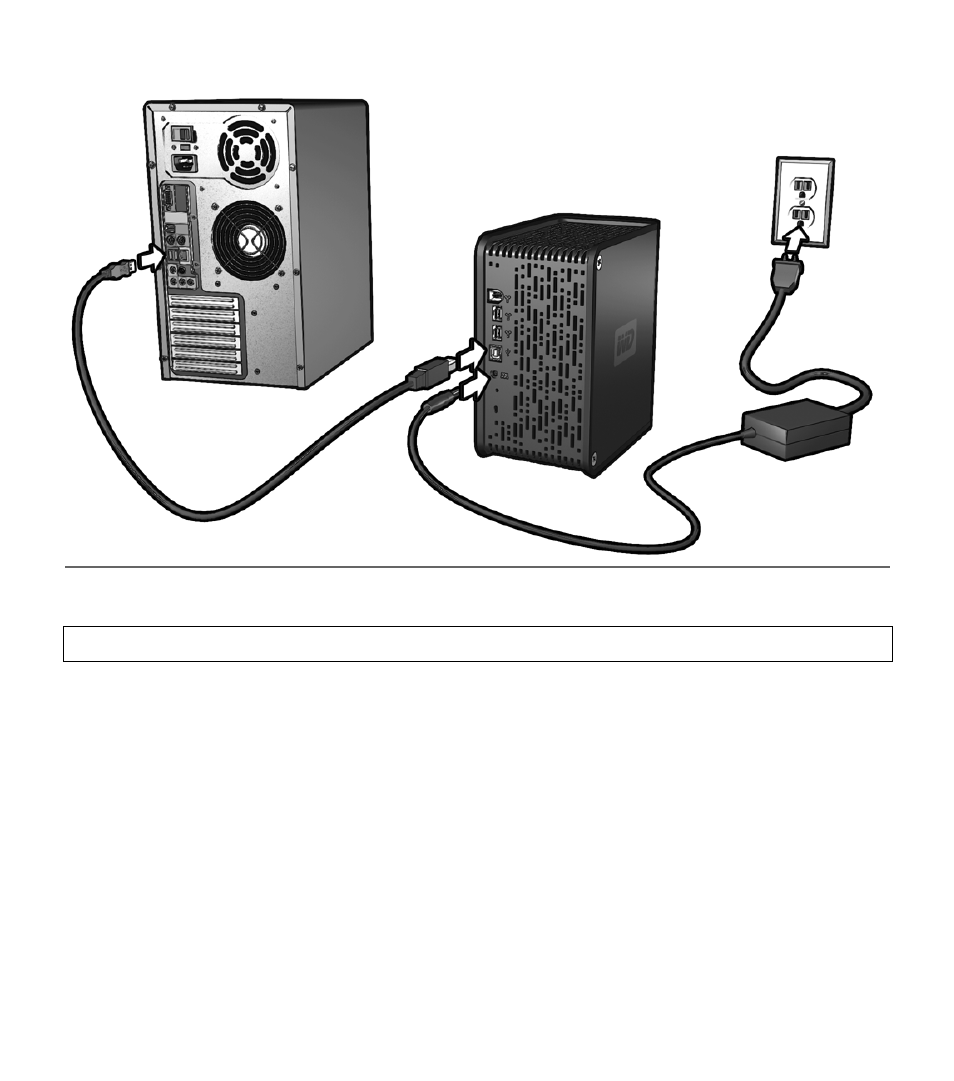
6. Connect the unit’s power cord and interface cable (USB, FireWire 800, or FireWire 400) as shown, after
which the unit mounts to the system.
My Book is now ready for use. For further information including product features, utilities, RAID configuration,
drive replacement, and troubleshooting, refer to the user manual provided on the CD.
Important: You must first install the drive utilities on the included CD before connecting the unit.
- WD Livewire Powerline AV Network Kit Quick Install Guide (7 pages)
- WD Livewire Powerline AV Network Kit User Manual (26 pages)
- WD NetCenter Quick Install Guide (4 pages)
- WD NetCenter User Manual (63 pages)
- My Book World Edition (blue rings) Quick Install Guide (29 pages)
- My Book World Edition (blue rings) User Manual (52 pages)
- My Book World Edition (white light) Quick Install Guide (8 pages)
- My Book World Edition (white light) User Manual (198 pages)
- WD ShareSpace Quick Install Guide (9 pages)
- WD ShareSpace User Manual (207 pages)
- WD Black2 Dual Drive Quick Install Guide (4 pages)
- WD Black2 Dual Drive User Manual (24 pages)
- WD Red (2 pages)
- WD Sentinel DX4000 Quick Install Guide (13 pages)
- WD Sentinel DX4000 User Manual (82 pages)
- WD Sentinel RX4100 Basic Install Guide (7 pages)
- WD Sentinel RX4100 User Manual (117 pages)
- WD Sentinel DS5100 Administrator and Maintenance Guide (111 pages)
- My Book Live Quick Install Guide (4 pages)
- My Book Live User Manual (146 pages)
- My Book Live Duo User Manual (146 pages)
- My Cloud Quick Install Guide (2 pages)
- My Cloud User Manual (126 pages)
- My Cloud EX4 Quick Install Guide (7 pages)
- My Cloud EX4 User Manual (170 pages)
- My Cloud EX2 (Populated) Quick Install Guide (7 pages)
- My Cloud EX2 (Diskless) Quick Install Guide (8 pages)
- My Cloud EX2 User Manual (168 pages)
- My Cloud Mirror Quick Install Guide (7 pages)
- My Cloud Mirror User Manual (166 pages)
- WD Arkeia DAx300 Installation and Configuration Guide (33 pages)
- WD Arkeia DA2300 Disk Expansion Kit (10 pages)
- WD Arkeia R120/R120T Installation and Configuration Guide (35 pages)
- My Book AV DVR Expander Quick Install Guide (7 pages)
- My Book 3.0 User Manual (21 pages)
- My Book Thunderbolt Duo User Manual (38 pages)
- My Book VelociRaptor Duo User Manual (38 pages)
- My Book Studio (USB 3.0) Quick Install Guide (5 pages)
- My Book Studio (USB 3.0) User Manual (42 pages)
- My Book for Mac (USB 3.0) Quick Install Guide (5 pages)
- My Book for Mac (USB 3.0) User Manual (43 pages)
- My Book Elite Quick Install Guide (2 pages)
- My Book Elite User Manual (85 pages)
- My Book for Mac Quick Install Guide (2 pages)
- My Book for Mac User Manual (78 pages)