Oil recommendations, Fuel recommendations, Starting – Briggs & Stratton MS-5158-5/03 User Manual
Page 5: Stopping, Adjustments
Document: - page 3 (Black)
Screen angle and frequency: 45.0000, 150.0000
GB
3
Oil Recommendations
(see fig.
)
Engine shipped from Briggs & Stratton without oil. Before
starting engine, fill with oil. Do not overĆfill.
Use a high quality detergent oil classified For Service SF, SG,
SH, SJ" or higher such as Briggs & Stratton 30W, Part Number
100005 (20 oz.) or 100028 (48 oz.). Use no special additives
with recommended oils. Do not mix oil with gasoline.
Choose the SAE viscosity grade of oil from this chart that
matches the starting temperature anticipated before the next
oil change. (see fig.
)
Note:
Synthetic oil meeting ILSAC GFĆ2,
API certification mark and API service symbol
(shown at left) with SJ/CF ENERGY CONĆ
SERVING" or higher, is an acceptable oil at all
temperatures. Use of synthetic oil does not
alter required oil change intervals.
*
Air cooled engines run hotter than automotive engines.
The use of nonĆsynthetic multiĆviscosity oils (5WĆ30,
10WĆ30, etc.) in temperatures above 40° F (4° C) will
result in higher than normal oil consumption. When using
a multiĆviscosity oil, check oil level more frequently.
** SAE 30 oil, if used below 40° F (4° C), will result in hard
starting and possible engine bore damage due to
inadequate lubrication.
Check oil level (see fig.
)
Oil capacity: approximately 1Ć1/2 quarts (48 ounces or 1.6
liters) when changing oil and filter. (Oil capacity will be greater
if engine is equipped with remote oil filter.)
Oil checking procedure: before starting engine, place
engine level and clean around oil fill
Ê
. Remove dipstick
Ë
,
wipe with clean cloth, insert and tighten down again. Remove
dipstick and check oil level. Oil should be at FULL mark
Ì
. If
oil is required, add slowly. Tighten dipstick firmly before
starting engine.
Oil filling procedure: first add 1 quart (32 ounces or 1 liter).
Start and run engine at idle for 30 seconds. Shut engine off and
wait 30 seconds. Then add more oil slowly to bring level to Full
mark on dipstick. Check for oil leaks. Tighten dipstick firmly
before starting engine.
Fuel Recommendations
Use clean, fresh, leadĆfree gasoline with a minimum of 85
octane. Leaded gasoline may be used if it is commercially
available and if unleaded is unavailable. Purchase fuel in
quantity that can be used within 30 days. See Storage.
In U.S.A. leaded gasoline may not be used. Some fuels, called
oxygenated or reformulated gasolines, are gasolines blended
with alcohols or ethers. Excessive amounts of these blends
can damage the fuel system or cause performance problems.
If any undesirable operating symptoms occur, use gasoline
with a lower percentage of alcohol or ether.
This engine is certified to operate on gasoline. Exhaust
Emission Control System: EM (Engine Modifications).
Do not use gasoline which contains Methanol. Do not mix oil
with gasoline.
For engine protection, we recommend using Briggs & Stratton
Fuel Stabilizer available from an Authorized Briggs & Stratton
Service Dealer.
Check fuel level.
Before refueling, allow
engine to cool 2 minutes.
Clean around fuel fill before removing cap to refuel. Remove
cap. Fill tank to approximately 1Ć1/2 inches below top of neck
to allow for fuel expansion. Be careful not to overfill.
Starting
(see figs.
)
ALWAYS KEEP HANDS AND FEET
CLEAR OF EQUIPMENT MOVING PARTS.
Do not use a pressurized starting fluid.
Vapors are flammable.
Start, store and fuel lawn mower in level position. Start lawn
mower on hard surface or over previously cut grass.
Check oil level.
Open fuel shutĆoff valve, if equipped.
Before starting engine
(see fig.
)
If engine runs low on oil, an oil pressure switch (if engine is
equipped) will either activate a warning device or stop the
engine. (Read the operating instructions supplied by the
equipment manufacturer to determine which way your engine
is equipped.) See Oil pressure on next page.
1. Open fuel shutĆoff valve, if equipped.
2. Move choke control to CHOKE position
Ê
.
Note: If engine does not start, remove air cleaner to check
choke. Choke must fully close. If not, see Adjustments.
3. Move throttle control
Ë
to FAST position.
4. Push rocker switch
Ì
to I position.
Rewind starter, if equipped
(see fig.
)
Grasp rope handle and pull slowly until
resistance is felt. Then pull cord rapidly to
overcome compression, prevent kickback
and start engine. Repeat if necessary with choke in RUN
position throttle in FAST. When engine starts, operate in FAST.
Electric starter
(see fig.
)
On engines equipped with 12 volt starting systems, turn key to
START position
Ê
or press button
Ë
. Repeat if necessary
with choke off and throttle control in FAST position. Operate
engine with choke off and throttle in FAST position.
Note: If equipment manufacturer has supplied battery,
charge it before trying to start engine, as equipment manufacĆ
turer recommends. Use short starting cycles (15 secs. per
min.) to prolong starter life. Extended cranking can damage
starter motor.
CAUTION:If engine is equipped with battery for electric starter,
do not operate engine with battery disconnected.
Stopping
(see fig.
)
Do not move choke control to CHOKE to stop engine. Backfire
or engine damage may occur. Move throttle control to IDLE or
SLOW position, then to STOP
Ê
, push rocker switch to 0
position or turn key to OFF
Ë
.
Always remove key from switch when equipment is not in use
or left unattended.
When engine or equipment is transĆ
ported, close fuel shutĆoff valve, if
equipped, to prevent fuel leakage.
Adjustments
(see fig.
)
To prevent accidenĆ
tal starting, remove
spark plug wire Ê
and ground it before
adjusting, and disĆ
connect battery at negative terminal, if equipped.
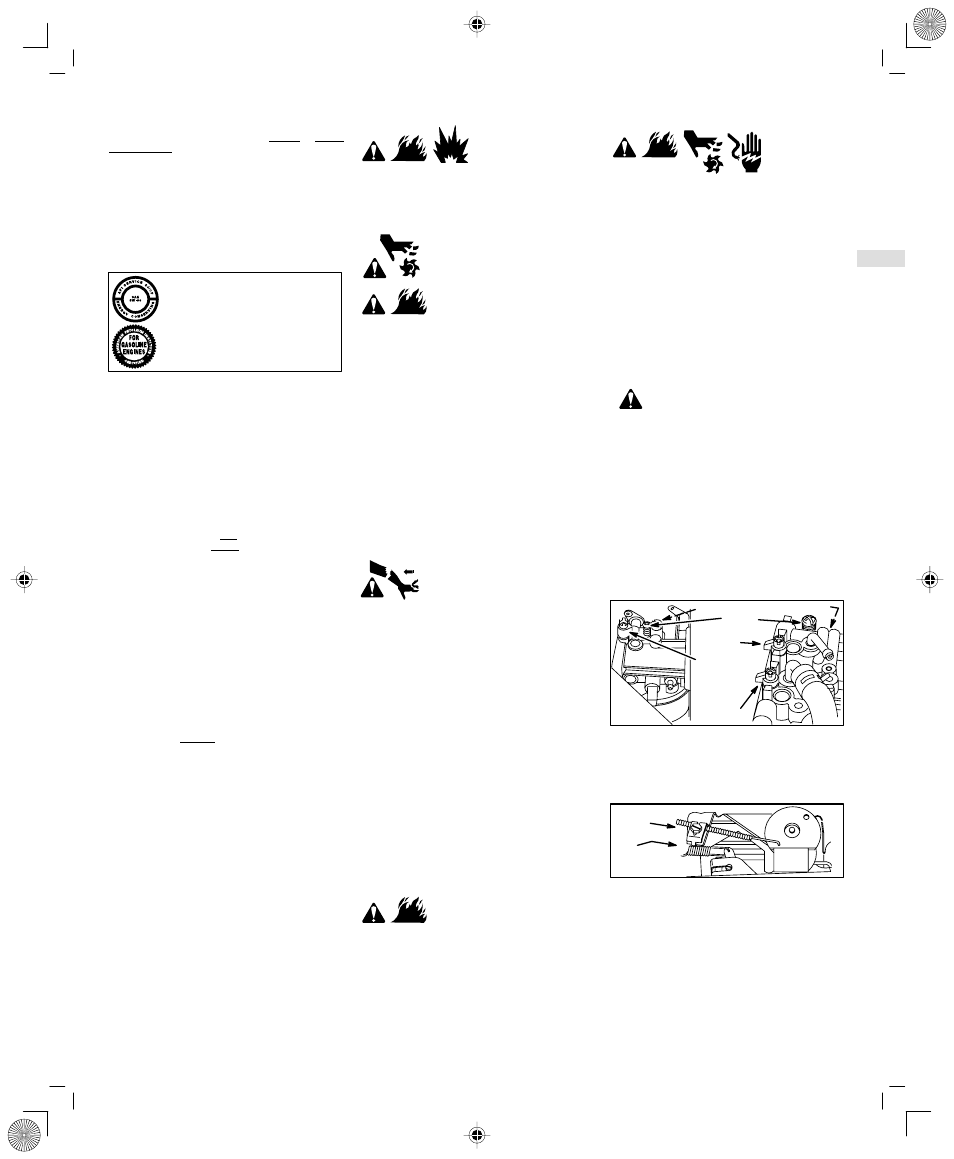
Choke control adjustments
Remove air cleaner. Move choke control to CHOKE position.
Carburetor choke valve
Ë
should be completely closed. If not,
loosen casing clamp screw
Ì
and pull casing and wire
Í
in
direction of arrow to end of travel. Tighten casing clamp screw.
Replace air cleaner.
Throttle control adjustments
Remove air cleaner. Move throttle control to FAST position.
Swivel
Î
should be against throttle stop
Ï
. If not, loosen
casing clamp screw
Ð
. Move casing and wire
Ñ
in direction
shown by arrow until swivel is against throttle stop. Tighten
casing clamp screw. Replace air cleaner.
Check operation of controls. Readjust if necessary.
Carburetor adjustments
The manufacturer of the equipment on which
this engine is installed specifies top speed at
which the engine will be operated. DO NOT
EXCEED this speed.
See an Authorized Briggs & Stratton Dealer for carburetor
adjustment.
Start engine and warm up approximately 5 minutes before
adjusting. With engine running, place throttle control in SLOW
position. Rotate carburetor throttle lever against the idle speed
screw and hold it. Turn idle speed screw to obtain 1400 rpm
(1200 rpm on two barrel carburetor). While still holding
carburetor throttle lever against idle speed screw, turn idle
mixture valve with limiter cap screw midway between limits.
DO NOT remove limiter cap. DO NOT force beyond limit. On
twin barrel carburetor, set cylinder #1 idle mixture valve
midway between limits. Then set cylinder #2 idle mixture valve
midway between limits while holding carburetor throttle lever
against idle speed screw.
CARBURETOR THROTTLE LEVER
CYL # 1
IDLE MIX-
TURE
VALVES WITH
LIMITER
CAPS
CYL # 2
IDLE
SPEED SCREW
Two barrel carburetor
Single barrel carburetor
Readjust the idle speed to 1200 rpm, if governed idle spring is
red, or 900 rpm, if governed idle spring is white as illustrated
below. Release carburetor throttle lever. Move throttle control
to FAST position. Engine should accelerate smoothly. If it does
not, readjust idle mixture valve(s) slightly counterclockwise.
GOVERNED
IDLE SPRING
(RED OR WHITE)
CASING
CLAMP
Note:Engines operated at approximately 3000 to 5000 feet (900
to 1500 meters) above sea level may require a high altitude
carburetor main jet. If erratic performance is observed, contact a
Briggs & Stratton Authorized Service Dealer for a high altitude
carburetor main jet.