Bunn espress® model es•1af, Installation, Electrical – Bunn ESPRESS ES.1AF User Manual
Page 5: Initial fill and heat, 6plumbing
5
BUNN
Espress®
Model
ES•1AF
NOTE: For cart applications, unit will function with inlet hose suspended into a container of water. Be sure not to
run the container dry, damage to the pump will occur.
ELECTRICAL
CAUTION- The brewer must be disconnected from the power source until specified. Improper electrical installation
will damage electronic components.
1. Using a voltmeter, check the voltage and color coding of each conductor at the electrical source.
2. When Instructed to proceed, connect the brewer to the power source.
CAUTION- The brewer must be properly grounded. A plumbing line will not provide an adequate ground.
INITIAL FILL AND HEAT
CAUTION- The brewer must be disconnected from the power source until specified. Improper electrical installation
will damage electronic components. Plumbing must be connected to the brewer before proceeding.
1. Make sure the brewer ON/OFF toggle switch is in the off position. The toggle switch is located on the upper
left side of the front panel, just above the pressure gauge
2. Connect brewer to the power source.
3. Place the brewer ON/OFF switch in the “ON” position. The tank will automatically fill. When full the heater
will begin heating the water in the tank.
NOTE: The tank heater switch is shipped in the “ON” position, and during normal operation should stay
there. This switch is located on the DBC control board behind the right hand side panel. If service is required
this switch may be turned off to disable the heating circuit.
During initial fill, using a bottled water source, a fault may occur. The controller will detect that the
tank is not filling fast enough.
If this occurs power down the unit. Reinitiate start-up procedures and the unit will complete filling.
The unit will begin heating after filling. If necessary, repeat until tank is properly filled.
4. When the steam side of the pressure gauge is in the green area the brewer is ready for selection
of one of the four drinks and the size drink desired.
.
INSTALLATION
BUNN
90 psig
max o
peratin
g pres
sure
BOM S
trainer
FLOW
0
0,5
0,5
1
1,5
1,5
2
2,5
2,5
0
4
8
12
12
16
16
CL 2
CL 2
ba
r
bar
1.
Pla
ce
an
em
pty
cu
p b
elo
w
the
di
sp
en
sin
g n
oz
zle
.
2.
Pr
es
s t
he
bu
tto
n i
nd
ica
tin
g y
ou
r s
ele
ctio
n.
3.
Pr
es
s a
ny
bu
tto
n t
o s
top
th
e c
yc
le.
1.
Fo
r c
om
ple
te
ins
tru
cti
on
s, s
ee
th
e o
pe
rat
ors
m
an
ua
l.
Wh
en
CL
EA
N
FR
OT
HE
R
lig
ht
fla
sh
es
, ri
ns
e t
he
fr
oth
er a
s f
ollo
ws
:
2.
Pla
ce
th
e e
nd
of
th
e m
ilk
su
pp
ly t
ub
e i
n a
co
nta
ine
r o
f c
lea
n h
ot
wa
ter
.
3.
Pr
es
s t
he
"C
LE
AN
FR
OT
HE
R"
bu
tto
n.
4.
Ca
ref
ull
y r
em
ov
e t
he
cu
p &
di
sc
ard
co
nte
nts
af
ter
flo
w
ha
s s
top
pe
d.
5.
Dis
as
se
mb
le
an
d th
oro
ug
hly
cl
ea
n t
he
m
ilk
fr
oth
er
ac
co
rdi
ng
to
lo
ca
l
sa
nit
ati
on
co
de
s,
at
lea
st
ev
ery
fo
ur
(4)
ho
urs
.
1.
Pla
ce
a
po
d i
n t
he
filt
er
ho
lde
r.
2.
Lo
ck
th
e f
ilte
r h
old
er
int
o t
he
gr
ou
p h
ea
d.
3.
Pla
ce
an
em
pty
cu
p b
elo
w
the
dis
pe
ns
ing
no
zzl
es
.
4.
Pr
es
s y
ou
r d
rin
k s
ele
ctio
n.
5.
Ca
refu
lly
re
mo
ve
th
e c
up
af
ter
th
e f
low
ha
s s
top
pe
d.
S
IN
G
L E
1
1 2
3
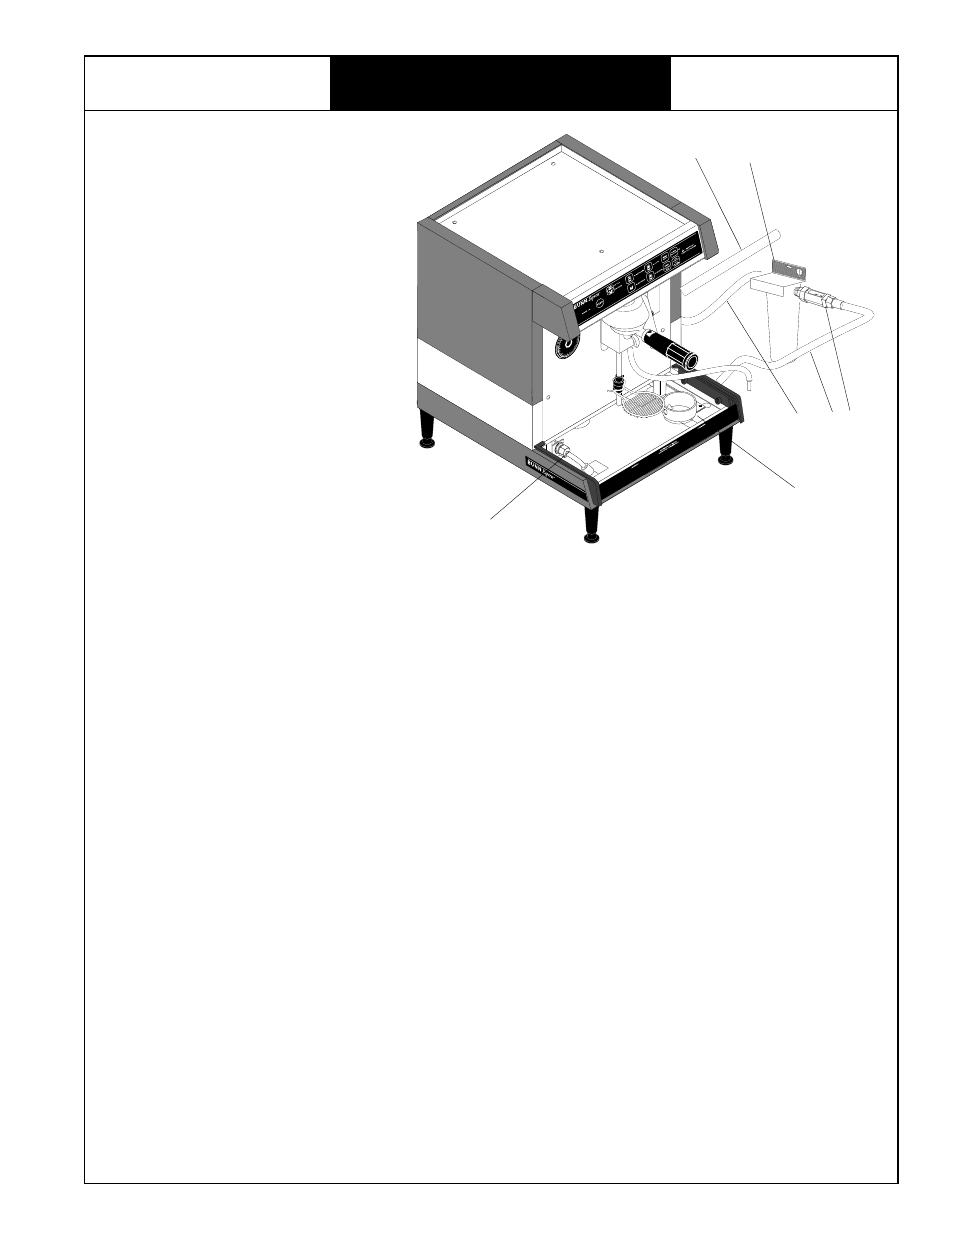
1. Inlet Hose
2. Strainer Assy.
3. Filter/Softener
4. Water Supply
Hose
5. Drain Hose
6. Drain Cup
6
6
PLUMBING
Install the brewer as indicated below:
5
4
P907