Photo, Settings – SPYPOINT Pro-X Plus User Manual
Page 14
26
27
Lithium battery pack with charger
The camera SPYPOINT PRO-X PLUS can be powered by a
rechargeable lithium battery LIT-C-8 (sold separately, refer to
the section «OPTIONS»). This type of battery is less affected
by cold temperatures and lasts up to 3 times more then an
alkaline battery. During the installation of lithium battery, place
the switch inside the battery case to «RECHARGEABLE».
12 volts Power
The camera SPYPOINT PRO-X PLUS can also be powered
from an external 12 volts DC input. When using a 12 volt
connection, we recommend you to remove the alkaline batteries
to prevent surcharges. To find the accessories available for the
12 volts, refer to the section «OPTIONS».
Solar panel
This model also offers the possibility of a connection to
a solar panel SP-12V (sold separately, refer to the section
«OPTIONS») to maintain the charge of the lithium battery
(sold separately, refer to the section «OPTIONS») or the 12
volt battery (sold separately, refer to the section «OPTIONS»).
During the installation of the rechargeable lithium battery or
12 volt battery, slide up the switch inside the battery case up
to «RECHARGEABLE» to activate the charging system of
the solar panel.
Electricity
The electrical power is recommended for security purposes. It
provides an instant trigger time when a movement is detected.
We recommend to remove the alkaline batteries when this
power is used. Although lithium battery can remain safely
inside the camera and it is ideal in case of a blackout. A 12 volts
DC adapter that can provide a minimum of 800 mA will be
needed. (Refer to the section «OPTIONS»)
Note: when using the electricity power, the «Multi-shot» mode
and the «Delay» between photos are disabled as the camera
starts instantly every time it detects motion.
Also, the imprinting
temperature on each picture is disabled.
English
MEMORY CARD
Using a memory card is required to operate the camera
SPYPOINT PRO-X PLUS. When the camera is « ON » and no
memory card is used, the screen displays « Insert memory card
». The SD slot of the camera has a 32 GB memory capacity.
Before inserting or removing the memory card, the camera
must be turned « OFF ». Failing to do so may cause loss of or
damage the pictures already recorded from the memory card.
When the SD card is full, the viewing screen indicates « DISK
FULL ». The following data shows an approximate quantity of
photos which can be recorded by the camera depending on the
memory card capacity.
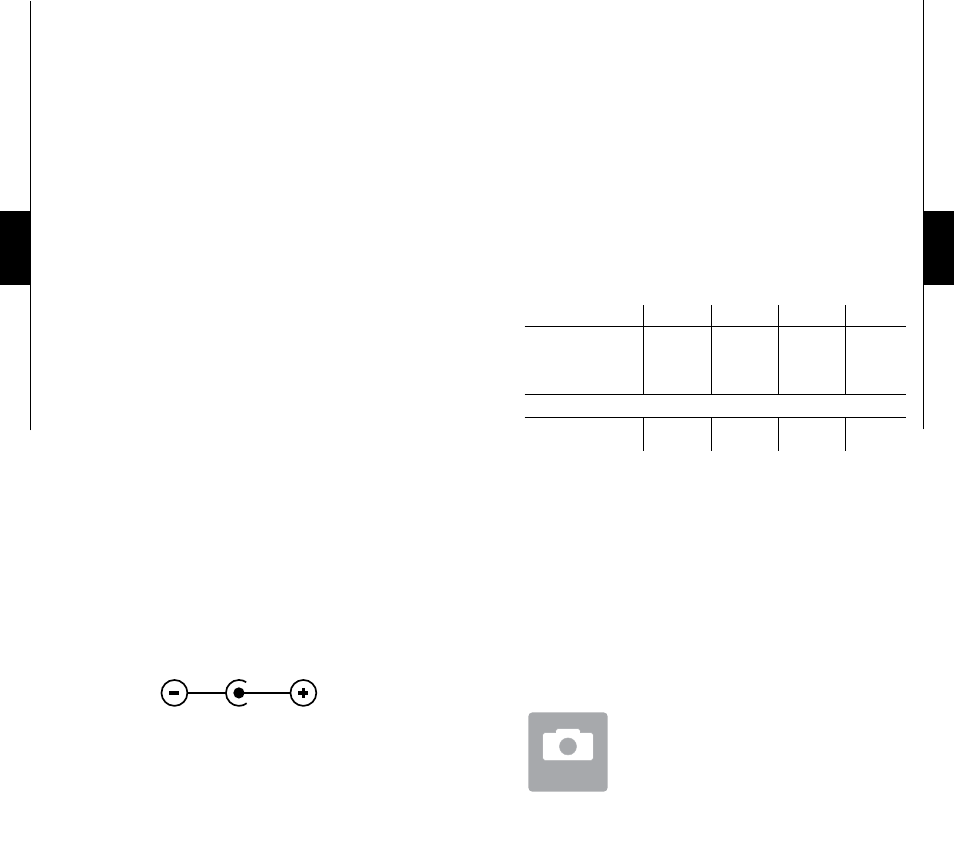
RESOLUTION
2.0 GB
4.0 GB
8.0 GB
32 GB
5 MP
6 MP
8 MP
10 MP
12 MP
1190
952
635
595
476
2380
1904
1270
1190
952
4760
3808
2540
2380
1904
19040
15232
10160
9520
7616
vIDEO RESOLUTION
320 x 240
640 x 480
45 min
30 min
1h30
1h
3h
2h
12h
8h
In « TEST » mode, if the SD card is locked, the screen indicates
« CARD PROTECT » and the light in the front of the camera
remains on.
SETTINGS
turn the camera to « ON » and navigate the interface by
pressing « », « », « » or « », press « OK » for
selection. to modify the selection, press « » and « »
again and press « OK » to confirm. to return to the previous
menu press « BACK ».
PHOtO
When the « PHOTO » mode is selected, the
test light in the front of the camera winks for
60 seconds to allow the operator to walk away
from the camera.
English
Photo