SPYPOINT C6 Quick start User Manual
Page 2
INSTALLATION WITH THE SUPPLIED STRAP:
Recommended installation height: about 3 feet above the ground.
Do not place the camera facing the sun.
SETTINGS
A
: Photo quality (High/Low)
B
: Number of recorded files
C
: Date/Time (MM/DD/YY, hh:mm)
D
: Temperature (Celcius/Farenheit)(if applicable)
1. Set to SET/TEST mode.
2. Press OK to edit option.
3. Press UP and DOWN to modify the option.
4. Press OK to set next option or to confirm.
5. Turn OFF the camera to record settings.
6. Turn ON the camera, then set to PHOTO or VIDEO mode to operate
the camera.
Settings
1. Insérez l’extrémité de la courroie dans la fente
qui se trouve au dos du mécanisme.
2. Insérez la courroie dans la fente sous le levier
et faites-la ressortir en arrière.
3. Créer une tension sur la courroie en la tirant vers
la droite, puis rabattez vers la gauche le levier pour
maintenir la position.
A
D
B
C
2
MODE
PHOTO
After 60 seconds, the camera starts in photo mode to take
photos.
VIDEO
After 60 seconds, the camera starts in video mode to take
videos.
SET/
TEST
Allows the user to test the detection system of the
camera. When the SET/TEST mode is selected, no photo
or video is recorded. Pass in front of the camera from left
to right. When the camera detects a motion, the test light
blinks to indicate that the camera would normally have
saved a photo or video. If the system does not detect
the movement, increase the detection distance using the
DISTANCE wheel or realign the system differently.
VIEW
Allows the user to view or delete recorded photos and
videos on a television.
DELAY
Allows the user to choose the time interval between each detection
before the camera records the next photo or video.
MULTI-SHOT
Takes up to 4 consecutive shots at each detection, with a 10 second
delay between each photo. For the cameras with a Flash unit, the
delay between each photo will be 15 seconds. This option is available
in PHOTO mode only.
VIDEO LENGTH
Allows the user to select the duration of the recording when the camera
is set in VIDEO mode.
1
2
3
4
1
2
3
4
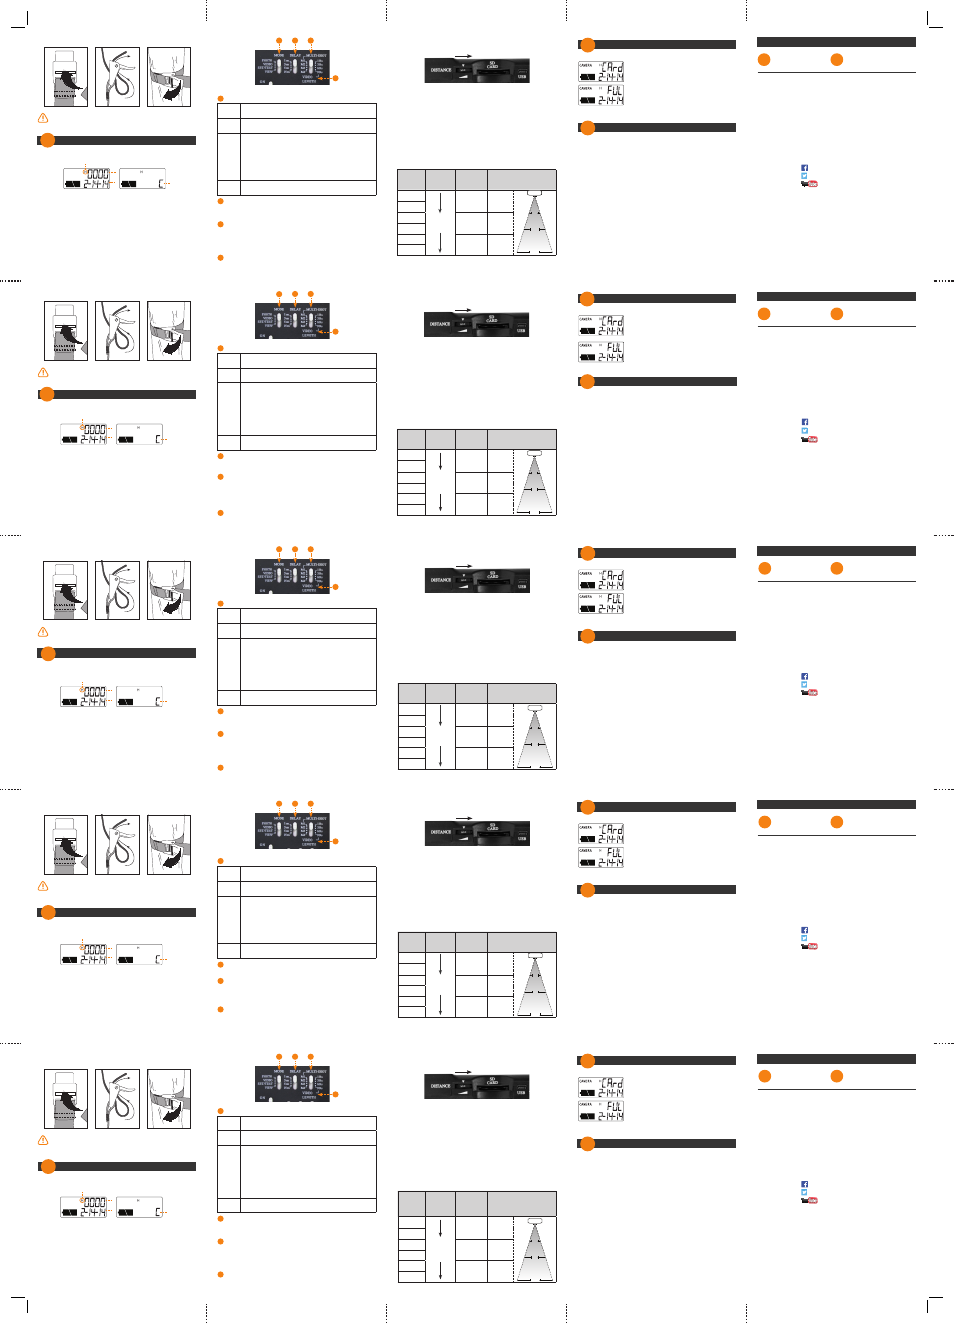
DISTANCE
Turn the DISTANCE dial to the right to increase the detection distance
and the sensitivity of the detector.
The camera is equipped with a detector sensitive to infrared. The
system will only detect a heat source in motion. The greater the mass
of heat, the more sensitive the system is. The range of detection is
between 5 and 65 feet. The best way to adjust the distance is to set
the camera to SET/TEST mode. Make sure to have the least amount
of objects possible in front of the camera during positioning. This will
prevent photos being taken by the camera when oriented towards the
sun at the same time an object moves in front of the camera (e.g. a
branch).
Here is a table of approximate detection distances and width of the
detection area according to the DISTANCE dial setting. The data can be
affected by the size of the subject and the outside temperature. Note
that this data is for illustrative purposes only.
Value on
dial
Sensitivity
Detection
distance
(ft)
Width of the
detection area(ft)
MIN
Gradually
increases
5-30
3
2
4
30-50
15
6
8
50-65
30
MAX
CAMERA
3
15
30
There is no memory card in the camera,
insert a card.
The memory card is full, delete files or use a
new memory card.
Visit
www.spypoint.com
, the complete instructions for your camera
can be found in the Support section.
Error messages
3
Complete instructions
4
Support
1-888-779-7646
Join the
SPYPOINT
®
community
facebook.com/spypoint
youtube.com/spypointtrailcam
twitter.com/SpypointCamera
vimeo.com/spypointxcelcam
facebook.com/spypoint
youtube.com/spypointtrailcam
twitter.com/SpypointCamera
vimeo.com/spypointxcelcam
facebook.com/spypoint
youtube.com/spypointtrailcam
twitter.com/SpypointCamera
vimeo.com/spypointxcelcam
INSTALLATION À L’AIDE DE LA COURROIE FOURNIE:
Hauteur d’installation recommandée: environ 1 mètre du sol.
Ne pas installer la caméra face au soleil.
PROGRAMMATION
A
: Qualité photo (High/Low)
B
: Nombre de fichiers enregistrés
C
: Date/Heure (MM/JJ/AA, hh:mm)
D
: Température (Celcius/Farenheit)(si applicable)
1. Mettre en mode SET/TEST.
2. Appuyer sur OK pour configurer l’option.
3. Utiliser UP et DOWN pour modifier l’option.
4. Appuyer sur OK pour configurer l’option suivante ou confirmer.
5. Mettre la caméra à OFF pour enregistrer les modifications.
6. Mettre la caméra à ON, puis mettre le commutateur au mode PHOTO
ou VIDEO pour utiliser la caméra.
1. Insérez l’extrémité de la courroie dans la fente
qui se trouve au dos du mécanisme.
2. Insérez la courroie dans la fente sous le levier
et faites-la ressortir en arrière.
3. Créer une tension sur la courroie en la tirant vers
la droite, puis rabattez vers la gauche le levier pour
maintenir la position.
A
D
B
C
Programmation
2
MODE
PHOTO
Après 60 secondes, la caméra démarre en mode photo
pour prendre des photos.
VIDEO
Après 60 secondes, la caméra démarre en mode vidéo
pour prendre des vidéos.
SET/
TEST
Permet de tester la caméra afin de déterminer si elle
détecte bien à l’endroit désiré. À noter qu’aucune photo/
vidéo n’est enregistrée. Passer devant la caméra de
façon perpendiculaire. Lorsque la caméra détecte un
mouvement, la lumière de test clignote pour indiquer que
l’appareil aurait normalement enregistré une photo/vidéo.
Si le système ne détecte pas les mouvements, augmenter
la distance de détection à l’aide de la roulette DISTANCE
ou réaligner le système de façon différente.
VIEW
Permet de visionner ou de supprimer les photos et les
vidéos directement à l’écran d’un téléviseur.
DELAY
Permet de choisir l’intervalle de temps d’attente avant que la caméra
ne détecte à nouveau et puisse enregistrer la prochaine photo ou vidéo.
MULTI-SHOT
Permet de prendre jusqu’à 4 photos consécutives à chaque détection,
avec un délai de 10 secondes entre chaque photo. Pour les caméras
avec un module FLASH, le délai entre chaque photo sera plutôt de
15 secondes. Cette option est disponible lorsque la caméra est
programmée en mode PHOTO.
VIDEO LENGHT
Permet de configurer la durée d’enregistrement des séquences vidéo
lorsque la caméra est programmée en mode VIDEO.
1
2
3
4
1
2
3
4
DISTANCE
Tourner la roulette vers la droite pour augmenter la distance de
détection et la sensibilité du détecteur.
La caméra est munie d’un détecteur sensible à l’infrarouge qui détecte
seulement une source de chaleur en mouvement. Plus la masse
de chaleur est grande, plus le système est sensible. La distance de
détection varie de 2 à 20 mètres. La meilleure façon de configurer la
distance est de mettre l’appareil en mode SET/TEST. Faire en sorte
d’avoir le moins d’objet possible devant la caméra, ceci évite qu’elle
se déclenche lorsque le soleil pointe en sa direction au même moment
qu’un objet est en mouvement devant l’appareil (par exemple: une
branche).
Voici un tableau des distances de détection approximatives et de la
largeur de la zone de détection selon la valeur de la roulette
DISTANCE. Ces données peuvent être affectées par la grandeur du
sujet et la température extérieure. À noter que ces données sont à
titre indicatif seulement.
Valeur
sur la
roulette
Sensibilité
Distance de
détection
(m)
Largeur de la zone
de détection
(m)
MIN
Augmente
graduelle-
ment
2-10
1
2
4
10-15
5
6
8
15-20
10
MAX
CAMERA
1
5
10
Il n’y a pas de carte mémoire dans la caméra,
insérer une carte.
La carte mémoire est pleine, effacer des
fichiers ou utiliser une nouvelle carte
mémoire.
Visiter
www.spypoint.com
, les instructions complètes de la
caméra se retrouvent sous la section Support.
Messages d’erreur
3
Instructions complètes
4
1-888-779-7646
Support technique
Rejoignez la communauté
SPYPOINT
MD
facebook.com/spypoint
youtube.com/spypointtrailcam
twitter.com/SpypointCamera
vimeo.com/spypointxcelcam
facebook.com/spypoint
youtube.com/spypointtrailcam
twitter.com/SpypointCamera
vimeo.com/spypointxcelcam
facebook.com/spypoint.FR
youtube.com/spypointtrailcam
twitter.com/SpypointCamera
vimeo.com/spypointxcelcam
INSTALLATION DER KAMERA MIT DEM MITGELIEFERTEN
BEFESTIGUNGSGURT:
Empfohlene Montagehöhe: ca. 1m über dem Boden.
Stellen Sie die Kamera nicht mit Blick zur Sonne auf.
EINSTELLUNGEN
A
: Bildqualität (High/Low)
B
: Anzahl der aufgenommenen Dateien
C
: Datum/Uhrzeit (MM/TT/JJ, hh:mm)
D
: Temperatur (Celcius/Farenheit)(falls zutreffend)
1. Stellen Sie den Schalter auf den SET/TEST-Modus.
2. Drücken Sie OK, um die Option zu bearbeiten.
3. Drücken Sie UP und DOWN, um die Option zu ändern.
4. Drücken Sie OK, um die nächste Option zu bearbeiten oder um zu
bestätigen.
5. Schalten Sie die Kamera aus, um die Einstellungen zu speichern.
6. Schalten Sie die Kamera ein, nun stellen Sie den Schalter auf PHOTO
oder VIDEO Modus, um die Kamera zu verwenden.
Einstellungen
1. Insérez l’extrémité de la courroie dans la fente
qui se trouve au dos du mécanisme.
2. Insérez la courroie dans la fente sous le levier
et faites-la ressortir en arrière.
3. Créer une tension sur la courroie en la tirant vers
la droite, puis rabattez vers la gauche le levier pour
maintenir la position.
A
D
B
C
2
MODE (MODUS)
PHOTO
Nach 60 Sekunden beginnt die Kamera im Foto-Modus
Bilder aufzunehmen.
VIDEO
Nach 60 Sekunden beginnt die Kamera im Video-Modus
Videos aufzunehmen.
SET/
TEST
Ermöglicht es dem Anwender, die Erfassung der Kamera
zu testen. Wenn der SET/TEST Modus ausgewählt ist, wird
kein Foto oder Video aufgezeichnet. Laufen Sie vor der
Kamera von links nach rechts. Wenn die Kamera die
Bewegung erkennt, blinkt die Testlampe auf, um anzuzeigen,
dass normalerweise ein Foto oder Video augenommen
wurde. Wenn das System die Bewegung nicht erkennt,
erhöhen Sie die Weite der Erfassung mit dem DISTANCE
Rad oder richten Sie die Kamera neu aus.
VIEW
Ermöglicht das Betrachten und Löschen von aufgenomm-
enen Bildern und Videos über über ein TV-Gerät.
DELAY (VERZÖGERUNGSZEIT)
Hier stellen Sie die Verzögerungszeit zwischen den einzelnen Aufnah-
men ein.
MULTI-SHOT (MEHRFACHAUFNAHME)
Mit einer Erfassung bis zu 4 aufeinanderfolgende Bilder in einem
Abstand von 10 Sekunden. Für Kameras mit einem Blitzlicht-Modul,
beträgt die Verzögerung zwischen den Bildern 15 Sekunden. Diese
Option ist nur im Foto-Modus verfügbar.
VIDEO LENGTH (VIDEOLÄNGE)
Hier stellen Sie die Länge des Videos ein, wenn die Kamera im Video-
Modus ist.
1
2
3
4
1
2
3
4
DISTANCE (DISTANZ)
Drehen Sie das DISTANCE Rad nacht rechts, um die Weite der Erfas-
sung und die Empfindlichkeit zu erhöhen.
Die Kamera ist mit einem Bewegungsmelder ausgestattet, der emp-
findlich auf Infrarotstrahlung ist. Die Kamera reagiert nur auf Wärme-
quellen in Bewegung. Je größer die Masse der Hitze, desto empfindli-
cher reagiert das System. Der Erfassungsbereich liegt zwischen 2 und
20 Metern. Der beste Weg, die Entfernung zu ermitteln, ist die Kamera
im SET/TEST Modus einzurichten. Achten Sie darauf, das sich möglichst
wenig Objekte vor der Kamera befinden. Dadurch wird verhindert, das
ungewollte Bilder aufgenommen werden, wenn die Kamera in Richtung
Sonne installiert ist und sich solche Objekte bewegen (z.B. Zweige)
Diese Tabelle zeigt die ungefähre Weite der Erfassung und die Breite
des Erfassungsbereichs, entsprechend dem Wert des DISTANCE
Rädchens. Diese Daten können durch die Größe des Motives und der
Außentemperatur beeinflusst werden. Beachten Sie, dass diese Daten
ausschließlich zu illustrativen Zwecken gedacht sind.
Wert der
Anzeige
Empfind-
lichkeit
Erfassungs-
reichweite
(m)
Breite des
Erfassungsbereiches(m)
MIN
Zunehmend
größer
2-10
1
2
4
10-15
5
6
8
15-20
10
MAX
CAMERA
1
5
10
Es ist keine Speicherkarte in der Kamera,
legen Sie eine Speicherkarte ein.
Die Speicherkarte ist voll, löschen Sie Dateien
oder verwenden Sie eine neue Speicherkarte.
Besuchen
www.spypoint.com
oder
www.spypoint.info
Die vollständige Bedienungsanleitung für Ihre Kamera können Sie
im Bereich Support (www.spypoint.com) oder im Bereich Produkte
(www.spypoint.info) finden.
Fehlermeldungen
3
Vollständige Instruktionen
4
Support
+49 (0) 36331 50540
Join the
SPYPOINT
®
community
facebook.com/spypoint
youtube.com/spypointtrailcam
twitter.com/SpypointCamera
vimeo.com/spypointxcelcam
facebook.com/spypoint
youtube.com/spypointtrailcam
twitter.com/SpypointCamera
vimeo.com/spypointxcelcam
facebook.com/spypoint
youtube.com/spypointtrailcam
twitter.com/SpypointCamera
vimeo.com/spypointxcelcam
INSTALLAZIONE DELLA TELECAMERA CON IL LACCIO
INCLUSO NELLA CONFEZIONE:
Altezza da terra consigliata per il montaggio: ca. 1m.
Non posizionate la telecamera in direzione del sole.
IMPOSTAZIONI
A
: Qualità d’immagine (High/Low)
B
: Numero di file registrati
C
: Data/Ora (MM/GG/AA, hh:mm)
D
: Temperatura (Celcius/Farenheit)(se corrisponde)
1. Posizionare l’interruttore su modalità SET/TEST.
2. Premere OK per modificare l’opzione.
3. Premere UP o DOWN, per modificare l’opzione.
4. Premere OK per modificare l’opzione successiva o per confermare.
5. Spegnere la telecamera per memorizzare le impostazione effettuate.
6. Spegnere la telecamera per memorizzare le impostazione effettuate.
Impostazioni
1. Insérez l’extrémité de la courroie dans la fente
qui se trouve au dos du mécanisme.
2. Insérez la courroie dans la fente sous le levier
et faites-la ressortir en arrière.
3. Créer une tension sur la courroie en la tirant vers
la droite, puis rabattez vers la gauche le levier pour
maintenir la position.
A
D
B
C
2
MODE (MODALITA’)
PHOTO
Dopo 60 secondi in modalità foto la telecamera inizia con
riprese di immagini fotografiche.
VIDEO
Dopo 60 secondi in modalità video la telecamera inizia con
riprese video.
SET/
TEST
Permette di testare l’area di rilevamento della telecamera.
In modalità SET/TEST non vengono registrati immagini o
video. Muovetevi davanti alla telecamera verso sinistra e
verso destra. Se la telecamera rileva il movimento, il TEST
LED lampeggia per mostrare che in questo case verrebbe
scattata una foto e registrato un video. Se la telecamera
non rivela il movimento modificate l’area di rilevamento
con la ruota DISTANCE oppure riposizionate la telecamera.
VIEW
Permette di visualizzare e cancellare le immagini ed i vid-
eo registrati tramite display tramite televisore.
DELAY (RITARDO)
Qui si imposta il ritardo tra le single immagini.
MULTI-SHOT (RIPRESE MULTIPLE)
Per scattare fino a 4 immagini consecutive a distanza di 10 secondi.
Per telecamere con modulo flash l’intervallo è di 15 secondi. Questa
opzione è disponibile solamente in modalità PHOTO.
VIDEO LENGTH (DURATA VIDEO)
Qui si imposta la durata del video, se si trova in modalità video.
1
2
3
4
1
2
3
4
DISTANCE (DISTANZA)
Ruotate verso destra, per aumentare l’area di rilevamento e la
sensibilità.
La telecamera è dotata di un rilevatore di movimento sensibile a raggi
infrarossi. La telecamera reagisce solo con fonti di calore in movimento.
Più grande è la massa di calore, più sensibile è la reazione del sistema.
L’area di rilevamento va da 2 a 20 metri. La via migliore, per determi-
nare la distanza, è quella di impostare la telecamera in modalità SET/
TEST. Prestate attenzione che non vi siano troppi oggetti (ad esem-
pio rami) davanti alla telecamera, in quanto l’ombra in movimento di
questi (se c’è il sole), fa si che la telecamera scatta immagini a vuoto.
Questa tabella mostra la distanza e la larghezza dell’area di rileva-
mento, corrispondente al valore indicato sul ruotino DISTANCE. Questi
valori possono variare a seconda della grandezza di quanto fotografato
o della temperature esterna. Tenete a mente che questi dati sono
pensati per motivi illustrativi.
Valore
sul
ruotino
Sensibilità
Area di
rilevamento
(m)
Larghezza dell’area di
rilevamento (m)
MIN
Aumento
a scala
2-10
1
2
4
10-15
5
6
8
15-20
10
MAX
CAMERA
1
5
10
Non è inserita nessuna scheda memoria,
inserire scheda.
La scheda memoria è piena, cancellate alcuni
dati oppure inserite una scheda nuova.
Visitate
www.spypoint.com
o
www.spypoint.info
Il manuale d’istruzioni completo della vostra telecamera si trova
nell’area Supporto (www.spypoint.com) o nell’area Prodotti
(www.spypoint.info).
Messaggi d’errore
3
Istruzioni completo
4
Supporto
+49 (0) 36331 50540
Join the
SPYPOINT
®
community
facebook.com/spypoint
youtube.com/spypointtrailcam
twitter.com/SpypointCamera
vimeo.com/spypointxcelcam
facebook.com/spypoint
youtube.com/spypointtrailcam
twitter.com/SpypointCamera
vimeo.com/spypointxcelcam
facebook.com/spypoint
youtube.com/spypointtrailcam
twitter.com/SpypointCamera
vimeo.com/spypointxcelcam
COLOCACIÓN DE LA CÁMARA CON LA CINTA DE FIJACIÓN
INCLUIDA:
Altura de montaje recomendada: aprox. 1 m sobre el suelo.
No coloque la cámara frente al sol.
AJUSTES
A
: Calidad de las imágenes (High/Low)
B
: Número de archivos almacenados
C
: Fecha/hora (MM/DD/AA, hh:mm)
D
: Temperatura (Celcius/Farenheit)(si está disponible)
1. Coloque el interruptor en el modo SET/TEST.
2. Presione OK, para editar la opción.
3. Presione UP y DOWN para modificar la opción.
4. Presione OK para modificar la siguiente opción o para confirmar.
5. Apague la cámara para guardar los ajustes.
6. Encienda la cámara y coloque el interruptor en el modo PHOTO o
VIDEO para emplear la cámara.
Ajustes
1. Insérez l’extrémité de la courroie dans la fente
qui se trouve au dos du mécanisme.
2. Insérez la courroie dans la fente sous le levier
et faites-la ressortir en arrière.
3. Créer une tension sur la courroie en la tirant vers
la droite, puis rabattez vers la gauche le levier pour
maintenir la position.
A
D
B
C
2
MODE (MODOS)
PHOTO
Tras 60 segundos la cámara empezará a tomar fotos en
el modo Foto.
VIDEO
Tras 60 segundos, la cámara empezará a grabar un vídeo
en el modo Vídeo.
SET/
TEST
Permite al usuario comprobar el sistema de detección de
la cámara. Cuando se selecciona el modo SET/TEST no
se graba o toma ningún vídeo ni fotografía. Pase frente
a la cámara de izquierda a derecha. Cuando la cámara
reconozca el movimiento, la luz de prueba parpadea para
indicar que en otro modo la cámara habría tomado una
fotografía o un vídeo. Si el sistema no detecta movimiento
alguno, aumente la distancia de detección usando la rueda
de DISTANCE o recoloque la cámara de manera diferente.
VIEW
Permite al usuario visualizar o borrar fotografías y vídeos
en un televisor.
DELAY (INTERVALO DE TIEMPO)
Le permite establecer el intervalo de tiempo entre la toma de distintas
fotografías.
MULTI-SHOT (TOMA DE FOTOGRAFÍAS EN RÁFAGA)
Para tomar hasta 4 fotografías seguidas por cada detección, con un
intervalo de tiempo entre cada fotografía de 10 segundos. Este
intervalo de tiempo será de 15 segundos para las cámaras con un
módulo de flash. Esta opción sólo está disponible en el modo foto.
VIDEO LENGTH (LONGITUD DEL VÍDEO)
Le permite ajustar la duración del vídeo cuando la cámara se encuentra
en modo vídeo.
1
2
3
4
1
2
3
4
DISTANCE (DISTANCIA)
Gire la rueda de DISTANCE hacia la derecha para aumentar la distancia
de detección y la sensibilidad del detector.
La cámara está equipada con un detector de movimiento sensible a los
infrarrojos. Este sistema sólo detecta una fuente calorífica en movi-
miento. Cuanto más masa presenta la fuente calorífica, más sensible
es el sistema. El área de detección oscila entre los 2 y los 20 metros. La
mejor manera para ajustar la distancia es utilizar el modo SET/TEST.
Asegúrese de colocar la cámara en un lugar donde haya los menos
objetos posibles frente a ella. Esto evitará que la cámara tome foto-
grafías no deseadas al estar colocada frente al sol y cuando los objetos
se muevan (por ej. ramas).
Esta tabla muestra las distancias aproximadas de detección y la
amplitud del área de detección de acuerdo al valor de la rueda de
DISTANCE. Estos datos pueden depender del tamaño del objeto y de
la temperatura exterior. Tenga en cuenta que estos datos tienen
sólo un valor ilustrativo.
Valor del
dial
Sensibili-
dad
Distancia
de
detección
(m)
Amplitud del área
de detección (m)
MIN
Cada
vez más
extenso
2-10
1
2
4
10-15
5
6
8
15-20
10
MAX
CAMERA
1
5
10
No hay tarjeta de memoria en la cámara,
introduzca una tarjeta de memoria.
La tarjeta de memoria está llena, elimine
datos o utilice una nueva tarjeta de memoria.
Visite
www.spypoint.com
o
www.spypoint.info
Puede encontrar el manual de instrucciones completo de la cámara
en la zona de Soporte (www.spypoint.com) o en la zona Productos
(www.spypoint.info).
Mensajes de error
3
Instrucciones completas
4
Soporte
+49 (0) 36331 50540
Join the
SPYPOINT
®
community
facebook.com/spypoint
youtube.com/spypointtrailcam
twitter.com/SpypointCamera
vimeo.com/spypointxcelcam
facebook.com/spypoint
youtube.com/spypointtrailcam
twitter.com/SpypointCamera
vimeo.com/spypointxcelcam
facebook.com/spypoint
youtube.com/spypointtrailcam
twitter.com/SpypointCamera
vimeo.com/spypointxcelcam