Sportsliter Solutions SLS Series Glare & Spill Control User Manual
Sls series glare and spill control
SLS SERIES GLARE AND SPILL CONTROL
INSTALLATION AND SERVICING INSTRUCTIONS
GENERAL SAFETY WARNING!
Dangerous voltages exist within these fixtures and all precautions usually observed in
handling high voltage equipment should be observed when replacing lamps, installing or
otherwise servicing these fixtures.
DO NOT AIM ABOVE HORIZONTAL
WARNING!
To reduce fire and shock hazard: Disconnect power before servicing. Install and maintain
fixture to meet all applicable codes. Ensure that fixtures and wiring are properly
grounded. Read and follow all instructions, electrical data markers, lamp carton warnings
and wiring labels before installing. Installation of fixture is to be preformed by a qualified,
licensed electrician only. The installer of this fixture is responsible for sale, secure
mounting suitable for the application. Once fixture is installed, give these instructions to
the equipment owner.
CAUTION!
High temperature tempered glass sometimes ruptures spontaneously.
Install to minimize hazard of falling diced glass.
Unpacking Instructions:
While unpacking, it is important to verify the location of all parts before
discarding any packaging materials.
Assembly Instructions:
1. Open lens assembly
2. Install lamp. Secure lamp with lamp end support wire form.
3. Close lens assembly.
4. Ensure the gasket is seated properly and snap the (4) latches over the
reflector flange.
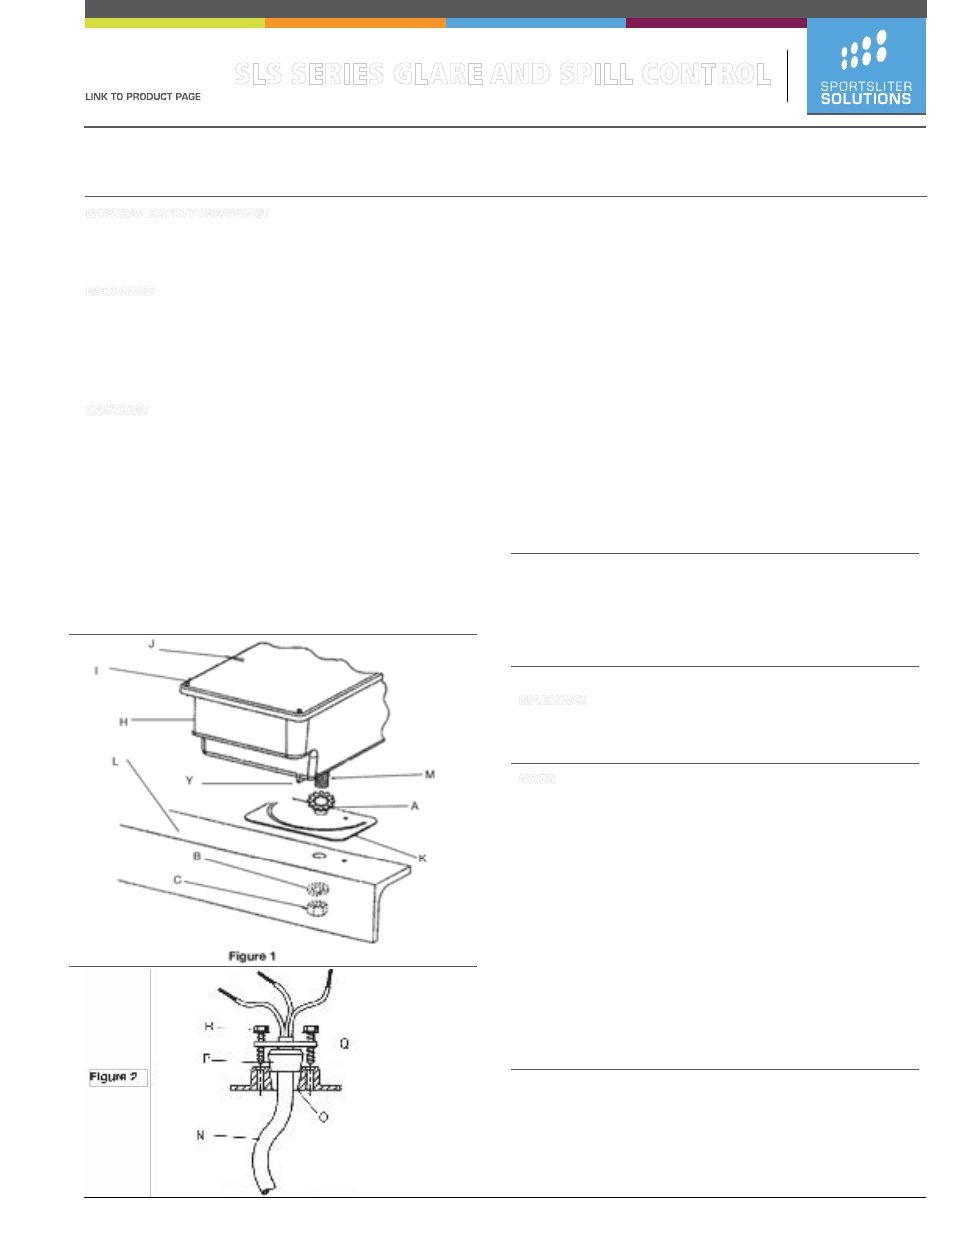
Mounting Instructions (See Figure 1)
This unit is supplied with 3/4” or 5/8 bolt, nut, slit washer, and
toothed washer for mounting to crossarm style (flat surface)
mounting brackets. This bolt is captive but may be replaced with a
longer, hex head bolt if required. A 5/8” bolt, S.A.E. 5 minimum or
a 3/4” bolt, S.A.E. 2 minimum is required. A tenon adapter (Ca: No.
4024SLS) is available for pole top mounting.
Included with the ballast housing is horizontal aiming plate (K).
1. Use the aiming plate as a template and mark the center of the small hole
on the crossarm (L). Note: Position the forward edge parallel to the
crossarm mounting bracket.
2. Drill a .219” dia. hole through the steel crossarm at the location just
marked. DO NOT drill through the aiming plate!
3. Using the supplied screw and nut, attach the aiming plate to the
crossarm. When mounting the fixture on a wooden crossarm, use a large
galvanized nail to attach the aiming plate.
4. Remove the nut (C), slit washer (B), and toothed washer (A) from the
main fixture mounting bolt (M).
5. Secure the fixture to the crossarm by placing the main fixture mounting
bolt through the toothed washer (A), horizontal aiming plate, and the
hole in the crossarm.
6. Replace the slit washer (B) and nut (C) on the main fixture mounting bolt
and tighten to 150 ft. lbs.
Mounting Notes:
• Ensure that the crossarm has adequate strength to support your desire
number of fixture.
• SLS5010 mounting brackets are available when obstructions will not
allow center fixture mounting on three-fixture brackets.
• DO NOT mount fixtures directly to concrete.
Wiring Instructions: (See Figures 1 & 2)
WARNING!
Units having two or more voltage taps: Remove the wirenut from the desired voltage lead
and connect lead to supply conductor. Replace wirenut on unused voltage lead. Failure to
replace wirenut on unused voltage lead will result in high voltage shock hazard.
NOTE:
All wiring is to be done in the wiring compartment (H) at the rear of the ballast
housing. Use minimum 90 C. SOWA. cord. (14/3 cord is required for fixture using 1500
watt lamps when fixtures are wired for 120V).
1. Specific wire gauge and wiring methods may be required by local or
national codes; consult local inspection agencies for details
prior to ordering.
2. Loosen (6) cover screws
(I) and set cover aside. Removal of green wire
tether is not recommended.
3. Feed supply cord
(N) into ballast housing through the wireway hole (O)
in the bottom of the wiring compartment (H), through the properly sized
rubber seal
(P) and the center hole in the retaining plate (Q).
4. The end of the cord’s outer jacket should not extend beyond 1” into the
wiring compartment.
5. Tighten the (2) screws
(R) to retain the supply cord.
6. Connect supply power leads to ballast primary leads in accordance with
local and NEC Codes.
7. Attach ground lead to green ground screw inside wiring compartment
and replace cover
(J), ensuring that no wires are pinched inside housing.
Drawing Number: 268-1118-9901
Installation Instructions