Scigene, Using mai tai® hybridization cassettes, Using mai tai – SciGene Using Mai Tai Hybridization Cassettes User Manual
Page 2: Hybridization cassettes, Cleaning and storage of the mai tai, Cassette
Using Mai Tai® Hybridization Cassettes
SciGene ◊ 617 N. Mary Avenue ◊ Sunnyvale, California 94085 USA ◊ (408) 733-7337 [email protected]
Using Mai Tai
®
Hybridization Cassettes
(continued)
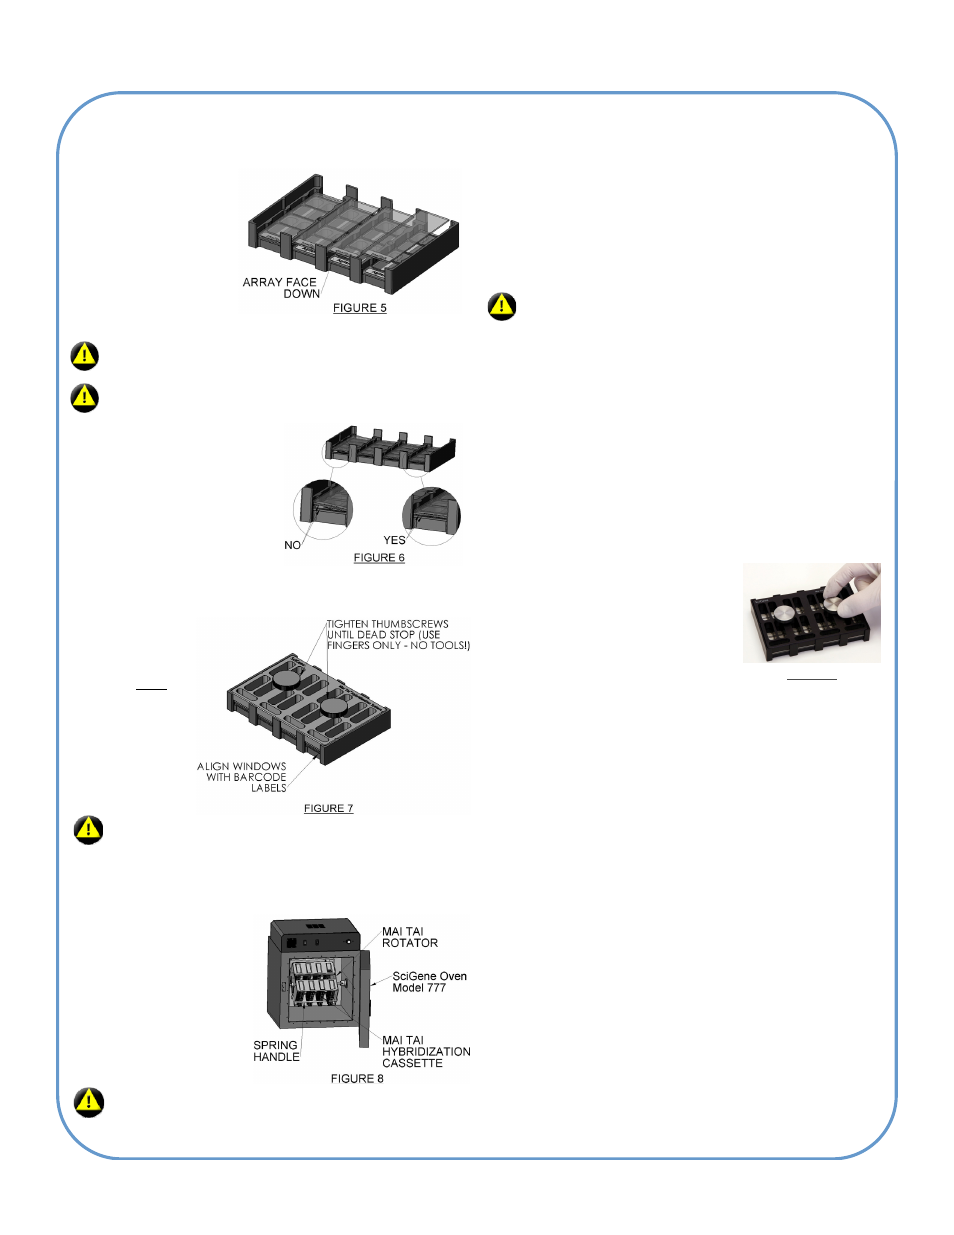
5. Holding array at the
ends with the array
side down and
ensuring that the
barcode side
matches with the one
on the gasket slide,
bring the array down
slowly holding it
horizontal to the
gasket slide (Figure 5).
Placing the array evenly onto the gasket slide is crucial to
prevent spilling or leakage.
Use Agilent arrays or microarrays from other sources that
are compatible with the Agilent gasket slides.
6. When all arrays have been
placed, make sure all
assemblies are laid flat
against the base plate. See
Figure 6 for examples of
proper and improper
placement.
7. Place the cover plate over
the arrays with the barcode
window matching the
barcodes on array. See Figure 7 for correct placement and
orientation.
11. Rotate the Mai Tai
®
Rotator at the speed and time
recommended by the microarray manufacturer.
12. At the completion of the incubation period, remove the
cassette(s) from the rotator and allow to cool for a few
minutes. Loosen thumbscrews and remove the top plate.
13. Remove all array-gasket-slide assemblies from the cassette
and place them in wash buffer specified by the array
supplier.
Place all assemblies into wash buffer before separating
any arrays from gasket slides.
14. With all assemblies submerged in wash buffer, separate
each array from its gasket slide and place in a slide rack
for processing.
15. Wash and dry the microarray(s) on the Little Dipper
®
Processor [SciGene Cat. #1080-40-1 (115v); 1080-40-2 (230v)]
or manually using the buffer(s) specified by the supplier.
Cleaning and Storage of the Mai Tai
®
Cassette
Hybridization solution may occasionally spill and dry on to the
Mai Tai
®
base and cover plates, making arrays or gasket slides
stick to these parts during hybridization. Base plates, cover
plates and thumbscrews need to be cleaned periodically to
prevent such sticking. Follow the protocol below to clean
Mai Tai
®
parts.
1. Disassemble each Mai Tai
®
cassette (Figure 9) into the base
plate, cover plate and thumbscrews.
Captive thumbscrews can be
unscrewed from the cover plate.
2. Using a lint-free wipe soaked in
70% ethanol, wipe all surfaces of
base plate, cover plate, thumbscrews and thumbscrew
hole carefully to remove dried hybridization solution and
salts.
3. Allow the clean parts to dry completely by evaporation.
4. Assemble the parts back together using the thumbscrews,
cover with cling wrap and store in a dry place.
— End Protocol —
SciGene
Automating Array Workflows
All third party marks are the property of their respective owners.
8. Tighten
the
thumbscrews all the
way to a complete
stop. Don’t use tools.
9. Rotate the cassette
to ensure that the
bubbles move freely
inside each array
chamber.
For optimal hybridization, it is best to have a single, large
bubble which moves freely around the chamber when
rotated. After assembly, ensure there are no stationary
bubbles in any array chamber when the assembly is
rotated. Stationary bubbles can be released by gently
tapping each corner of the assembly on a firm surface as it
is rotated.
10. Place the assembly into
the Mai Tai
®
rotator in
the pre-heated oven.
Raise the spring bar
and load the Mai Tai
®
cassettes into the
sleeves of the rotator as
shown in Figure 8.
When loading multiple cassettes, load equal number of
cassettes on either sides of the rotator to balance weight.
FIGURE 9