Caution – S&S Cycle Valve Spring Kits for 1984-2004 Big Twin & 1986-2003 Four-Cam (90-2077 and 90-2078) User Manual
Page 2
S&S
®
valve spring and collar kits #90-2077 and 90-2078
accommodate valve lifts up to .640” using standard length,
5
⁄
16
”
diameter valves, and are compatible with stock style valve
guides and valve guide seals. These spring kits are included
with S&S Super Stock
®
cylinder heads for Harley-Davidson
®
Evolution
®
and Twin Cam 88
®
engines.
NOTES
●
Spring kit components are not interchangeable with those
from other S&S valve spring kits.
●
Titanium top collars supplied with kit #90-2078 do not
require steel wear plate used with previous S&S
titanium collars.
Mixing of valves, springs or collars between early and late
S&S high-lift kit can cause extensive engine damage not
covered under warranty.
Installation of 90-2077 or 90-2078 spring kits does not usually
require modification for S&S or most stock heads. Exceptions are
Buell
®
Thunderstorm heads and certain Sportster
®
models and
big twin heads with different machining in valve spring pockets.
In such cases, removing a small amount of material
(approximately .030”) from O.D. of S&S bottom collar should
allow collar to rest flat in spring pocket for correct installation.
It may be necessary to machine the valve spring pocket deeper
to achieve the correct installed height when installing springs in
Twin Cam 88
®
cylinder heads.
90-2077 and 90-2078 spring pressures are as follows at 1.800”
installed height: Closed valve - 171 lbf; .560” lift - 389 lbf; .630
lift - 416 lbf.
Spring Installation Procedure
1. Remove heads from engine and disassemble. If cylinder
heads/valves are to be reconditioned, proceed at this time
according to standard procedure. Refer to Harley-Davidson
®
service manual as necessary.
2. Place lower spring collar in valve spring pocket in head. Place
outer spring on collar. Collar must sit flat on cylinder head
and spring coils must not contact sides of spring pocket in
head. If necessary, machine lower collar and/or spring pocket
to obtain minimum clearance of .030”. Do not modify spring
in any way.
3.
Using following procedure, determine installed spring
height and clearance between top collar and valve guide.
A. Lubricate valve stem and install valve in guide.
B. Install bottom collar, valve seal, top collar, and valve
keepers. Pull top collar tightly against keepers to seat
keepers in collar.
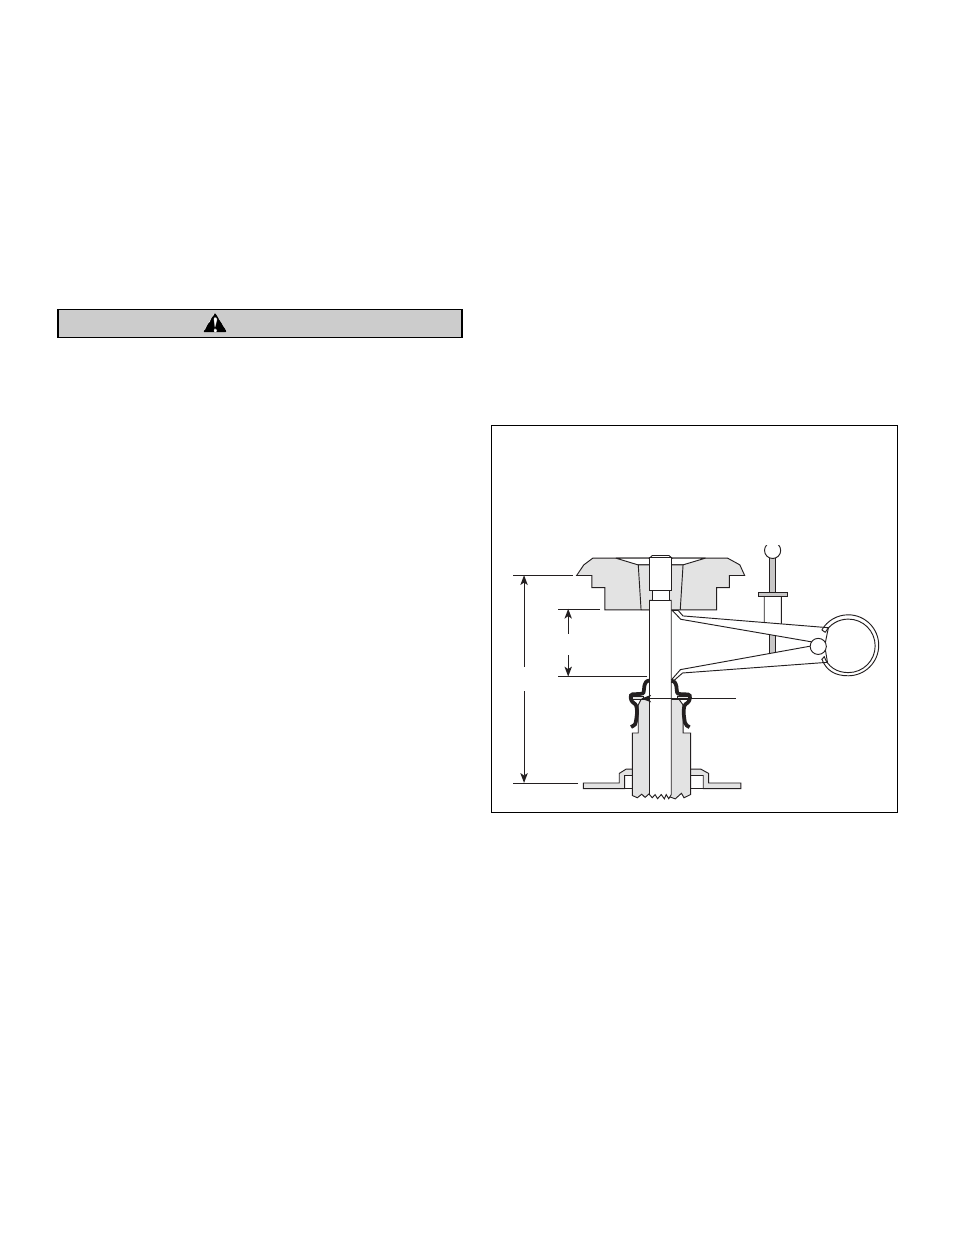
C. While holding valve firmly against seat in closed
position, measure installed spring height (distance
between lower valve spring seating surface and outside
step of top collar). See Figure A, Dimension A. Record
measurement.
D. Measure distance between top collar keepers and top of
valve guide or seal (if applicable). See Figure A,
Dimension B. Distance must be at least .060” greater
than valve lift of cam to be used. If dimension B is not
.060” greater than valve lift, valve guide must be
shortened to obtain required clearance.
Remove seal and grind
guide here to obtain
greater measurement B.
B
A
Dimension A:
Installed spring height must be adjusted to 1.800" ± .020"
Dimension B:
Must be .060" greater than valve lift for camshaft to be used.
Figure A
CAUTION
2