Piston change (re-cone kit), Settings and tuning – MTX Audio JackHammer 22 4000W RMS Dual 2 Ohm SuperWoofer User Manual
Page 5
mtx.com
PISTON CHANGE (RE-CONE KIT)
Since the installation of the JackHammer is a large investment in time and resources, the cone can be
removed without removing the entire sub or enclosure. Re-coning the woofer is surprisingly easy. No glue is
needed, just bolts, and if you followed the enclosure design it can be done without taking the woofer out of
the enclosure. Directions for either procedure follow.
To Re-cone the Woofer when Removed from the Enclosure
To remove the cone, unscrew the twelve
3
⁄
16
" hex screws from the front gasket of the woofer and remove the
gasket. Next remove the six
5
⁄
32
" hex screws from the back of the spider plateau and loosen the tinsel leads at
the terminal. The tinsel leads are the four 3mm hex screws at the top of the terminal that hold the voice coil
wires. Gently pull on the cone under the surround and the cone assembly should pull away from the woofer
motor. Be sure and pull evenly to prevent the assembly from binding in the basket. You are now ready to put in
the new re-cone kit.
Place the new cone assembly into the woofer motor. Make sure to align the tinsel leads from the re-cone kit
with the terminals and line up the large notches in the surround with the largest holes in the basket. Insert
the tinsel leads into the terminal ensuring the red lead is going into the positive (+) position and the black lead
is going into the negative (–) position. Tighten the four set screws and then slightly tug in the tinsel leads to
make sure they are tight in the terminal.
Next, insert the six
5
⁄
32
” hex screws back into the spider plateau and tighten. Replace the top gasket over
the surround on the top of the woofer. The counter-bore holes in the gasket need to align with the smaller
threaded holes in the basket. Insert the twelve
3
⁄
16
" hex gasket screws into the counter-bored holes and
tighten. Your new cone is now installed and you are ready to once again experience the JackHammer’s
extreme bass!
To Re-cone the Woofer when Installed in the Enclosure
If you have made the back removable, as suggested earlier in this manual, you can remove the cone without
removing the woofer from the enclosure. To remove the cone, unscrew the twelve
3
⁄
16
" hex screws from the
front gasket of the woofer and then remove the top gasket. DO NOT remove the T-30 wood screws because
the gasket can be removed with these still in place. Next, remove the six
5
⁄
8
" bolts from the back with a
15
⁄
16
"
wrench and pull off the back of the enclosure. Then, remove the six
5
⁄
32
" hex screws from the back of the
spider plateau and loosen the tinsel leads at the terminal. The tinsel leads are the four 3mm hex screws at
the top of the terminal that hold the voice coil wires. Gently pull on the cone under the surround and the cone
assembly should pull away from the woofer motor. Be sure and pull evenly to prevent the assembly from
binding in the basket. You are now ready to put in the new re-cone kit.
Place the new cone assembly into the woofer motor. Make sure to align the tinsel leads from the re-cone kit
with the terminals and line up the large notches in the surround with the largest holes in the basket. Insert
the tinsel leads into the terminal ensuring the red lead is going into the positive (+) position and the black lead
is going into the negative (–) position. Tighten the four set screws and then slightly tug in the tinsel leads to
make sure they are tight in the terminal.
Next, insert the six
5
⁄
32
" hex screws back into the spider plateau and tighten. Replace the top gasket over
the surround on the top of the woofer. The counter-bore holes in the gasket need to align with the smaller
threaded holes in the basket. Insert the twelve
3
⁄
16
" hex gasket screws into the counter-bored holes and
tighten. Finally, replace the back of the enclosure and re-attach the
5
⁄
8
" bolts to support the back of the woofer.
Your new cone is now installed and you are ready to once again experience the JackHammer’s extreme bass!
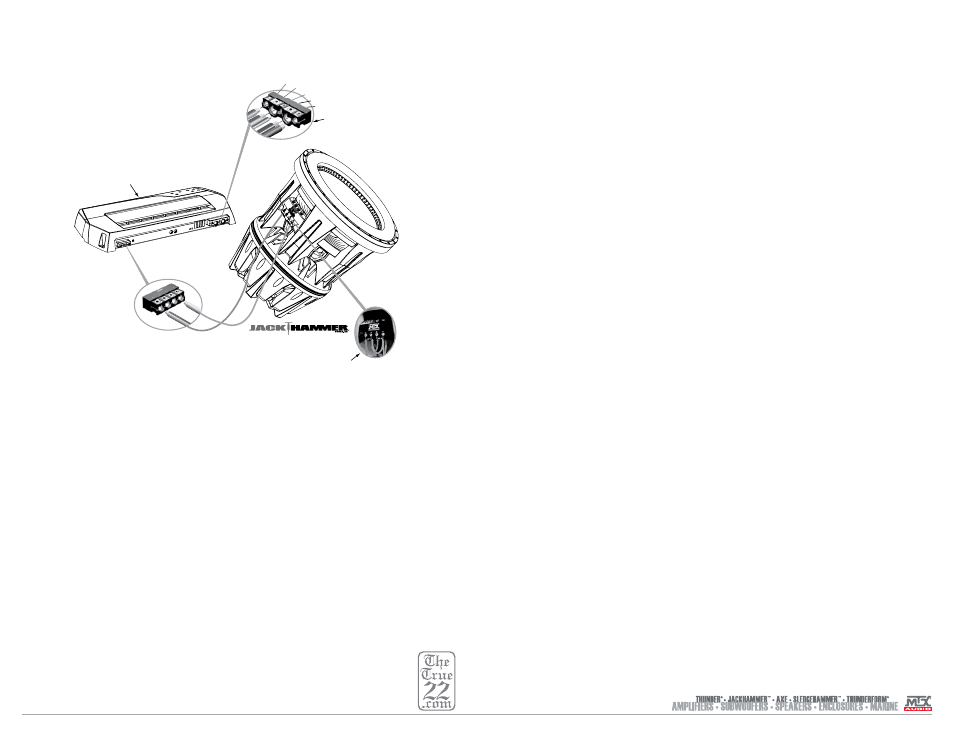
T9922-22 WIRING SETUP
This figure shows the recomended amplifier connection for the T9922-22 using the MTX TE4001D amplifier.
SETTINGS AND TUNING
Strapped amplifiers require “gain matching.” This is the process of adjusting each amplifier’s gain, frequency,
and EQ to be sure both amplifiers are sending the same AC voltage to the woofer. This will require a volt ohm/
multi meter and test tones.
1. It is recommended to have a crossover setting of 60-80Hz and the subsonic filter turned off.
2. The parametric EQ can be used to adjust ±12dB from 30-80Hz with a variable “Q” of 0.5 to 4. Using the
boost in the 60-80Hz region with a “Q” of 1 or 2 is suggested. The “Q” adjusts the bandwidth of frequencies
that are boosted or cut. For more information, read the owner’s manual for the amplifier.
Wiring Conversion from -44 to -22
The T9922-22 requires only one TE4001D amplifier to operate correctly, while the T9922-44 requirers
two TE4001D amplifiers. If you are converting your woofer from a dual 4 Ohm (T9922-44RCK) to a dual 2
Ohm (T9922-22RCK) you will need to wire the coils in a parallel configuration (1 Ohm impedance) before
connecting to one TE4001D amplifier. The other option is to connect the woofer in series (4 Ohm impedance)
to two TE4001D strapped amplifiers.
CA
P+ +
BATT
REM
-GN
D CA
P-
1/0 AWG
1/0 AWG
16 AWG
4 AWG
4 AWG
Amplifier shown operating at 1 Ohm driving both
JackHammer voice coils which are wired in parallel.
Amplifier’s main
power terminals
Woofer Terminal Connection
(1 ohm connection)
Minimum 8awg
Speaker wire
8 AWG