Wiring options, Mounting – MTX Audio JackHammer 22 4000W RMS Dual 2 Ohm SuperWoofer User Manual
Page 4
mtx.com
WIRING OPTIONS
Often overlooked, the installation components used to connect the entire system need to match the maximum
capability of the system or you will lose performance. MTX Audio recommends using StreetWires 4 AWG
cable as the speaker wire.
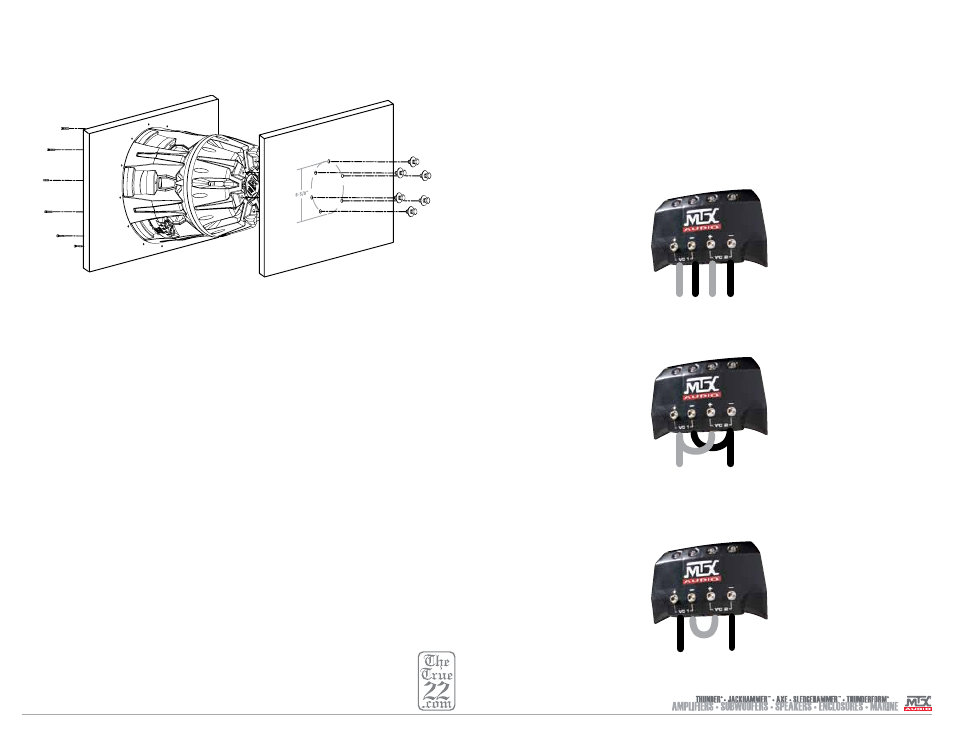
Dual Voice Coil Wiring
The JackHammer Superwoofer is available in a dual 2 Ohm (T9922-22) voice coil configuration. The voice
coils are labeled VC1 and VC2.
Note: Both voice coils should always be connected.
Independent Voice Coil Connection Configuration
This connection is ideal when using two large mono block amplifiers per voice coil.
Parallel Configuration
Wiring the voice coils in a parallel configuration will have a total final load of 1 Ohm. Connect each of the dual
voice coil’s positive terminals together so that they share the same source (amplifier). Do the same for the
negative terminals. This connection is ideal when using a large 1 Ohm stable amplifier.
Note: The wiring of the dual voice coils will affect impedance for the amplifier system. Care must be taken
to assure that the resulting impedance does not exceed the amplifier’s requirements.
Series Configuration
Wiring the voice coils in a series configuration will have a total final load of 4 Ohms.
MOUNTING
Mounting the JackHammer is nothing that can be taken lightly, quite literally. You need to follow the steps
below carefully and have all the necessary equipment. You will need to be able to lift the nearly 370 lbs.
subwoofer comfortably. MTX Audio recommends a fork lift for safe installation.
The woofer is designed to distribute its weight evenly throughout the entire structure. This is accomplished by
including rear motor mounts with
5
⁄
8
"-11 bolts so it is mounted from both the front and the back. It is important
that both these sides are mounted properly to ensure proper weight distribution. The drawing above shows
the rear mounting hole detail for the back support. The holes are located on an 8
5
⁄
8
" bolt circle, meaning the
holes are located on a radius of 4
5
⁄
16
" from the center point. Use the pallet from the JackHammer packaging
to make a mounting template if needed. For the recommended 1" baffle, the bolts needed should be
5
⁄
8
"-11
threaded bolts 1
3
⁄
4
" long. Washers should be used with the
5
⁄
8
"-11 bolts to be sure there will be no air leaks
around the bolts.
Note: MTX Audio also recommends making the back of the enclosure removable to replace the woofer
cone if ever needed. This would make it possible to replace the cone assembly without removing the
woofer.
In the gasket of the woofer, there are four eyelet rings. Make sure they are screwed in securely and then
attach a chain between them for lifting. Use one tine of the fork lift to lift the JackHammer with the chain then
slowly lower it into the enclosure. Unscrew the eyelets and align the woofer with the front and rear mounting
holes, and then fasten it using the screws and bolts provided. Remember to pre-drill the screw holes using a
5
⁄
32
" drill bit. Then, lift the enclosure, complete with JackHammer, into the back of the vehicle.
Note: This unit is EXTREMELY heavy! Make sure everyone is clear and out of the way in case something
should break or fall!
Note: MTX Audio is not responsible for damages occurred during installation. For custom installation help
or answers to further questions, please call 1-800-CALL-MTX.