Mayline CSII Tilt Top Return User Manual
Page 4
(4)
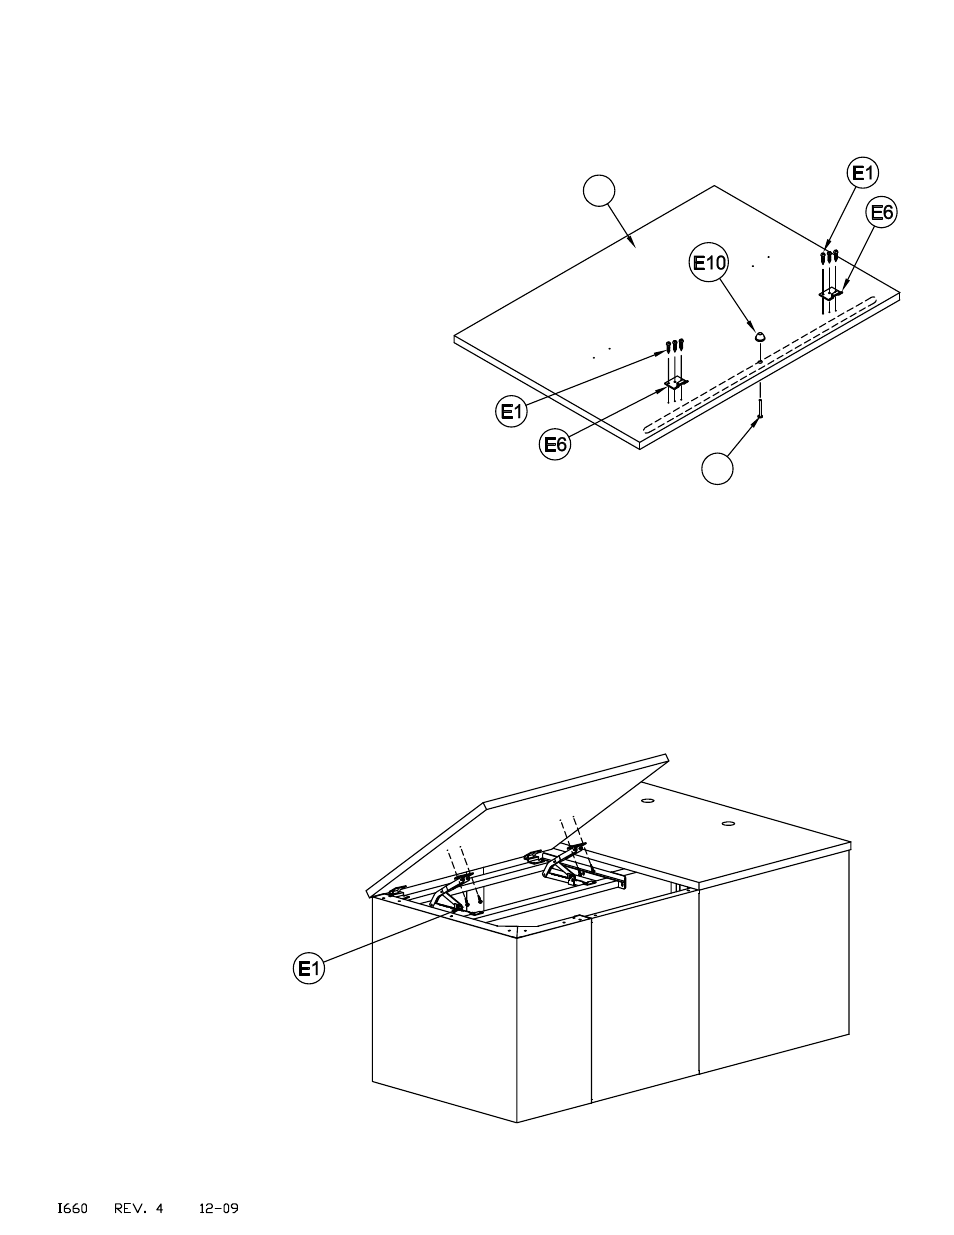
12. Place the Work Surface (1) face down onto a clean surface.
Position the Upper Hinge (E6) with the hinge tab toward the
bottom edge. Secure with six #10 X 3/4 Screws (E1).
13. With the Pencil Stop (5) removed, insert the Rivet (E9) into
the center hole in the groove. Position it with the Rivet head in
the groove and place the Push Nut (E10) on the end of the Rivet
that protrudes beyond the bottom surface.
1
E9
14. To mount the Work Surface to the base, insert the tabs
of the Upper Hinges into the slots of the Lower Hinges
mounted on the Frame Assembly. Raise the Lift Hinges
until the mounting plate holes are aligned with the pre-drilled
holes in the Work Surface and secure in place with four #10
X 3/4 Screws (E1).
15. Apply Rubber Bumpers (E8) near the end of the Frame
Assembly, farthest from the Hinges.
16. Place the Pencil Stop (5) into the
Work Surface groove.
- 5 Shelf Bookcase Aberdeen Series (5 pages)
- Bowfront Desk Aberdeen Series (3 pages)
- Contour Bridge Aberdeen Series (3 pages)
- Conference Front Desk Aberdeen Series (3 pages)
- Credenza Aberdeen Series (3 pages)
- Desk Mount Hutch - Glass Doors Aberdeen Series (5 pages)
- Desk Mount Hutch - Wood Doors Aberdeen Series (5 pages)
- Desk-Mounted 20" 4-drawer Pedestal Aberdeen Series (2 pages)
- Extended Corner, Left Aberdeen Series (3 pages)
- Extended Corner, Right Aberdeen Series (3 pages)
- Peninsula Return 60 x 30 Aberdeen Series (3 pages)
- Peninsula Return 72 x 36 Aberdeen Series (4 pages)
- Return Aberdeen Series (4 pages)
- Straight Front Desk Aberdeen Series (3 pages)
- Suspended Pedestal for Credenza - 20" Aberdeen Series (4 pages)
- Suspended Pedestal for Desk - 26" Aberdeen Series (4 pages)
- Reception Counter Aberdeen Series (3 pages)
- Reception Return Screen Aberdeen Series (3 pages)
- 2 Shelf Bookcase Aberdeen Series (5 pages)
- 3 Shelf Bookcase Aberdeen Series (5 pages)
- Boat-Shaped Table – 72" x 36 Boat Aberdeen Series" (3 pages)
- Boat-Shaped Table – 96" x 48 Boat Aberdeen Series" (3 pages)
- Boat-Shaped Table – 120" x 48 Boat Aberdeen Series" (4 pages)
- Boat-Shaped Table – 144" x 48 Boat Aberdeen Series" (4 pages)
- Boat-Shaped Table -- 216" x 48 Boat Aberdeen Series" (5 pages)
- Presentation Cabinet Aberdeen Series (3 pages)
- Bowfront Desk Corsica Series (3 pages)
- Bridge Return Corsica Series (3 pages)
- Center Drawer Corsica Series (2 pages)
- Credenza Corsica Series (4 pages)
- Lateral File Corsica Series (3 pages)
- Pedestal for Credenza - BBF Corsica Series (2 pages)
- Pedestal for Credenza - FF Corsica Series (2 pages)
- Pedestal for Desk - BBF Corsica Series (2 pages)
- Pedestal for Desk - FF Corsica Series (2 pages)
- Peninsula Desk Corsica Series (2 pages)
- Return, Left Corsica Series (4 pages)
- Return, Right Corsica Series (4 pages)
- Straight Front Desk Corsica Series (3 pages)
- 72" Conference Table Corsica Series (3 pages)
- 84"/96 Conference Table Corsica Series" (3 pages)
- 120" Conference Table Corsica Series (4 pages)
- Presentation Board Corsica Series (3 pages)
- Round Table Corsica Series (3 pages)
- Top, Modesty Panel, and Base Leg - Adder Corsica Series (5 pages)