Mayline E-Series User Manual
Page 4
(4)
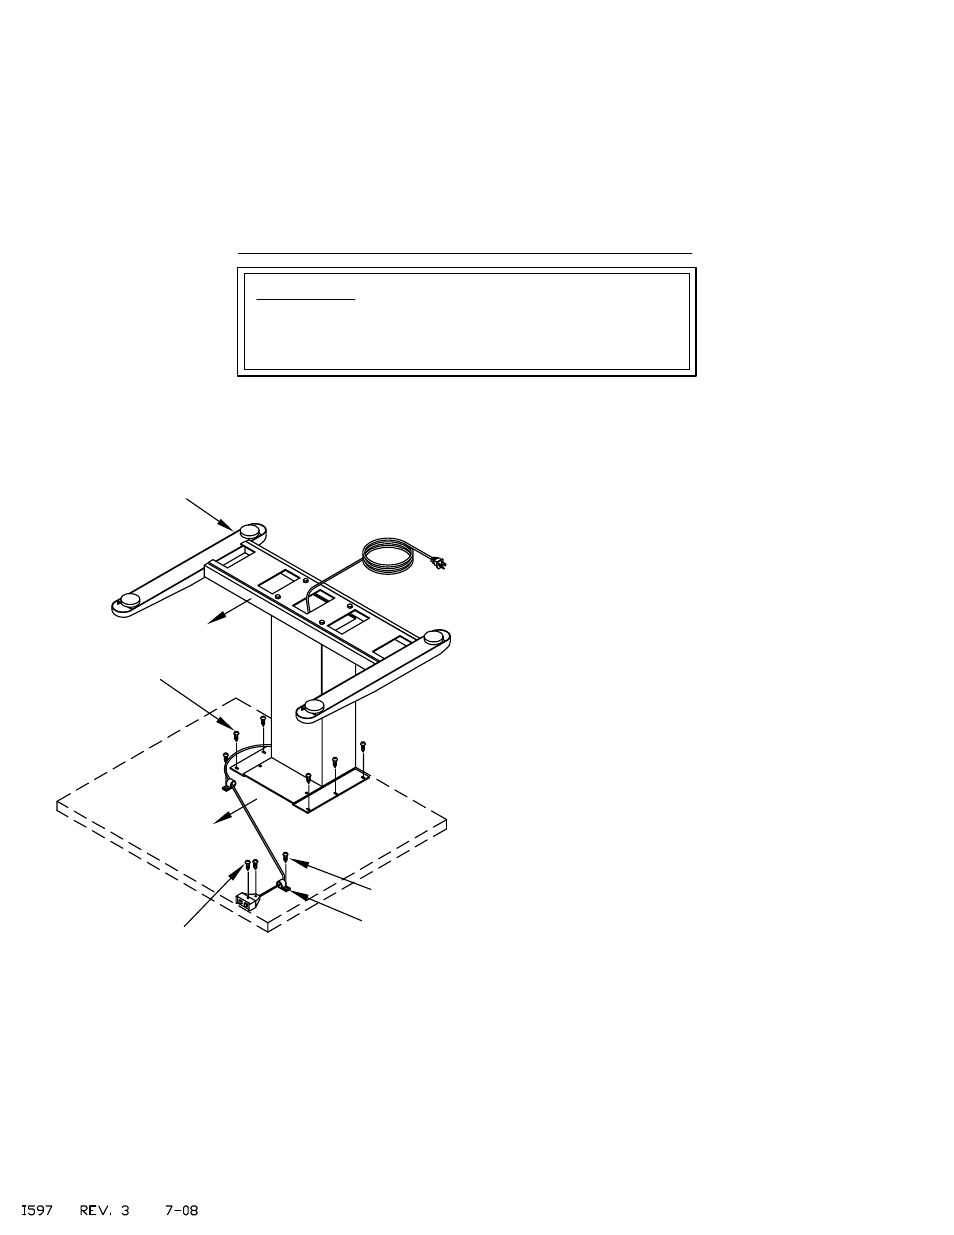
WORK SURFACE INSTALLATION PROCEDURE
Assembled
Power Base
Screws Provided
with Control
Screw (E9)
FRONT
FRONT
NOTE:
#10 X 3/4" Screws (E9) are provided for clamp
installation only.
#10 x 1" Screws (E10) are provided for Work
Surface attachment only.
1. Place work surface face down, onto a protected
surface.
2. Invert the Power Base so the Top Plate is down.
Position the front of the Power Base toward the front
of the work surface. Secure the Base using six #10
x 1" Screws (E10).
3. Place Hand control in desired location along front
edge. Attach using screws provided with the control.
4. Various size clamps are provided to secure
excess cable to the work surface. Position Clamps
(E6 - E7 - E8) as needed and secure with #10 X 3/4"
Screws (E9).
5. Turn the completed unit to an upright postion.
Clamp (E6)
Screw (E10)
ATTENTION:
MAYLINE includes screws for the installation of a Work
Surface with a minimal thickness of 1 inch (25.4mm).
- 5 Shelf Bookcase Aberdeen Series (5 pages)
- Bowfront Desk Aberdeen Series (3 pages)
- Contour Bridge Aberdeen Series (3 pages)
- Conference Front Desk Aberdeen Series (3 pages)
- Credenza Aberdeen Series (3 pages)
- Desk Mount Hutch - Glass Doors Aberdeen Series (5 pages)
- Desk Mount Hutch - Wood Doors Aberdeen Series (5 pages)
- Desk-Mounted 20" 4-drawer Pedestal Aberdeen Series (2 pages)
- Extended Corner, Left Aberdeen Series (3 pages)
- Extended Corner, Right Aberdeen Series (3 pages)
- Peninsula Return 60 x 30 Aberdeen Series (3 pages)
- Peninsula Return 72 x 36 Aberdeen Series (4 pages)
- Return Aberdeen Series (4 pages)
- Straight Front Desk Aberdeen Series (3 pages)
- Suspended Pedestal for Credenza - 20" Aberdeen Series (4 pages)
- Suspended Pedestal for Desk - 26" Aberdeen Series (4 pages)
- Reception Counter Aberdeen Series (3 pages)
- Reception Return Screen Aberdeen Series (3 pages)
- 2 Shelf Bookcase Aberdeen Series (5 pages)
- 3 Shelf Bookcase Aberdeen Series (5 pages)
- Boat-Shaped Table – 72" x 36 Boat Aberdeen Series" (3 pages)
- Boat-Shaped Table – 96" x 48 Boat Aberdeen Series" (3 pages)
- Boat-Shaped Table – 120" x 48 Boat Aberdeen Series" (4 pages)
- Boat-Shaped Table – 144" x 48 Boat Aberdeen Series" (4 pages)
- Boat-Shaped Table -- 216" x 48 Boat Aberdeen Series" (5 pages)
- Presentation Cabinet Aberdeen Series (3 pages)
- Bowfront Desk Corsica Series (3 pages)
- Bridge Return Corsica Series (3 pages)
- Center Drawer Corsica Series (2 pages)
- Credenza Corsica Series (4 pages)
- Lateral File Corsica Series (3 pages)
- Pedestal for Credenza - BBF Corsica Series (2 pages)
- Pedestal for Credenza - FF Corsica Series (2 pages)
- Pedestal for Desk - BBF Corsica Series (2 pages)
- Pedestal for Desk - FF Corsica Series (2 pages)
- Peninsula Desk Corsica Series (2 pages)
- Return, Left Corsica Series (4 pages)
- Return, Right Corsica Series (4 pages)
- Straight Front Desk Corsica Series (3 pages)
- 72" Conference Table Corsica Series (3 pages)
- 84"/96 Conference Table Corsica Series" (3 pages)
- 120" Conference Table Corsica Series (4 pages)
- Presentation Board Corsica Series (3 pages)
- Round Table Corsica Series (3 pages)
- Top, Modesty Panel, and Base Leg - Adder Corsica Series (5 pages)