Assembly instructions: optional drawers – Mayline Ranger 4-post Table User Manual
Page 2
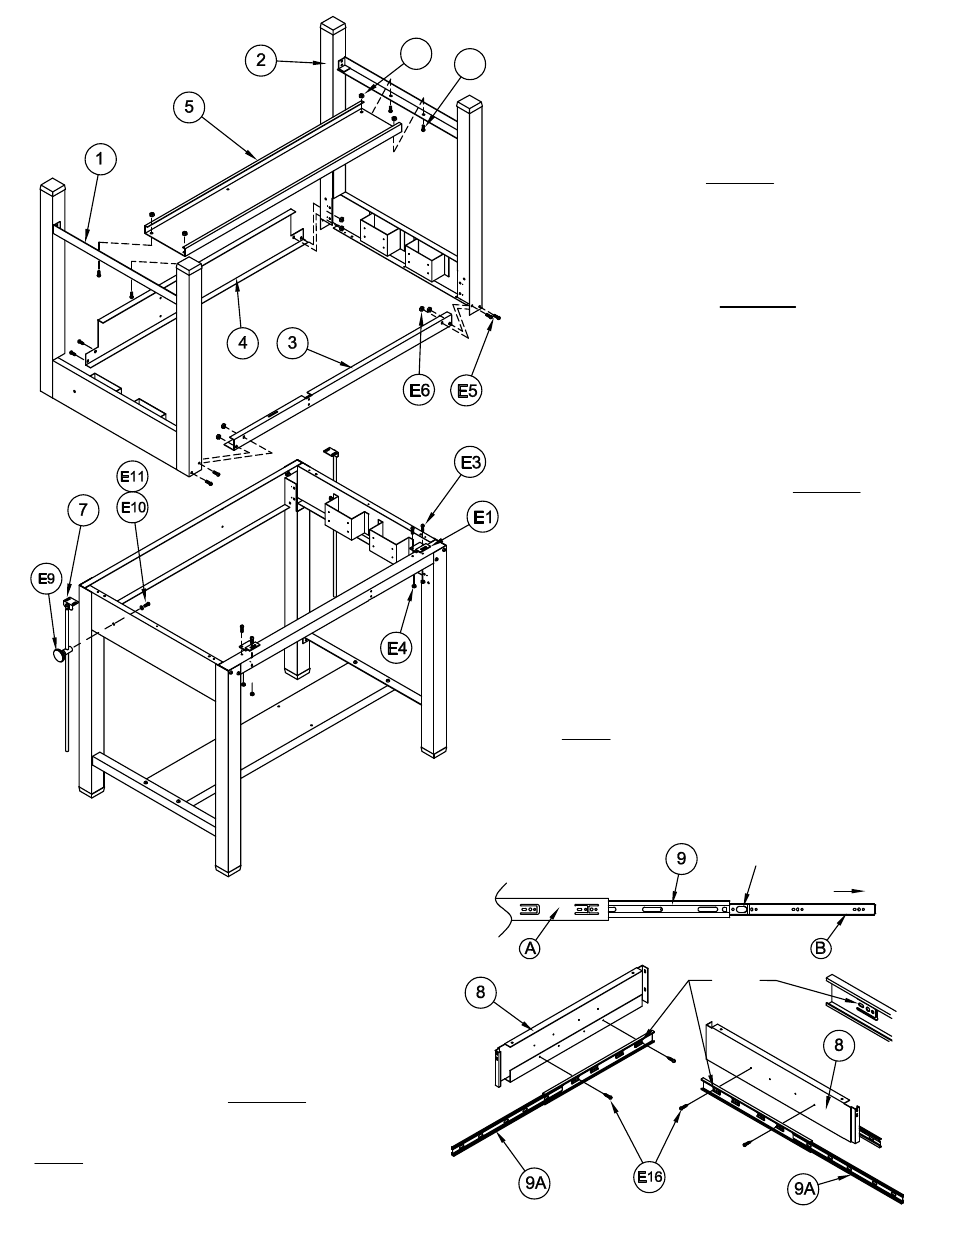
1. Place the two End Assemblies (1 & 2)
upside down. Position the Front Rail (3)
with the larger of the two flanges toward the
floor. Position the Rear Rail (4) with the
Dust Cover attachment holes toward the
floor. Secure these Rails to the End
Assemblies with two Screws (E5) and two
Nuts (E6) per leg. DO NOT tighten screws
at this time.
2. Position the Foot Rail (5) with flat
surface toward the floor. Attach the Foot
Rail to the End Assemblies with four Screws
(E5) and Nuts (E6). TIGHTEN all screws
from steps 1 & 2 now.
3. Turn assembled table to an upright
position. MAYLINE recommends that two
people perform this task.
4. Fasten one Tilt Rod Guide (E12) to each
side of the table using one Bolt (E11) and
one Washer (E10) per guide. DO NOT
tighten completely.
5. Insert Tilt Rod Assembly (7) through hole
in Guide and tighten in place with Plastic
Knob (E9).
6. Position the Lower Hinge (E1) with the
slot hanging beyond the front of the table.
Align the holes and attach with Screws (E3)
and Hex Nuts (E4). Tighten these screws.
NOTE: If your product is not equipped with
the OPTIONAL Drawers proceed to the
final page of this Instruction Sheet for Top
Installation.
1. Separate the Drawer Slides (9) into two pieces.
Extend the Slide to the full extension. Remove the
smaller portion (9B) by pressing the plastic release
and pulling.
2. Attach the large Slide portion (9A) to the Center
Support (8) using two Screws (E16). Begin attaching
the Slide using the large ' Horizontal' slot in the last
mounting tab.
NOTE: If you are installing the Optional Shallow
Drawer, repeat step #2 on the opposite side of the
Center Support.
SHALLOW
DRAWER
SLIDE
TOOL
DRAWER
SLIDE
ASSEMBLY INSTRUCTIONS:
OPTIONAL DRAWERS
Begin
"HERE"
"PRESS"
PULL
E5
E6
(2)