Mayline SRF3871 User Manual
Page 4
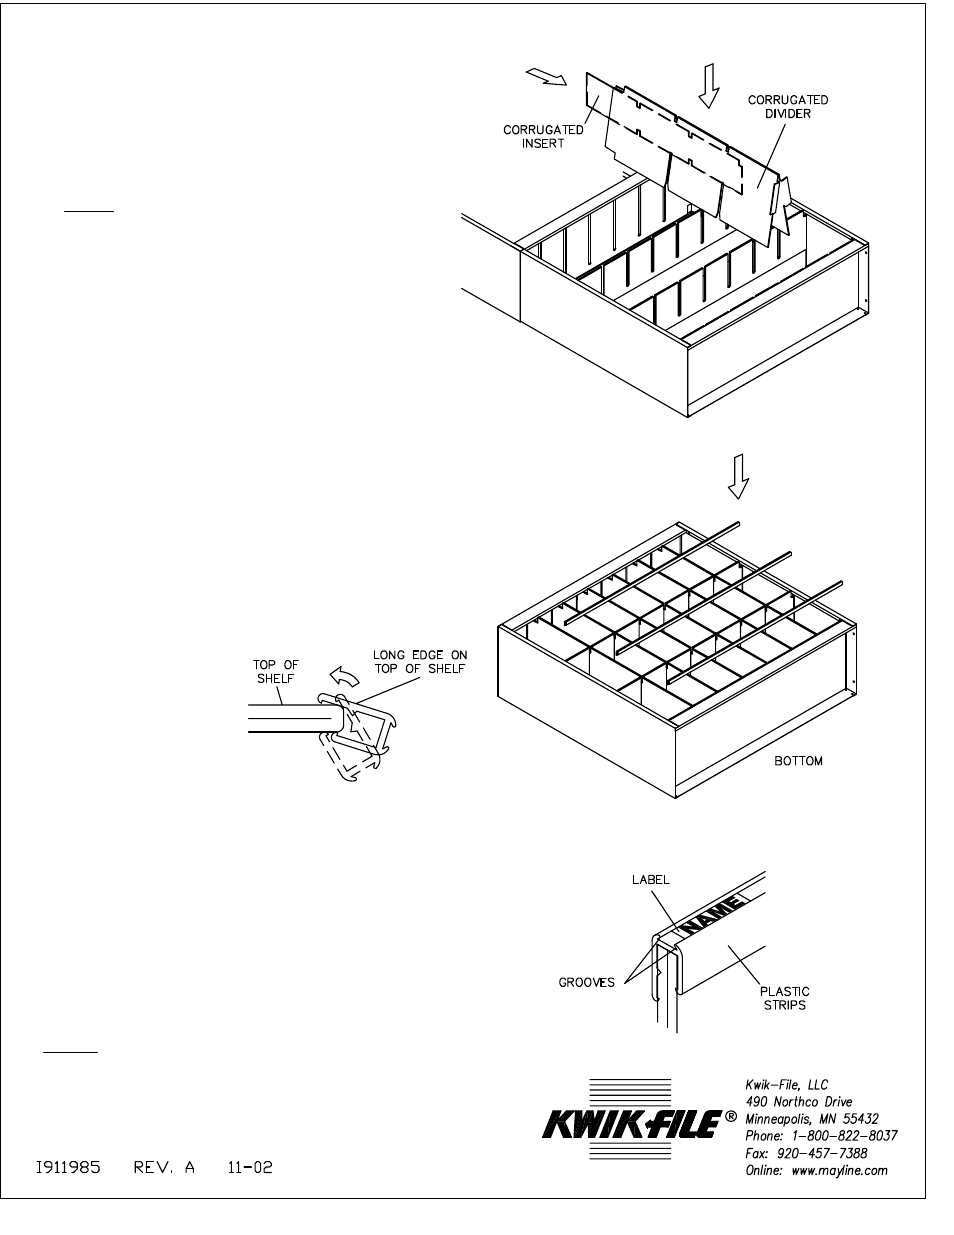
8. Place a corrugated insert ( with notch at the
bottom front) into a corrugated divider. Fold small
flaps at bottom of divider outwards. Now install
corrugated divider, making sure the folded flaps
fit under bottom shelf in each level, and top of
divider fits into slots in header panel. Finally,
press divider down firmly until flush with shelves.
Repeat with remaining five dividers and inserts in
upper level; then install 6 dividers and inserts in
lower level.
9. Install plastic strips on front edge of each shelf,
with the short edge of the plastic strip under the
bottom, and the longer edge over the shelf top.
Roll each strip onto the shelf edge and press
firmly into place. Repeat for all shelves.
10. The grooves in the front of each plastic strip
hold the paper labels provided. Separate each
label along the perforations; then insert in the
bottom groove, and push the label into place,
tucking the top of label into the top groove with
your fingernail. (Labels can be created using a
PC and printer or typewriter as desired, but
before separating.)
- 5 Shelf Bookcase Aberdeen Series (5 pages)
- Bowfront Desk Aberdeen Series (3 pages)
- Contour Bridge Aberdeen Series (3 pages)
- Conference Front Desk Aberdeen Series (3 pages)
- Credenza Aberdeen Series (3 pages)
- Desk Mount Hutch - Glass Doors Aberdeen Series (5 pages)
- Desk Mount Hutch - Wood Doors Aberdeen Series (5 pages)
- Desk-Mounted 20" 4-drawer Pedestal Aberdeen Series (2 pages)
- Extended Corner, Left Aberdeen Series (3 pages)
- Extended Corner, Right Aberdeen Series (3 pages)
- Peninsula Return 60 x 30 Aberdeen Series (3 pages)
- Peninsula Return 72 x 36 Aberdeen Series (4 pages)
- Return Aberdeen Series (4 pages)
- Straight Front Desk Aberdeen Series (3 pages)
- Suspended Pedestal for Credenza - 20" Aberdeen Series (4 pages)
- Suspended Pedestal for Desk - 26" Aberdeen Series (4 pages)
- Reception Counter Aberdeen Series (3 pages)
- Reception Return Screen Aberdeen Series (3 pages)
- 2 Shelf Bookcase Aberdeen Series (5 pages)
- 3 Shelf Bookcase Aberdeen Series (5 pages)
- Boat-Shaped Table – 72" x 36 Boat Aberdeen Series" (3 pages)
- Boat-Shaped Table – 96" x 48 Boat Aberdeen Series" (3 pages)
- Boat-Shaped Table – 120" x 48 Boat Aberdeen Series" (4 pages)
- Boat-Shaped Table – 144" x 48 Boat Aberdeen Series" (4 pages)
- Boat-Shaped Table -- 216" x 48 Boat Aberdeen Series" (5 pages)
- Presentation Cabinet Aberdeen Series (3 pages)
- Bowfront Desk Corsica Series (3 pages)
- Bridge Return Corsica Series (3 pages)
- Center Drawer Corsica Series (2 pages)
- Credenza Corsica Series (4 pages)
- Lateral File Corsica Series (3 pages)
- Pedestal for Credenza - BBF Corsica Series (2 pages)
- Pedestal for Credenza - FF Corsica Series (2 pages)
- Pedestal for Desk - BBF Corsica Series (2 pages)
- Pedestal for Desk - FF Corsica Series (2 pages)
- Peninsula Desk Corsica Series (2 pages)
- Return, Left Corsica Series (4 pages)
- Return, Right Corsica Series (4 pages)
- Straight Front Desk Corsica Series (3 pages)
- 72" Conference Table Corsica Series (3 pages)
- 84"/96 Conference Table Corsica Series" (3 pages)
- 120" Conference Table Corsica Series (4 pages)
- Presentation Board Corsica Series (3 pages)
- Round Table Corsica Series (3 pages)
- Top, Modesty Panel, and Base Leg - Adder Corsica Series (5 pages)