Ride on, Bahn right ignition cover for victory —chrome, Installation – Kuryakyn 7637 BAHN RIGHT IGNITION COVER for VICTORY — CHROME User Manual
Page 2
PAGE
2
NOTE:
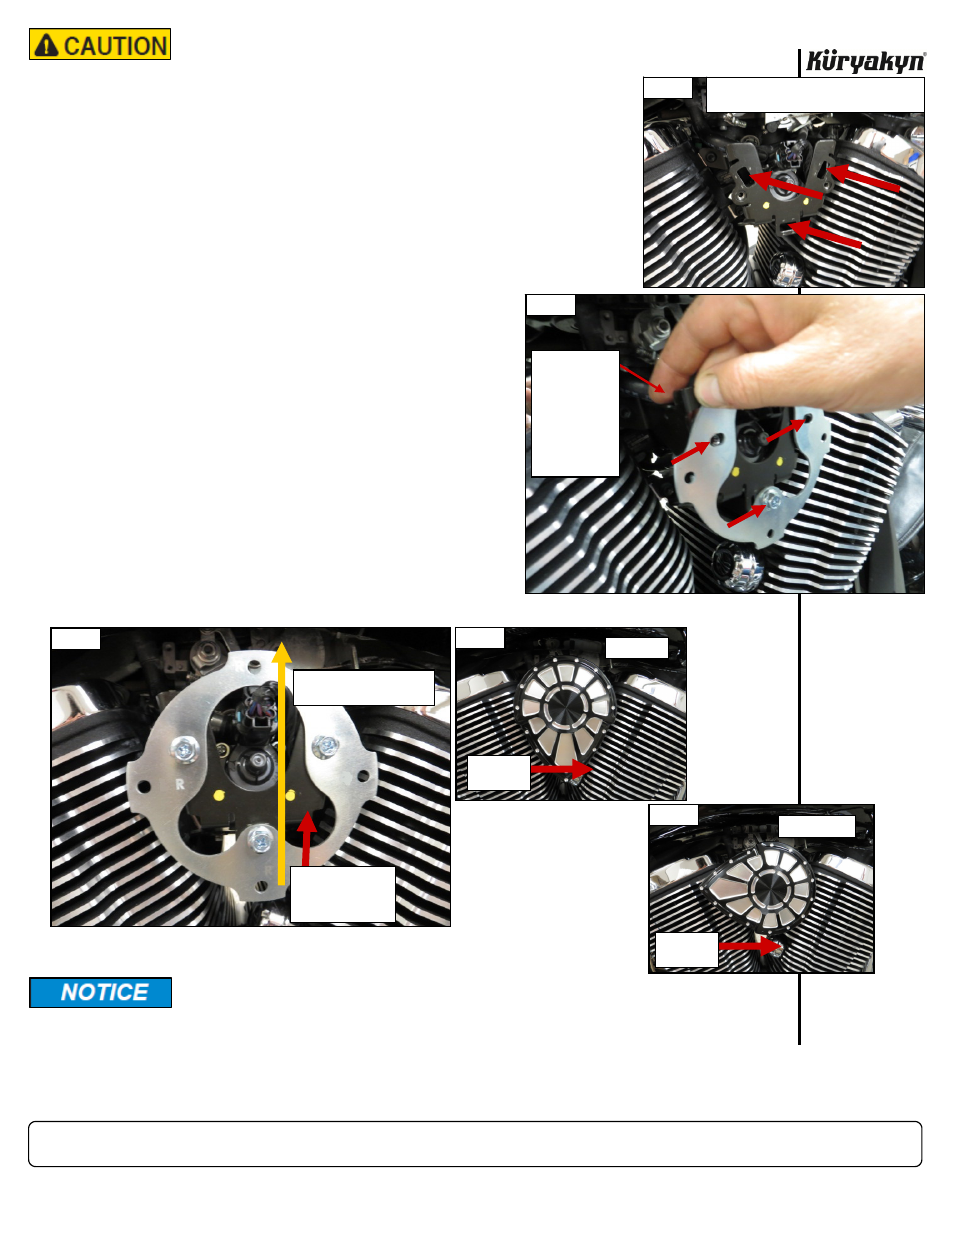
Refer to PIC 2. The three red arrows show the three slots
used to mount the new Mounting bracket.
STEP 3
Position the included Mounting bracket as shown in PIC 3.
STEP 4
Hold one of the included M6 serrated nuts against the backside of the IAC
bracket as shown in PIC 3. Insert one of the included M6 serrated flange
screws through one of the Mounting bracket slots, the IAC bracket and into
the nut. Thread the screw into the nut. Leave the hardware loose for now.
STEP 5
Refer
to
PIC 3. Repeat
STEP 4
for the other two slots.
STEP 6
Refer
to
PIC 4. Pushing up on the Mounting bracket, fully
tighten the screws. Ensure the mounting holes are aligned
vertically.
STEP 7
Refer to PIC 4. Insert the remaining three M6 screws
through the holes marked “
R
” on the Mounting bracket
itself.
NOTE:
Refer to PIC 5 and 6. The Right-Side
Ignition Cover can be mounted either
vertically or horizontally.
STEP 8
Refer
to
PIC 5 or 6. Hold the Cover up to the Mounting
bracket in the desired position.
STEP 9
Thread the three screws into the threaded bosses on the
backside of the Cover. Leave them loose until all three
have started in their threads, then tighten fully.
BAHN RIGHT IGNITION COVER for VICTORY —CHROME
INSTALLATION
It is the end user’s responsibility to ensure that all of the fasteners
(including pre-assembled) are tightened before operation of the motorcy-
cle. Küryakyn will not issue a warranty on components lost due to improper
installation. Periodic maintenance may be required.
Working around the sharp edges of the cylinder-head
fins exposes your hands to injury. Wear protective gloves
to prevent serious injury.
Ride On!
PIC 5
FRONT OF
BIKE
VERTICAL
PIC 6
FRONT OF
BIKE
HORIZONTAL
PIC 2
PICTURE SHOWS THE SLOTS USED TO
MOUNT THE NEW BRACKET
HOLD A NUT
AGAINST THE
BACKSIDE OF
THE IAC
BRACKET.
INSERT A
SCREW
THROUGH THE
BRACKETS AND
INTO THE NUT
PIC 3
PIC 4
R
R
R
PUSH UP ON THE
BRACKET AND
THEN TIGHTEN THE
SCREWS
ENSURE MOUNTING HOLES
ARE ALIGNED VERTICALLY