Ride on, Retractable passenger pegs, Installation – Kuryakyn 4388 RETRACTABLE PASSENGER PEGS User Manual
Page 2
PAGE
2
YOU WILL BE WORKING AROUND THE ENGINE AND EXHAUST SYSTEM
DURING INSTALLATION. ENSURE THAT THE ENGINE AND
EXHAUST SYSTEM HAVE FULLY COOLED TO PREVENT INJURY.
STEP 2
Remove the stock passenger peg from the peg mount. The hardware will be reused
.
STEP 3
Install the model specific splined peg adapter (sold separately) in place and secure
using the stock passenger peg hardware.
STEP 4
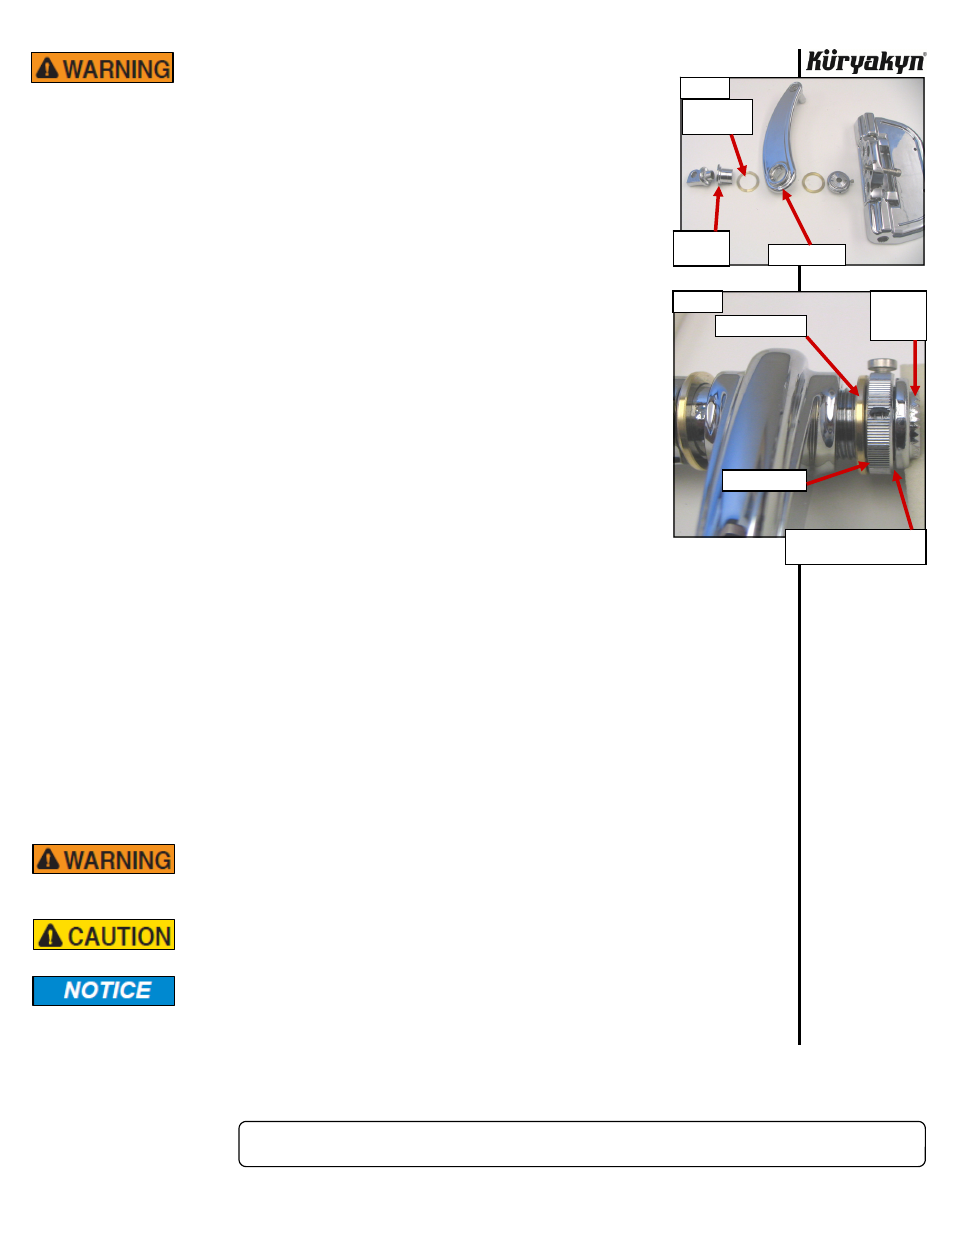
As shown in PIC 1, locate the splined mount, one brass bushing and the swing arm.
STEP 5
Slide the brass bushing over the splined mount. With the swingarm and splined
mount together, the splined mount will act as a stop for the swingarm. Make sure
that you adjust the splined mount so that the arm moves and stops as desired.
Hold this assembly in place on the splined peg adapter installed in Step 3.
STEP 6
As shown in PIC 2, thread the knurled nut on to the new splined board mounts.
Slide the brass bushing on to the splined board mount after the knurled nut.
STEP 7
Mate the splined mount of the floorboard with the splined mount assembly from
Step 4. Insert the 5/16-18 x 2" Socket Head Cap Screw through the floorboard
(purchased separately) and into the splined assembly to hold it in place.
NOTE:
If using Kuryakyn Premium, P/N 4351 or Ribbed Floorboards, P/N 4357,
you will use the included 5/16”-18 X 2-3/8” Socket Head Cap Screws to
attach the boards to the mount.
Loosely thread the floorboard and splined mount assembly to the adjustable
passenger peg mount. Make sure the knurled nut is against the collar of the
splined board adapter. PIC 2
STEP 8
Adjust the floorboard as desired and tighten the 5/16-18 x 2" Socket Head Cap Screw. Test for
clearance around the swing arm and mount. Move arm forward and back completely.
STEP 9
Adjust the tension of the swing arm by loosening the socket head bolt and rotating the knurled
nut. Rotating toward the arm will provide more friction. When adjusted as desired, tighten the
socket head bolt and test the peg arm for desired tension again.
NOTE:
There are two holes in the knurled nut. If you can not get the knurled nut tight enough,
insert a small screwdriver or hex wrench in to these holes and rotate to aid in
tightening
the
knurled
nut.
STEP 10
Mount the Trident peg to the swing arm using the hardware included with the peg. Tighten the
bolt
securely.
STEP 11
Tighten all hardware securely and check for proper function. Test that no contact is made between
the swing arms and components on the motorcycle.
THE FOLDING ARM IS INTENDED AS A FOOTREST AND IS NOT INTENDED
TO BE USED FOR MOUNTING OR DISMOUNTING THE MOTORCYCLE OR TO
SUPPORT THE FULL WEIGHT OF THE PASSENGER.
Ensure that the installation of this product does not interfere with the
proper operation of the motorcycle before riding.
It is the installer’s responsibility to ensure that all of the fasteners (including
pre-assembled) are tightened before operation of the motorcycle. Küryakyn will
not provide warranty coverage on products or components lost due to improper
installation or lack of maintenance. Periodic inspection and maintenance are
required on all fasteners.
Ride On!
RETRACTABLE PASSENGER PEGS
INSTALLATION
PIC 1
SPLINED
MOUNT
BRASS
BUSHING
SWING ARM
PIC 2
BRASS BUSHING
KNURLED NUT
SPLINED
BOARD
MOUNT
THREAD KNURLED
NUT UP TO COLLAR