Ride on, Ergo ii/mini arms/switchblade pegs, Installation – Kuryakyn 4074 ERGO II/MINI ARMS with SWITCHBLADE PEGS User Manual
Page 3
PAGE
3
ADJUST POSITION OF MINI ARM AND SWITCHBLADE PEGS
STEP 13
Adjust for Longer or Shorter Inseam Lengths:
•
Loosen the 1/2-13 Button Head Fastener securing the Mini
Arm to the mount. Pull the Mini Arm out of the interlocking
cogs.
•
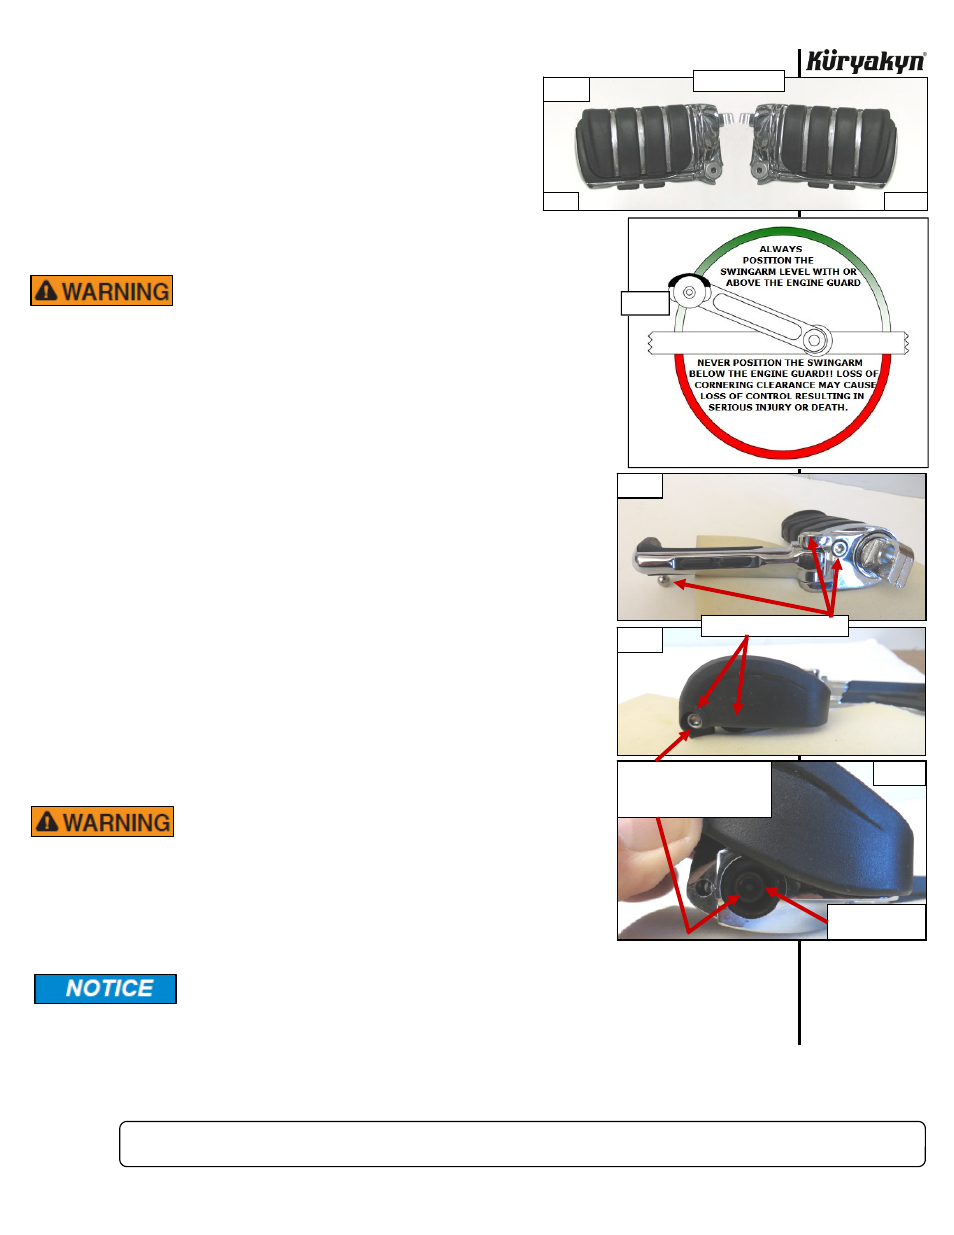
Rotate the Mini Arm to the desired position then push the
Mini Arm back into the interlocking cogs; be sure the Mini
Arm is either level with the engine guard, or above the
engine guard. NEVER position the Mini Arm below the engine
guard! FIG 1 Tighten the 1/2”-13 fastener securely.
IT IS THE INSTALLERS RESPONSIBILITY TO ENSURE
THERE IS SUFFICIENT CORNERING CLEARANCE
BEFORE RIDING. ALWAYS POSITION THE MINI ARM
EITHER LEVEL WITH, OR ABOVE THE ENGINE GUARD.
POSITIONING THE MINI ARM BELOW THE ENGINE
GUARD WILL GREATLY DECREASE CORNERING
CLEARANCE WHICH MAY CAUSE LOSS OF CONTROL
RESULTING IN SERIOUS INJURY OR DEATH.
STEP 14
Adjust the Clevis Angle:
• Loosen the 1/2”-13 Hex Head Fastener securing the Mini Arm to the
clevis. Pull outward on the clevis and Switchblade Peg to clear the roll
pins.
•
Rotate the clevis and Switchblade Peg assembly to the desired angle
then push the assembly back into the Mini Arm, making sure the roll
pins in the clevis line up with the holes on the Mini Arm, and re-tighten
the fasteners securely.
NOTE:
Ensure that all of the fasteners on both pegs are tight before
operating the motorcycle. PIC 8, PIC 9, PIC 10
STEP 15
Adjust the Peg Angle:
Using a hex wrench, remove the socket head cap screw that retains the
end rubber pad. PIC 9 Gently raise the pad (PIC 10) and insert a hex
wrench and tighten the 5/16”-18 socket head cap screw located inside
the large hole on the end of the peg. PIC 10 The male mount will seat
itself into the peg and keep it from rotating.
If the swing arm feels loose,
adjust the detent spring tension using the set screw on the underside of
the swing arm.
CHECK TO MAKE SURE THAT THERE IS PROPER
GROUND CLEARANCE WITH AND WITHOUT THE
FOLDING ARM EXTENDED WHEN CORNERING. LOSS
OF CONTROL OF THE MOTORCYCLE AND SERIOUS
INJURY MAY OCCUR IF THE SWITCHBLADE PEG IS
NOT POSITIONED PROPERLY. REPOSITION THE
SWITCHBLADE PEG IF NECESSARY SO THAT THERE IS
ADEQUATE CORNERING CLEARANCE.
It is the installer’s responsibility to ensure that all of the fasteners (including
pre-assembled) are tightened before operation of the motorcycle. Küryakyn will
not provide warranty coverage on products or components lost due to improper
installation or lack of maintenance. Periodic inspection and maintenance are
required on all fasteners.
Ride On!
ERGO II/MINI ARMS/SWITCHBLADE PEGS
INSTALLATION
FIG 1
PIC 7
LEFT
RIGHT
FRONT OF BIKE
PIC 9
PIC 8
TIGHTEN THESE FASTENERS
REMOVE THIS FASTENER AND
RAISE RUBBER PAD TO
TIGHTEN MAIN FASTENER
THIS FASTENER
PIC 10
5/16”-18 SOCKET
HEAD CAP SCREW