Ride on, License plate frame rear panel accent, Bike prep – Kuryakyn 3139 LICENSE PLATE FRAME REAR PANEL ACCENT User Manual
Page 2: Install the new frame, Installation
PAGE
2
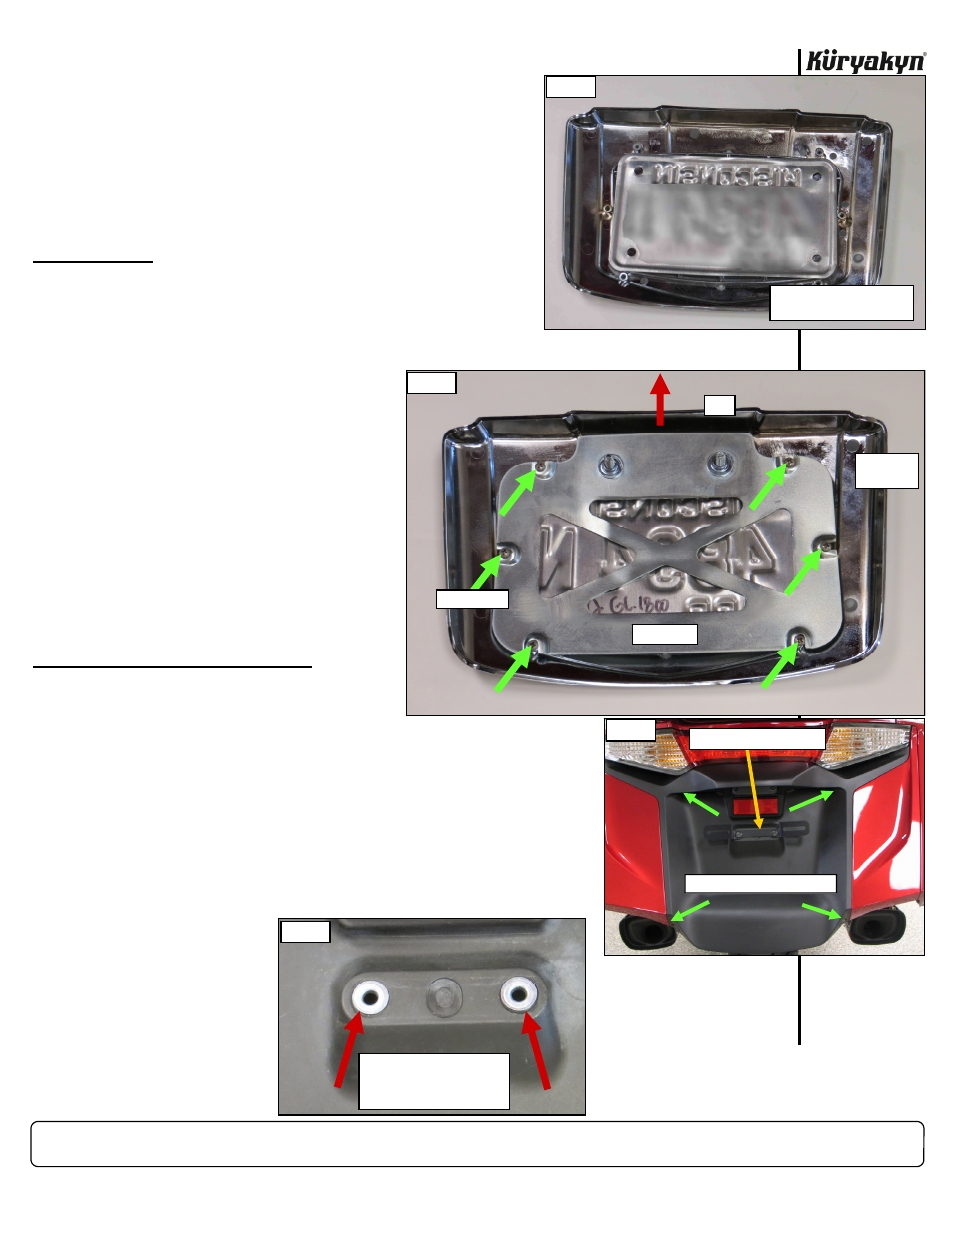
STEP 4
Refer
to
PIC 1. Position the license plate in the License Plate Frame
STEP 5
Refer
to
PIC 2. Secure the plate and Weldment to the Frame
with the six (6) included screws; DO NOT OVER TIGHTEN
THE SCREWS!
NOTE:
If necessary, install the included Foam Pad
between the Weldment and license plate to
reduce vibration/rattling of thinner plates.
BIKE PREP:
STEP 6
Refer to PIC 3. Remove the four screws securing the rear
fender panel to the bike; save the screws for reinstallation.
STEP 7
Gently, remove the panel, then discon-
nect the connector.
STEP 8
Remove the two nuts and washers from
the backside of the panel; save the nuts
and washers for later use.
STEP 9
Remove the existing license plate
bracket; it will not be reused.
NOTE:
Refer to PIC 4. Ensure
that the top hat washers
remain in their holes as
the existing bracket is
removed.
INSTALL THE NEW FRAME:
STEP 10
Insert the threaded studs on the new
Frame assembly through the holes in
the panel; secure the Frame to the
panel with the nuts and washers from
STEP 8
; leave the nuts snug
for now to allow for adjustment.
STEP 11
Align the Frame on the panel, then tighten the nuts.
STEP 12
Reconnect the connector; turn IGN ON and check for proper operation
of the license plate light. Reinstall the rear fender panel.
STEP 13
Ensure proper operation of ALL rear end lighting BEFORE riding the
motorcycle
LICENSE PLATE FRAME REAR PANEL ACCENT
INSTALLATION
TOP
BACKSIDE
OF FRAME
WELDMENT
PIC 2
#6 SCREWS
PIC 4
ENSURE THAT THE TOP HAT
WASHERS REMAIN IN THE
FENDER PANEL BEFORE
INSTALLING NEW FRAME
Ride On!
ALIGN LICENSE PLATE IN
BACKSIDE OF FRAME
PIC 1
REMOVE THE FOUR SCREWS
PIC 3
LICENSE PLATE BRACKET