Ride on, Comfort drop mounts/mini boards, Installation – Kuryakyn 7564 COMFORT DROP MOUNTS/MINI BOARDS for GL 1800 User Manual
Page 2
PAGE
2
STEP 3
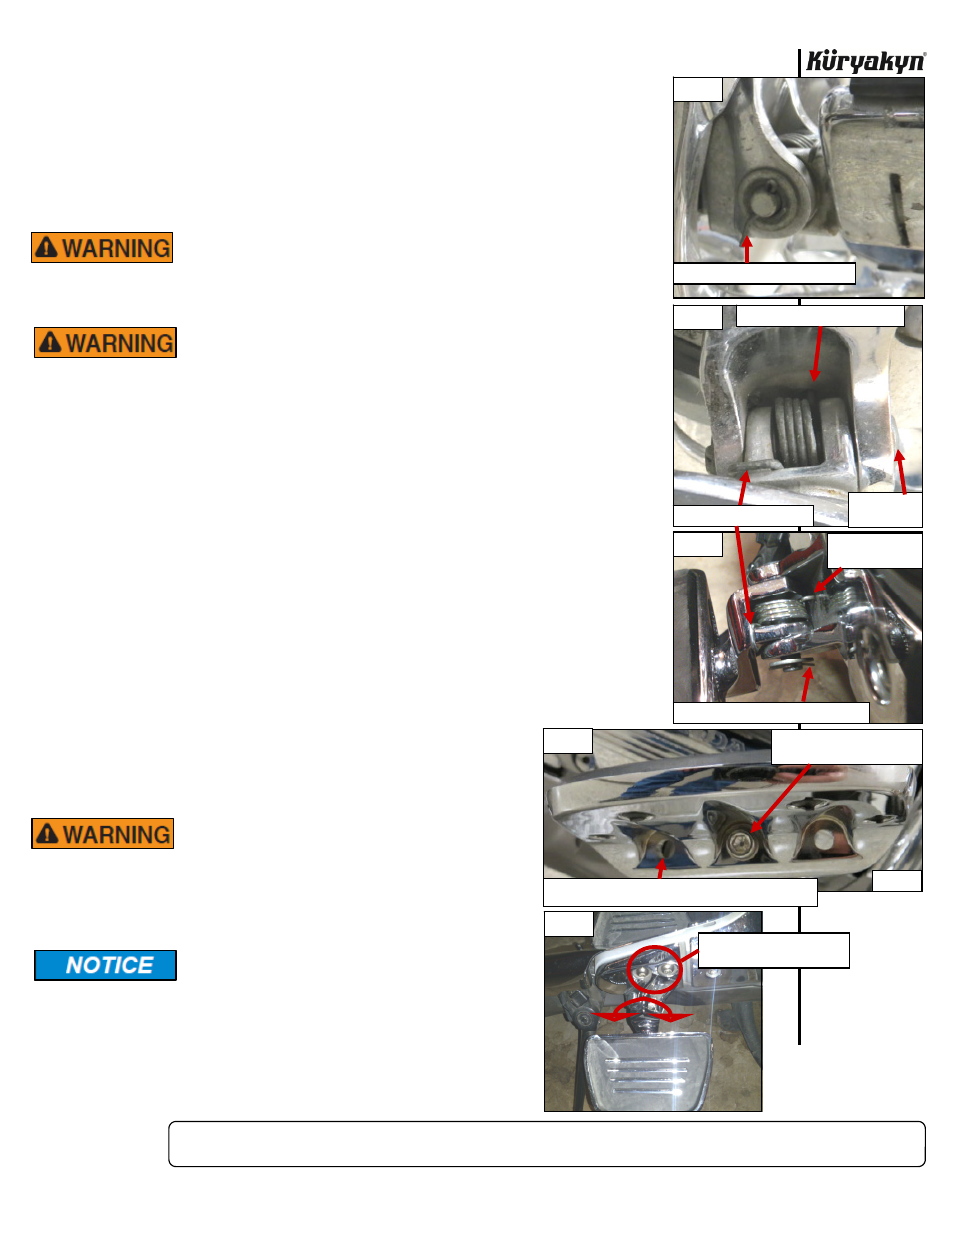
Remove the stock pegs from the OEM mounts by removing the cotter pin and washer from the
bottom of the mounting pin. PIC 2 Carefully remove the pin, watching how the
spring is connected to the peg and the hole in the mount. PIC 3 Keep all these
parts except the cotter pin, they will be reused.
STEP 4
Reconnect the new Comfort Drop Mount and Mini Board to the mount, making sure
that the spring is in the proper position. Drop the mounting pin back into position
and secure with the OEM washer and included cotter pin. PIC 4 Check to make
sure that your peg pivots up freely.
FOOTPEGS MUST BE INSTALLED SO THEY WILL FOLD
UPWARD IF HIT BY ANY OBJECT. FAILURE TO ADJUST THE
FOOTPEGS TO OPERATE IN THIS MANNER COULD RESULT IN
SERIOUS INJURY OR DEATH.
DO NOT USE THE REARWARD MOUNTING HOLE IN THE MINI
BOARDS. USING THIS POSITION WILL MOVE THE BOARD
TOO FAR FORWARD AND MAY ALLOW YOUR FOOT TO
BECOME LODGED BETWEEN THE BOARD AND THE SHIFT
LEVER. THIS MAY CAUSE LOSS OF CONTROL RESULTING IN
SERIOUS INJURY OR DEATH.
NOTE:
If leaving the Mini Boards in the factory installed position on the Comfort
Mount,
tighten
the
socket
head
cap
screw that attaches the Mini Board
(PIC 5) to the Comfort Mount before riding the motorcycle.
STEP 5
To change the position of the Mini Board rearward, remove the socket head cap
screw that attaches the Mini Board to the splined adapter. PIC 5 Insert the socket
head cap screw into the forward hole on the Mini Board and thread it into the
splined adapter. Make sure the splines on the Mini Board are engaged on the
splines on the adapter in the desired position and tighten securely.
STEP 6
To change the tip-up or tip-down position of the Mini Boards, loosen the socket
head cap screw far enough to allow the splines on the Mini Board and adapter to
disengage. Move the Mini Board to the desired position, and making sure the
splines on the board and adapter are engaged in that position, tighten the socket
head
cap
screw
securely.
NOTE:
If the Mini Boards do not seem parallel after tightening
in the desired orientation, they can be fine tuned by
loosening the two footpeg mount fasteners and
rotating the peg mount forward or backward to achieve
the desired position. PIC 6
IT IS THE INSTALLERS RESPONSIBILITY TO
ENSURE THERE IS SUFFICIENT CORNERING
CLEARANCE BEFORE THE MOTORCYCLE IS
RIDDEN. INSUFFICIENT CORNERING
CLEARANCE MAY CAUSE LOSS OF CONTROL
RESULTING IN SERIOUS INJURY OR DEATH.
It is the installer’s responsibility to ensure that all
of the fasteners (including pre-assembled) are
tightened before operation of the motorcycle.
Küryakyn will not provide warranty coverage on
products or components lost due to improper
installation or lack of maintenance. Periodic
inspection and maintenance are required on all
fasteners.
Ride On!
COMFORT DROP MOUNTS/MINI BOARDS
INSTALLATION
PIC 2
PIC 3
REMOVE COTTER PIN AND WASHER
SPRING FITS IN HOLE IN MOUNT
SPRING HOOKS OVER PEG
CAREFULLY
REMOVE PIN
PIC 4
SPRING FITS IN
HOLE IN MOUNT
NEW COTTER PIN AND OEM WASHER
PIC 5
REMOVE THIS FASTENER TO
CHANGE BOARD POSITION
DO NOT USE REAR MOUNTING HOLE!
FRONT
LOOSEN THESE FASTENERS
TO FINE TUNE ANGLE
PIC 6