Ride on, L.e.d. front reflector conversion, Installation – Kuryakyn 7448 L.E.D. FRONT REFLECTOR CONVERSION User Manual
Page 2
PAGE
2
STEP 2
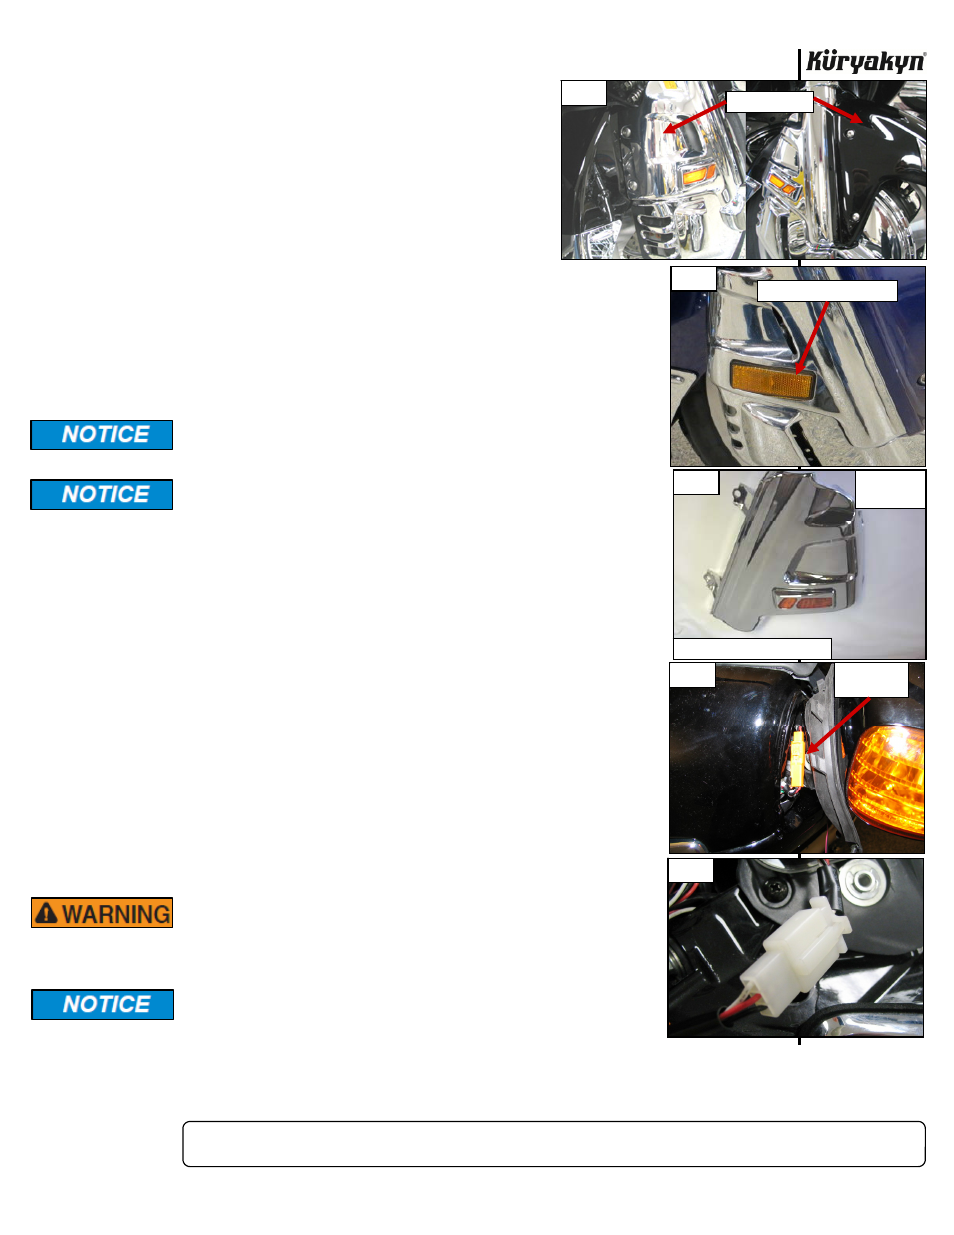
Remove the front fender and the fork covers from the motorcycle. PIC 1 Set the hardware aside, it
will
be
reused.
STEP 3
Remove the stock reflectors from the fork covers.
STEP 4
Install the LED conversion lights in place of the reflectors. The
wires will pass through one of the holes in the fork cover used to
mount the stock reflector. The stock nut and washer will be
reused. We suggest the orientation shown in PIC 3. Route the
wires up to the rubber brake hoses. Re-install the fork covers.
STEP 5
“Peel back” the rubber boot at the base of each of the rear view
mirrors. The turn signal light wiring and connector plug will be
exposed.
PIC
4
STEP 6
Neatly route the wires so the terminated ends come out of the fairing at the rear
view mirror bases. We suggest routing the wires along the brake hoses to the
lower fork clamps and securing them with nylon cable ties. Be sure the remaining
lengths of wire leading to the mirror bases are out of harms way. Remember to
take into account the movement of the front end - both up and down (suspension)
and left to right (steering).
Be sure to leave sufficient slack in the wiring harness to allow for
extension of the forks. If there is not enough wire to allow for
movement, the wiring harness will be damaged!
Secure all wiring away from any moving parts, pinch points or
extreme heat. Küryakyn WILL NOT issue a warranty on any electrical
component that fails due to pinched, crimped, broken, abraded,
melted or frayed wires.
STEP 7
Locate the connection plug between the mirror mounted turn signals and the
fairing. Separate the plug, and install the supplied “Y” adapter plug in line.
(‘06-later GL 1800 models require Küryakyn P/N 7300, Adapter Plug, F6B
Models require Küryakyn P/N 7301, Adapter Plug, purchase separately.) If
you have other Küryakyn products, there will already be one “Y” connector in
place. This connector can be added to the existing one.
STEP 8
Insert the pins into male connector housing so the following color wires join as
follows (remember the housing only plugs in one way!):
“Y” Connector Plug
L.E.D. Conversion Light
black
(ground)
black
(ground)
red (running light)
green (running light)
white (turn signal)
red (turn signal)
STEP 9
Plug the rotor light into one of the small plugs on the “Y” connector (the
remaining one will be used for other Küryakyn accessories). Replace the rubber
boots around the base of the mirrors.
STEP 10
Turn the key on and test that all lights work.
ENSURE PROPER LIGHT OPERATION BEFORE RIDING THE
MOTORCYCLE. VISIBILITY IS A MAJOR CONCERN FOR
MOTORCYCLISTS. A LIGHT MALFUNCTION COULD RESULT
IN DEATH OR SERIOUS INJURY.
It is the installer’s responsibility to ensure that all of the fasteners
(including pre-assembled) are tightened before operation of the
motorcycle. Küryakyn will not provide warranty coverage on
products or components lost due to improper installation or lack of
maintenance. Periodic inspection and maintenance are required on all fasteners.
Ride On!
L.E.D. FRONT REFLECTOR CONVERSION
INSTALLATION
PIC 1
PIC 5
PIC 4
PIC 3
PIC 2
REMOVE THESE
REMOVE THE REFLECTORS
RECOMMENDED ORIENTATION
RIGHT SIDE
SHOWN
USE THIS
CONNECTOR