Ride on, Run-brake strip lights, Installation – Kuryakyn 3247 L.E.D. VERTICAL RUN-BRAKE STRIP LIGHTS User Manual
Page 2
PAGE
2
Ensure the area of installation is free of grease, oil, dirt or other debris including
wax/polish products and bugs to ensure proper adhesion. Küryakyn WILL NOT
issue a warranty on any parts lost due to improper installation.
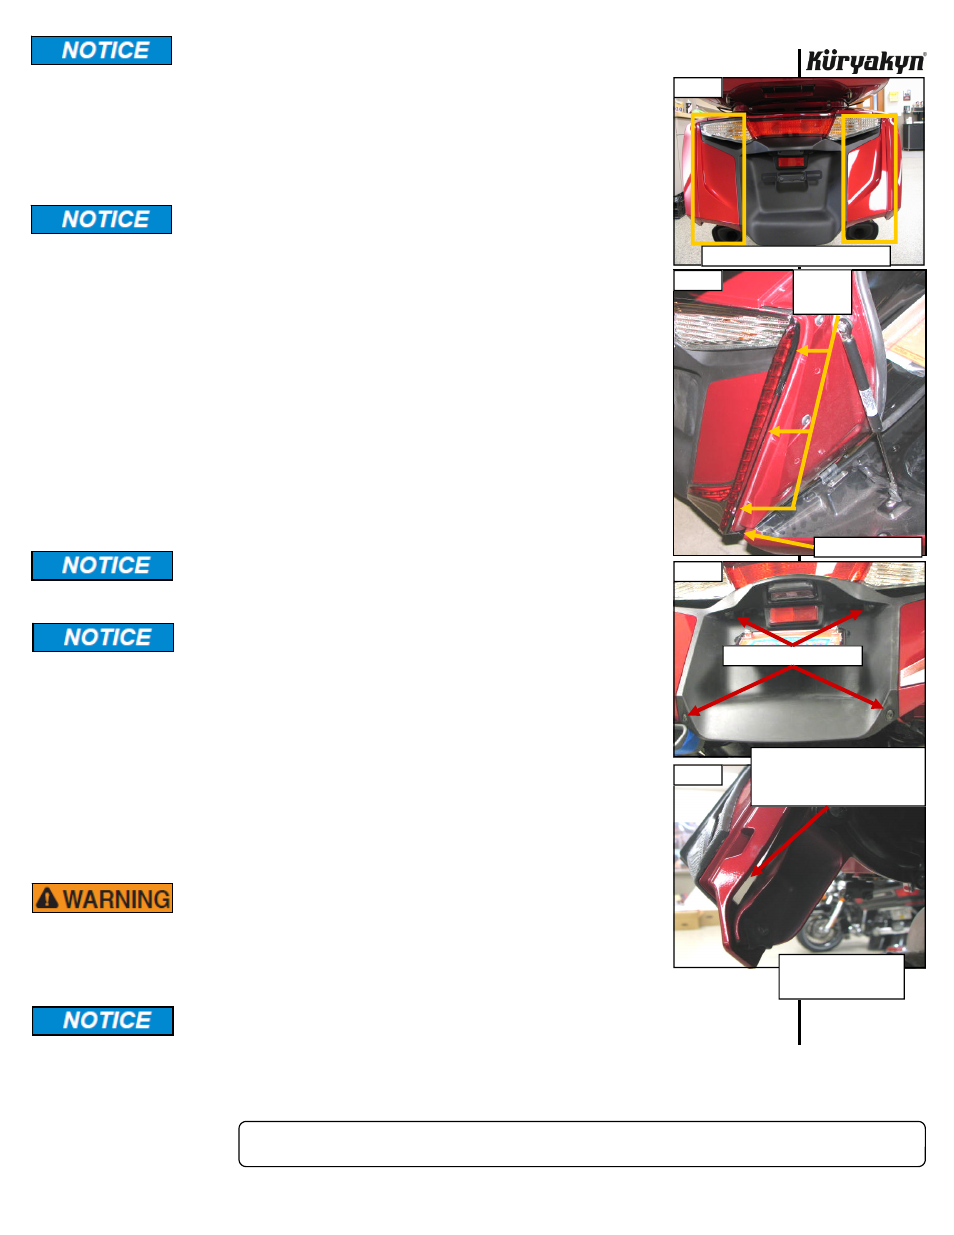
STEP 3
Test fit the right side Accent to the right saddlebag. The Accent will follow the
seam between the saddlebag door and the saddlebag. The Accent has a formed
bottom that will “hook” under the saddlebag. Make sure that the top of the
Accent is placed inboard far enough that the saddlebag door can open and
close without hitting the top of Accent. Make any reference marks on the
saddlebag with a non-permanent marker or masking tape. PIC 2
The adhesive will not bond correctly if applied at temperatures less
than 50°F. Do not attempt this installation in temperatures less
than 50°F.
STEP 4
Rub the backing of the adhesive with the back of your fingernail to activate the
adhesive. Remove the backing. Using any reference marks made in Step 3, and
making sure the wire harness is routed out the bottom channel in the Accent,
firmly press the Accent in place. Full bond will occur in 24 hours.
NOTE:
If the motorcycle is to be operated before the 24 hour cure time has
expired, use a good quality masking or painter’s tape over the Accent to
assist in holding the Accent in place until the cure time is over.
STEP 5
Repeat Steps 3 and 4 for the left side.
STEP 6
Remove the four fasteners that secure the rear fender panel and remove it. PIC 3
STEP 7
Route the wire harness from each Strip Light through the opening between the
inside of the saddlebag and the saddlebag support. PIC 4 Use the supplied cable
ties
to
secure
the
harness out of harms way.
Secure all wiring away from any moving parts, pinch points or
extreme heat. Küryakyn WILL NOT issue a warranty on any electrical
component that fails due to pinched, crimped, broken, abraded,
melted or frayed wires.
Küryakyn recommends the use of dielectric grease on electrical
connections.
STEP 8
Please refer to the instructions for P/N 3230: Locate the Six pin connector
from the Rear Accessory Plug and Play harness. If you do not have an open
connector on this plug, disconnect the harness from the current accessory that is
plugged into it. Connect the included Triple “Y” adapter and connect the existing
accessory
and
the
new
Vertical Run-Brake Strip Light Trim to it. Use the included
cable ties to secure the wiring out of harms way.
NOTE:
It does not matter which connector from the Accents is plugged into
which Triple “Y” connector, the Accents are wired to draw from the
correct wires on each side.
STEP 9
Turn the motorcycle on and check that all the lights work correctly.
ENSURE PROPER LIGHT OPERATION BEFORE RIDING THE
MOTORCYCLE. VISIBILITY IS A MAJOR CONCERN FOR
MOTORCYCLISTS. A LIGHT MALFUNCTION COULD RESULT IN
DEATH OR SERIOUS INJURY.
STEP 10
Replace the rear fender panel. Tighten the fasteners securely.
It is the installer’s responsibility to ensure that all of the fasteners (including
pre-assembled) are tightened before operation of the motorcycle. Küryakyn will
not provide warranty coverage on products or components lost due to improper
installation or lack of maintenance. Periodic inspection and maintenance are
required on all fasteners.
Ride On!
RUN-BRAKE STRIP LIGHTS
INSTALLATION
PIC 1
THOROUGHLY CLEAN THESE AREAS
PIC 3
REMOVE THESE SCREWS
PIC 4
ROUTE WIRE UNDER SADDLEBAG
AND THROUGH THIS OPENING IN
THE SUPPORT TO THE CENTER OF
THE BIKE
PIC 2
FOLLOW
THIS
SEAM
HOOK UNDER HERE
LEFT SIDE OF BIKE
SHOWN WITH CENTER
PANEL REMOVED