Ride on, Standard chrome hypercharger — vstar 950, Installation – Kuryakyn 9427 STANDARD CHROME HYPERCHARGER — VSTAR 950 User Manual
Page 3
PAGE
3
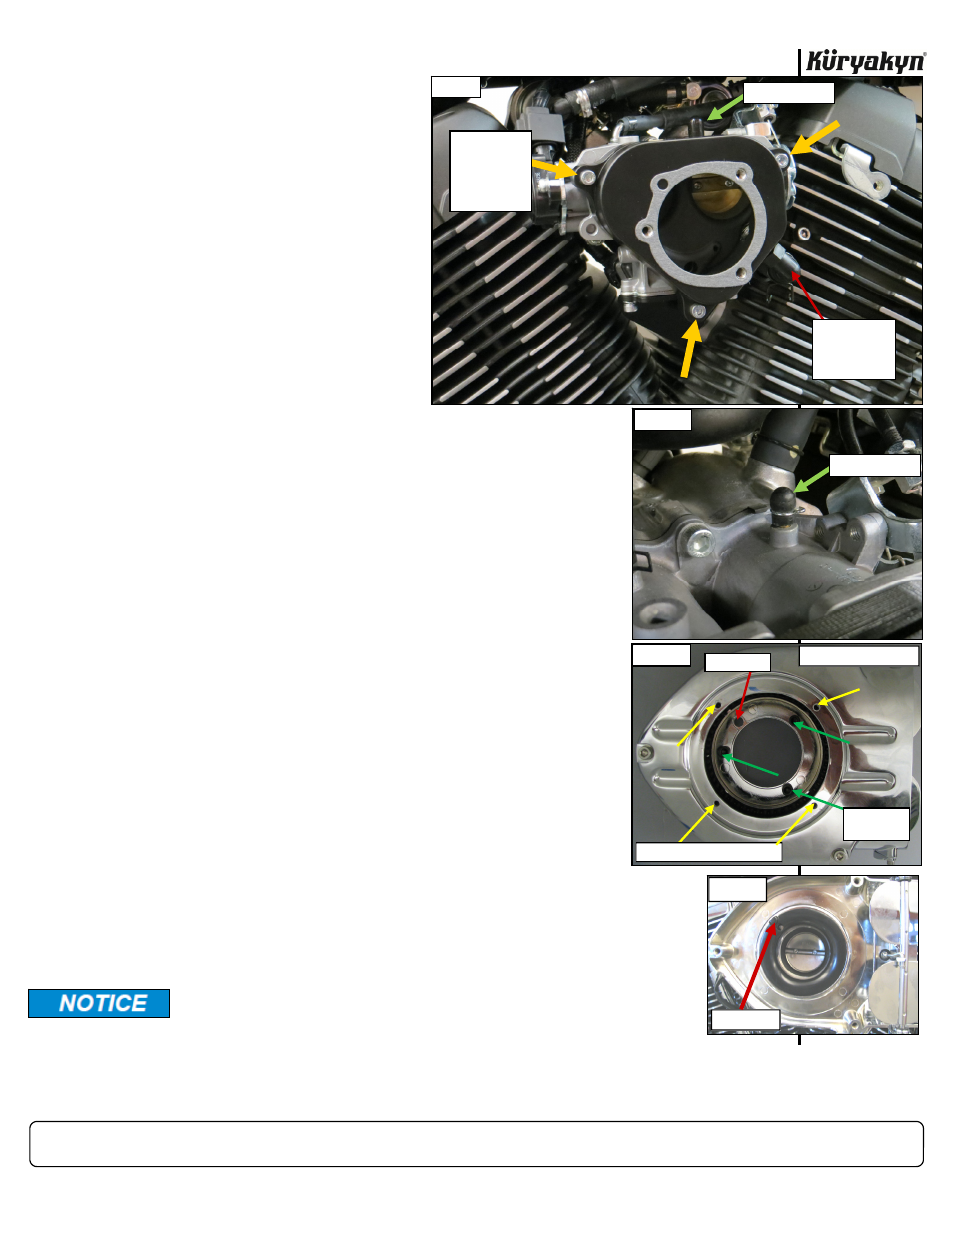
STEP 12
Refer
to
PIC 5. Hold the Adapter assembly up to the throttle body; attach the breather hose to
the 1/2” Elbow Fitting and secure it with the hose clip.
STEP 13
Position the Adapter so that the Rubber
Plate interlocks with the flange on the throt-
tle body.
STEP 14
Refer
to
PIC 5. Secure the Adapter to the
throttle body with the three OEM screws
removed in
STEP 2
. Leave the screws
loose until all three have been started, then
tighten.
STEP 15
Refer
to
PIC 5. Remove the adhesive back-
ing from the included Adhesive Gasket, align
the holes, and install it on the Adapter as
shown.
STEP 16
Refer
to
PICs 5 and 6. On top of the throt-
tle body, remove the cap and connect the
included Vacuum Hose to the vacuum nip-
ple.
STEP 17
Locate the included Hypercharger. Refer to PIC 7. Remove the four Screws
securing the Trap Door to the Hypercharger; set the Screws and Trap Door
aside for now.
STEP 18
Insert the three 1/4”-20 X 1-1/2” Socket Head Cap Screws (included with
the 7/8” Spacer) through the mounting holes inside the Hypercharger. Align
the holes and place one of the included Gaskets over the three mounting
Screws that protrude from the back of the Hypercharger.
Refer to PIC 7. DO NOT place a screw through the vent hole at the 10-
o’clock position.
STEP 19
Slide the included 7/8” Spacer onto the protruding ends of the screws on
the back side of the Hypercharger.
Attach the Hypercharger, Gasket and Spacer to the throttle body with the
included 1/4”-20" X 1-1/2” Socket Head Cap Screws. Tighten the screws
evenly. DO NOT over-tighten the screws.
STEP 20
Route the Vacuum Hose toward the front of the Hypercharger (ensure it
routes away from moving parts, extreme heat, and vibration).
Connect the Vacuum Hose to the Hypercharger Vacuum Nipple located on
the backside.
STEP 21
Refer
to
PIC 8. Securely snap the included Velocity Ring to the inside of the
Hypercharger. Ensure that the hole in the Velocity Ring aligns with the vent
hole (10 o'clock position).
STEP 22
Reinstall the Trap Door and four Screws.
STANDARD CHROME HYPERCHARGER — VSTAR 950
Ride On!
INSTALLATION
ATTACH THE
BREATHER
HOSE TO THE
FITTING
PIC 5
SECURE THE
ADAPTER TO
THE THROTTLE
BODY WITH
THE THREE
OEM SCREWS
VACUUM NIPPLE
VACUUM NIPPLE
PIC 6
VENT HOLE
PIC 8
It is the end user’s responsibility to ensure that all of the fasten-
ers (including pre-assembled) are tightened before operation of
the motorcycle. Kuryakyn will not provide warranty coverage on
products or components lost or damaged due to improper instal-
lation or lack of maintenance. Periodic inspection and mainte-
nance are required on all fasteners.
VENT HOLE
PIC 7
TRAP DOOR REMOVED
MOUNTING
HOLES
TRAP DOOR SCREW HOLES