Wolo bad boy air horn, Installation – Kuryakyn 7290 SUPER DELUXE WOLO BAD BOY AIR HORN KIT User Manual
Page 2
PAGE
2
YOU WILL BE WORKING AROUND THE ENGINE AND EXHAUST SYSTEM
DURING INSTALLATION. ENSURE THAT THE ENGINE
AND EXHAUST SYSTEM HAVE FULLY COOLED TO
PREVENT INJURY.
STEP 2
Disconnect the lead wires from the horn and remove the horn from the
motorcycle
.
STEP 3
Decide on a location for mounting the new Wolo Bad Boy horn, usually on
the left (clutch) side down tube of the motorcycle. Test the chosen
location by holding the mounting block and horn it and verifying
clearances between the horn, mount and any component on the
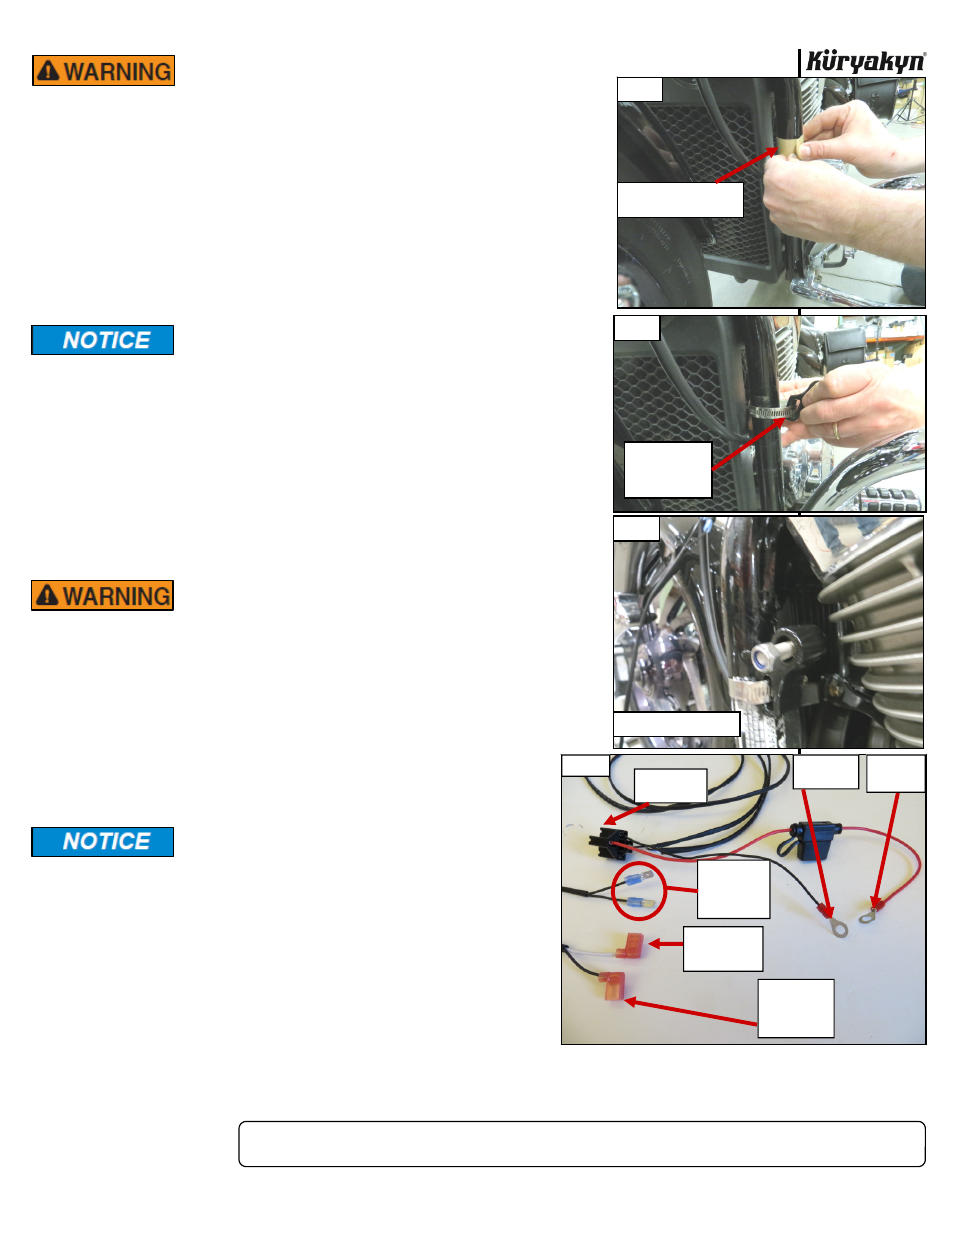
motorcycle. Wipe the area with the included alcohol pad. Test fit the
paint protector strip to the desired mounting area. PIC 1 Cut the
protector strip to length, remove the backing and attach it to the area.
It is the installer’s responsibility to ensure that there is
adequate clearance between the Super Deluxe Wolo Horn
and any component on the motorcycle. Küryakyn is not
responsible for any damage due to inadequate clearance.
STEP 4
Open the included band clamp all the way to release the end from the
screw housing. Wrap the clamp around the frame. Thread the end of the
clamp through the opening in the mount and back to the screw housing
of the clamp typically as shown in PIC 3. Insert the end into the screw
housing
and
torque the clamp to 60 IN/LBS.
STEP 5
Using the included M8 X 1.25 X 30mm socket head cap screw and
M8 nylock nut, attach the Wolo Bad Boy horn to the mount. Verify
clearances between the horn, mount and any component on the
motorcycle. Tighten securely.
MAKE SURE THE NEW SUPER DELUXE WOLO HORN
DOES NOT INTERFERE WITH ANY COMPONENT OR
MOVEMENT OF ANY COMPONENT ON THE
MOTORCYCLE. INTERFERENCE WITH COMPONENTS
OR THEIR MOVEMENT MAY CAUSE LOSS OF CONTROL
RESULTING IN SERIOUS INJURY OR DEATH.
STEP 6
Remove the seat or side cover to gain access to the battery. Connect the
ring terminals on the new Horn Wiring Harness to the battery, red wire to
positive and black wire to negative. PIC 2
STEP 7
Route the wires under the fuel tank, or down along the frame to
the
new
horn.
Secure all wiring from the newly installed and/or
from existing parts, away from any moving parts,
pinch points or extreme heat. Küryakyn WILL NOT
issue a warranty on any electrical component that
fails due to pinched, crimped, broken, abraded,
melted or frayed wires.
STEP 8
Secure the wiring harness with the provided cable ties. Be
certain the wires are away from any pinch points or direct heat.
STEP 9
Connect the BLACK wires with the male spades from the new
Harness to the horn wires on the stock wiring harness.
WOLO BAD BOY AIR HORN
INSTALLATION
-cont.-
PIC 4
BATTERY
POSITIVE
BATTERY
NEGATIVE
TO HORN
WIRES ON
STOCK
HARNESS
TO POSITIVE
(REAR) SPADE
ON HORN
TO NEGATIVE
(FRONT)
SPADE ON
HORN
PLUG RELAY
IN HERE
PIC 1
PIC 3
PIC 2
TEST FIT AND ATTACH
PROTECTIVE STRIP
LOOP CLAMP
AROUND FRAME
AND THROUGH
MOUNT
TIGHTEN BAND CLAMP