Skeleton hand mirrors, Installation – Kuryakyn 1759 SKELETON HAND MIRROR SET User Manual
Page 2
PAGE
2
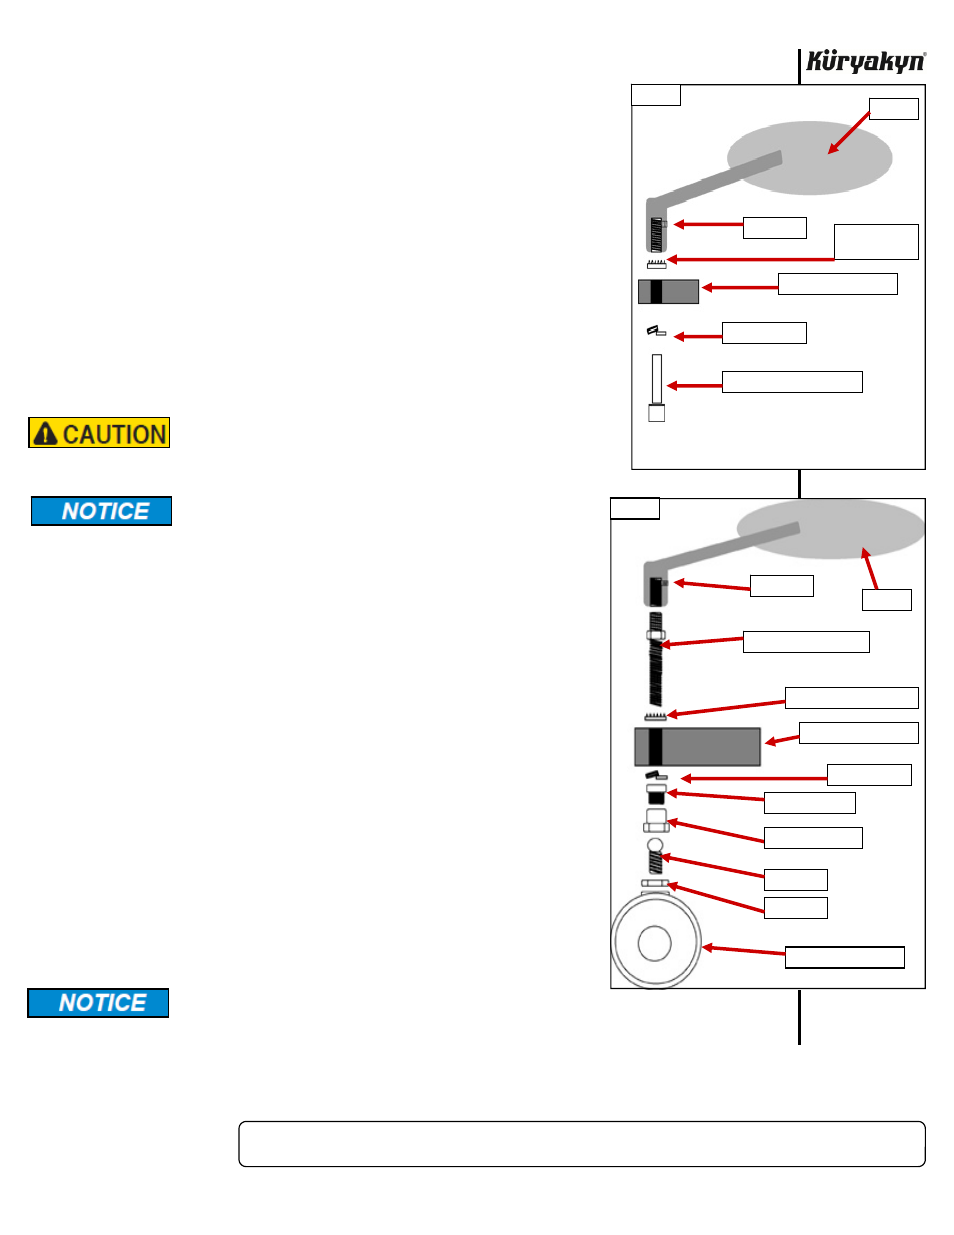
STEP 4
Place a split lock washer over the socket head cap screw and insert it in the hole in the hand
control. FIG 1
STEP 5
Place an internal lock washer over the protruding end of the socket
head
cap
screw.
STEP 6
While holding the mirror in place, thread the socket head cap screw
into the bottom of the mirror stem.
NOTE:
Ensure that the setscrew in the mirror stem does not prevent the
socket head cap screw from being installed fully. FIG 1
STEP 7
Adjust the position of the mirror stem for visibility and clearance;
tighten the socket head cap screw and then the setscrew.
STEP 8
Repeat STEP 3 through STEP 7 for the opposite side.
H-D WITH BOTTOM MOUNTED TURN SIGNALS
Right
Side
Procedure
STEP 9
Loosen and remove the retainer nut and ball stud clamp shown in FIG 2
Removing the retainer nut and /or the ball stud clamp
will release the turn signals from the hand controls.
Secure the turn signals to prevent damage or injury
.
Avoid damage to the motorcycle. Protect painted surfaces
with a soft cloth or blanket.
STEP 10
Remove the stock mirror; hold the stock turn signal to prevent it from
being
damaged.
STEP 11
Screw a double ended stud into the new mirror stem; tighten and then
tighten the set screw. FIG 2
NOTE:
Ensure that the setscrew in the mirror stem does not prevent the
double ended stud from being installed fully. FIG 2
STEP 12
Place an internal lock washer over the long end of one of the
double-ended
studs;
insert
the
assembly into the mirror stem hole in the
hand control. FIG 2
STEP 13
Place a split lock washer over the protruding end of the double-ended
stud and thread the retainer nut onto the stud. FIG 2
STEP 14
Adjust the position of the mirror stem for visibility and clearance; tighten
the
retaining
nut.
STEP 15
Install the ball stud clamp onto the retainer nut; adjust the turn signal
and
tighten
the
clamp.
STEP 16
Repeat STEP 2 through STEP 8 for the LEFT SIDE.
STEP 17
Adjust the mirrors for proper view before riding the motorcycle.
It is the installer’s responsibility to ensure that all of the
fasteners (including pre-assembled) are tightened before operation of the
motorcycle. Küryakyn will not issue a warranty on components lost due to improper
installation. Periodic maintenance may be required.
SKELETON HAND MIRRORS
INSTALLATION
-cont.-
FIG 1
MIRROR
INTERNAL
LOCK WASHER
HANDLEBAR CONTROL
LOCK WASHER
SOCKET HEAD CAP SCREW
SETSCREW
FIG 2
STOCK TURN SIGNAL
RETAINER NUT
LOCKWASHER
HANDLEBAR CONTROL
INTERNAL LOCKWASHER
DOUBLE ENDED STUD
SETSCREW
MIRROR
BALL STUD CLAMP
BALL STUD
LOCK NUT