Ride on, Velociraptor air cleaner, Installation – Kuryakyn 9512 VELOCIRAPTOR AIR CLEANER KIT User Manual
Page 3
PAGE
3
STEP 7
Mount the provided breather hoses to the hose fittings on the aluminum breather
assembly. Test fit the complete assembly to the air intake
flange, connecting the open end of the hoses to the breather
bolts from Step 4.
NOTE:
Modifying or cutting the hoses may be necessary in
order to ensure that kinks or tight bends do not
limit/obstruct the air flow. On the right or front side,
ensure there is no obstruction to the pull or return of
the throttle wheel. Place the supplied cable ties over
the crankcase breather nipples and crankcase breather
bolts to secure both ends of the hoses.
STEP 8
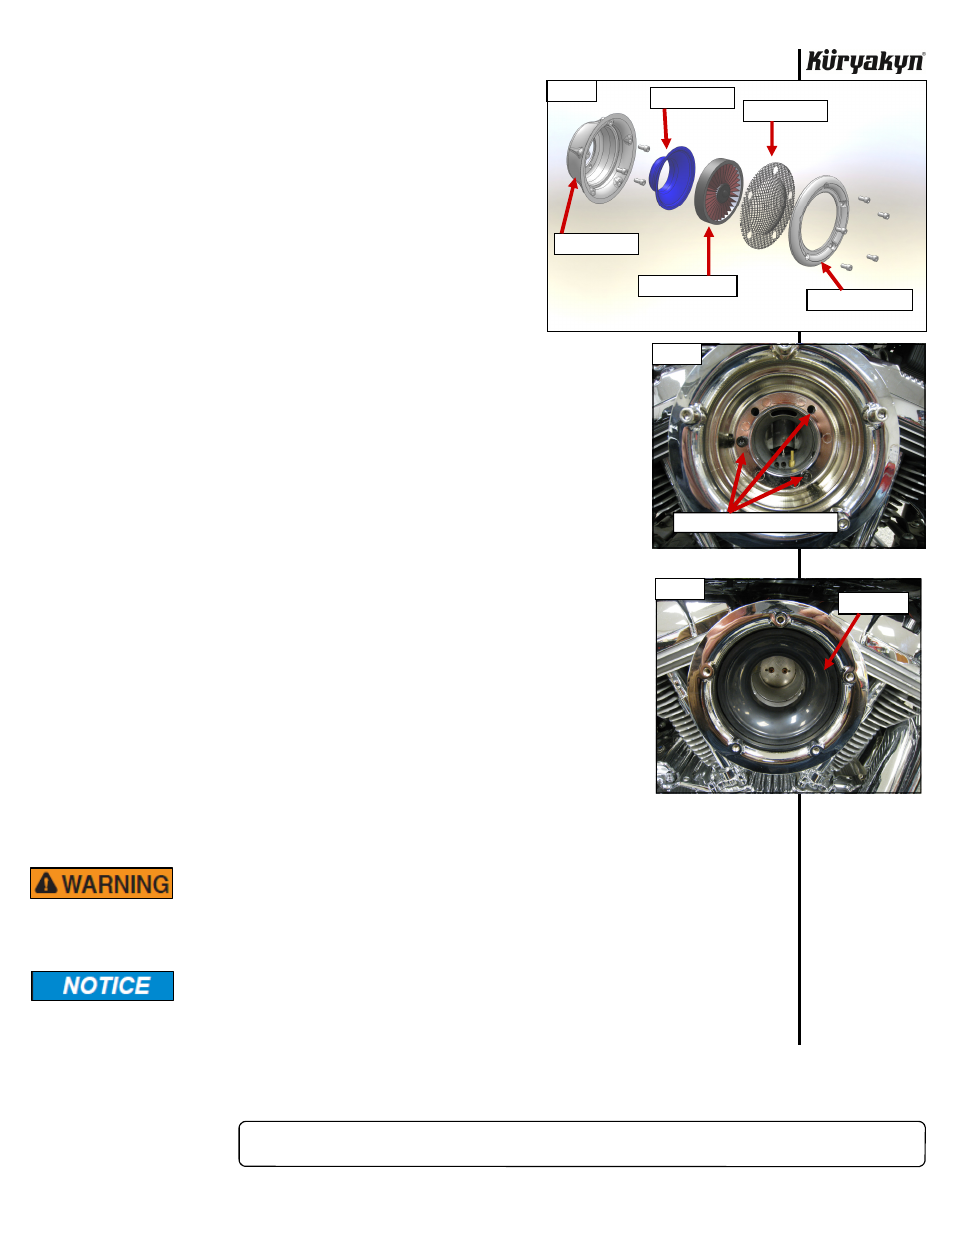
Completely disassemble the Velociraptor Assembly. Make note
as to how it is assembled, it will help for reassembly. FIG 1
STEP 9
Locate the velocity stack (chrome cone) from the Velociraptor Assembly. Insert
the three 1/4”–20 socket head cap screws through the mounting holes
in the
chrome cone from the inside. Place one of the included non-adhesive backed
gaskets over the three mounting screws now protruding from the back of the
chrome cone. DO NOT place a bolt through the float bowl vent hole - this hole
is the one in the 10-o’clock position.
STEP 10
While holding a gasket in place between the breather adapter and support
bracket- at this time you should have three gaskets installed, one di-
rectly behind the chrome cone, one between the breather adapter/
support bracket and one between the support bracket/throttle body or
carb-secure the assembly to the throttle body/carb. PIC 5 DO NOT over
tighten the fasteners; the aluminum will strip easily.
STEP 11
Snap the black Super Ring into place on the installed Velociraptor. Ensure it is
securely snapped into place before continuing with the installation. PIC 6.
STEP 12
Place the filter into the Velociraptor, secure with the chrome Steel Mesh and
the Outer Ring. Line up the holes in the Mesh with those of the Outer Ring,
secure with five 1/4”-20 x 1/2” Socket Head Cap Screws.
STEP 13
Double check the tightness of all related fasteners, check for hose
clearance and check throttle for correct operation, making sure it
returns properly, before starting bike.
ROTATE THROTTLE AND CHECK THAT IT MOVES FREELY AND RETURNS
TO CLOSED BEFORE STARTING BIKE. FAILURE OF THE THROTTLE TO
RETURN COULD RESULT IN LOSS OF CONTROL CAUSING SERIOUS
INJURY OR DEATH.
It is the installer’s responsibility to ensure that all of the fasteners (including
pre-assembled) are tightened before operation of the motorcycle. Küryakyn will
not provide warranty coverage on products or components lost due to improper
installation or lack of maintenance. Periodic inspection and maintenance are
required on all fasteners.
Ride On!
VELOCIRAPTOR AIR CLEANER
INSTALLATION
USE 1-1/2” CAP SCREWS HERE
PIC 5
FIG 1
CHROME CONE
PLASTIC CONE
FILTER ELEMENT
MESH SCREEN
OUTER TRIM RING
PIC 6
SUPER RING