Ride on, Relocator for tour-pak, Installation – Kuryakyn 8957 RELOCATOR for TOUR PAK User Manual
Page 2
PAGE
2
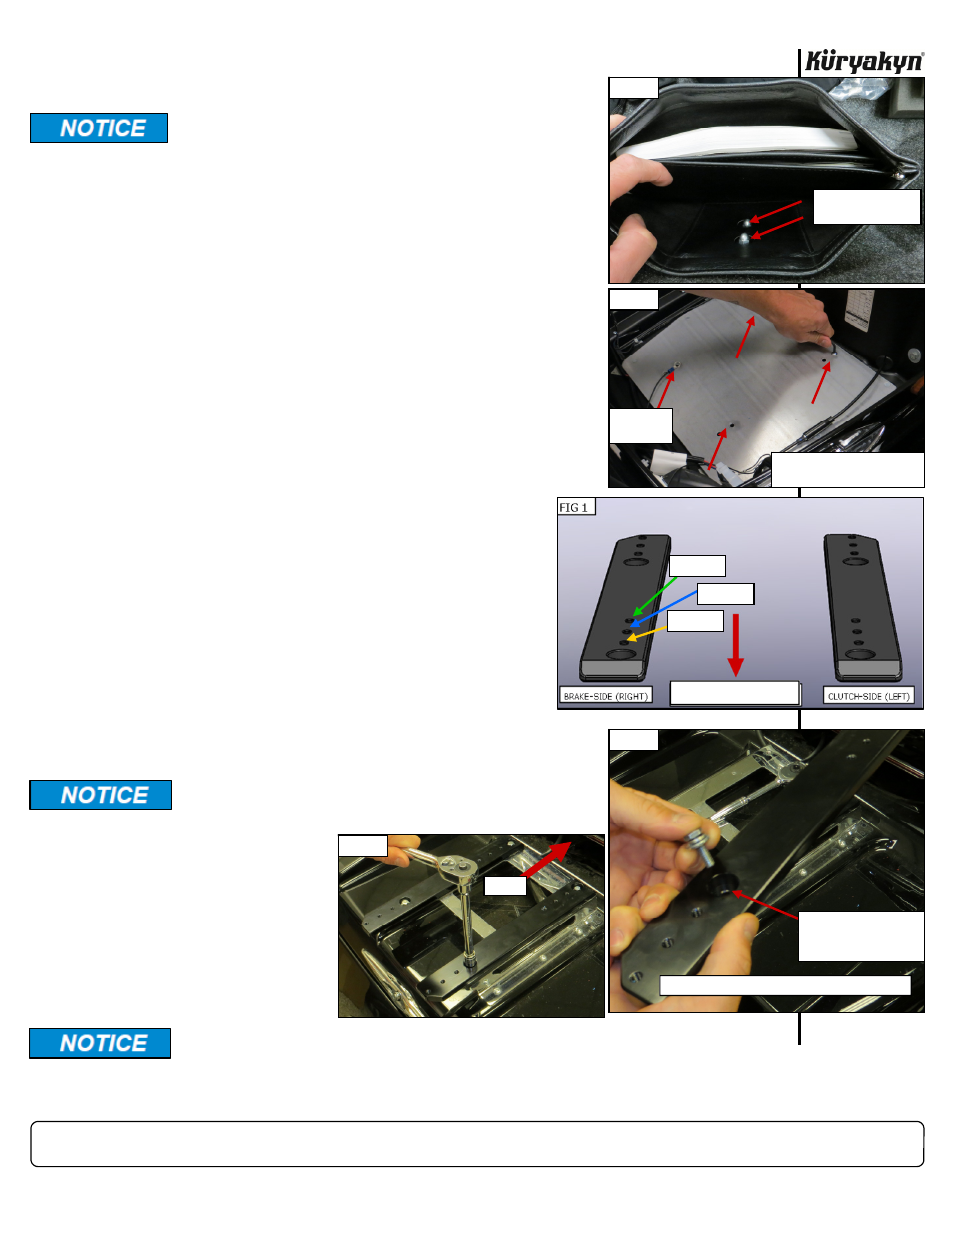
STEP 3
Open the Tour-Pak. Refer to PIC 1. Remove the two acorn nuts located inside the document pouch
in the Tour-Pak. Remove the pouch.
STEP 4
Remove the trunk liner and set it aside.
STEP 5
Remove the four screws securing the Tour-Pak to the mount. PIC 2 Set
the screws aside for now; they will be reused later. Note the location of
the ground strap; it will be re-installed later. PIC 2
STEP 6
Carefully move the Tour-Pak out of the way. Have someone secure the
Tour-Pak while the Relocator Blocks are being installed.
STEP 7
Refer to FIG 1. Determine the Right-and Left-Hand Relocator Blocks.
The countersunk holes are offset to ensure that they are installed on the
correct side. The beveled edges face the front of the motorcycle.
STEP 8
Attach the clutch-side (left) Relocator Block to the OEM mount with two
of the included 1/4”-20 Screws, Lock Washers and Flat Washers. PIC 3
Insert the screws though the countersunk holes. Leave the first screw
loose until the other has been installed, then Torque the screws to 96
to 100 in./lbs.
STEP 9
Repeat STEP 8 for the brake-side (right). PIC 4
STEP 10
The Relocator allows for three different mounting positions over
a range of about three inches.
Refer to FIG 1. Determine which of the three mounting positions
will work best for you.
STEP 11
Add an included Lock Washer and Flat Washer to each screw
(removed in
STEP 5
) and set them within arms reach of the
work area.
STEP 12
Carefully position the Tour-Pak over the Relocator Blocks. Align
the holes in the Tour-Pak with the threaded holes in the Blocks.
Attach the Tour-Pak to the Blocks with the screws from
STEP 11
.
Leave the screws loose until all have been started in their threaded
holes, then torque the screws to 96 to 100 in./lbs.
.
STEP 13
Reinstall the Tour-Pak liner.
STEP 14
Reinstall the document pouch
and acorn nuts. Reinstall the
CB cable (if removed).
STEP 15
Ensure the Tour-Pak is secure
before riding the motorcycle.
Relocator for Tour-Pak®
INSTALLATION
PIC 4
Assistance is highly recommended to secure the
Tour-Pak as the mounting screws are being re-
moved.
PIC 3
THE 1/4” SCREWS GO
IN THE COUNTERSUNK
HOLES
CLUTCH-SIDE (LEFT) RELOCATOR BLOCK SHOWN
Ensure that the ground strap (PIC 2) is reattached
to the floor of the Tour-Pak during reinstallation.
PIC 1
REMOVE THE TWO
ACORN NUTS
3” BACK
2” BACK
1” BACK
It is the end user’s responsibility to ensure that all of the fasteners
(including pre-assembled) are tightened before operation of the motorcy-
cle. Küryakyn will not provide warranty coverage on products or compo-
nents lost due to improper installation or lack of maintenance. Periodic in-
spection and maintenance are required on all fasteners.
Ride On!
PIC 2
REMOVE THE FOUR SCREWS
FROM THE TOUR-PAK
GROUND
STRAP
FRONT OF MOTORCYCLE
FRONT