Mach 2 co-ax air cleaner, Installation – Kuryakyn 9569 MACH 2 CO-AX AIR CLEANER KIT User Manual
Page 2
PAGE
2
A FACTORY SERVICE MANUAL WILL BE HELPFUL IN PERFORMING THIS
INSTALLATION. DO NOT ATTEMPT TO PERFORM THIS
INSTALLATION IF YOU ARE NOT CONFIDENT IN YOUR
ABILITY TO COMPLETE ALL OF THE STEPS IN THE
PROCEDURE; CONSULT A TRAINED TECHNICIAN. IMPROPER
INSTALLATION COULD RESULT IN SERIOUS INJURY OR
DEATH.
Some of our high performance air cleaners extend beyond the
stock/OEM unit to achieve smoother air flow and better
performance. Riding position may be affected, so it is important to
familiarize yourself with the new riding position.
Proper tuning is important. We recommend carbureted bikes
should be rejetted. Lean conditions and/or retarded ignition timing
will cause high exhaust temperatures and discolor chrome exhaust.
NOTE:
Pictures are of a Twin Cam. Evo motors will be similar.
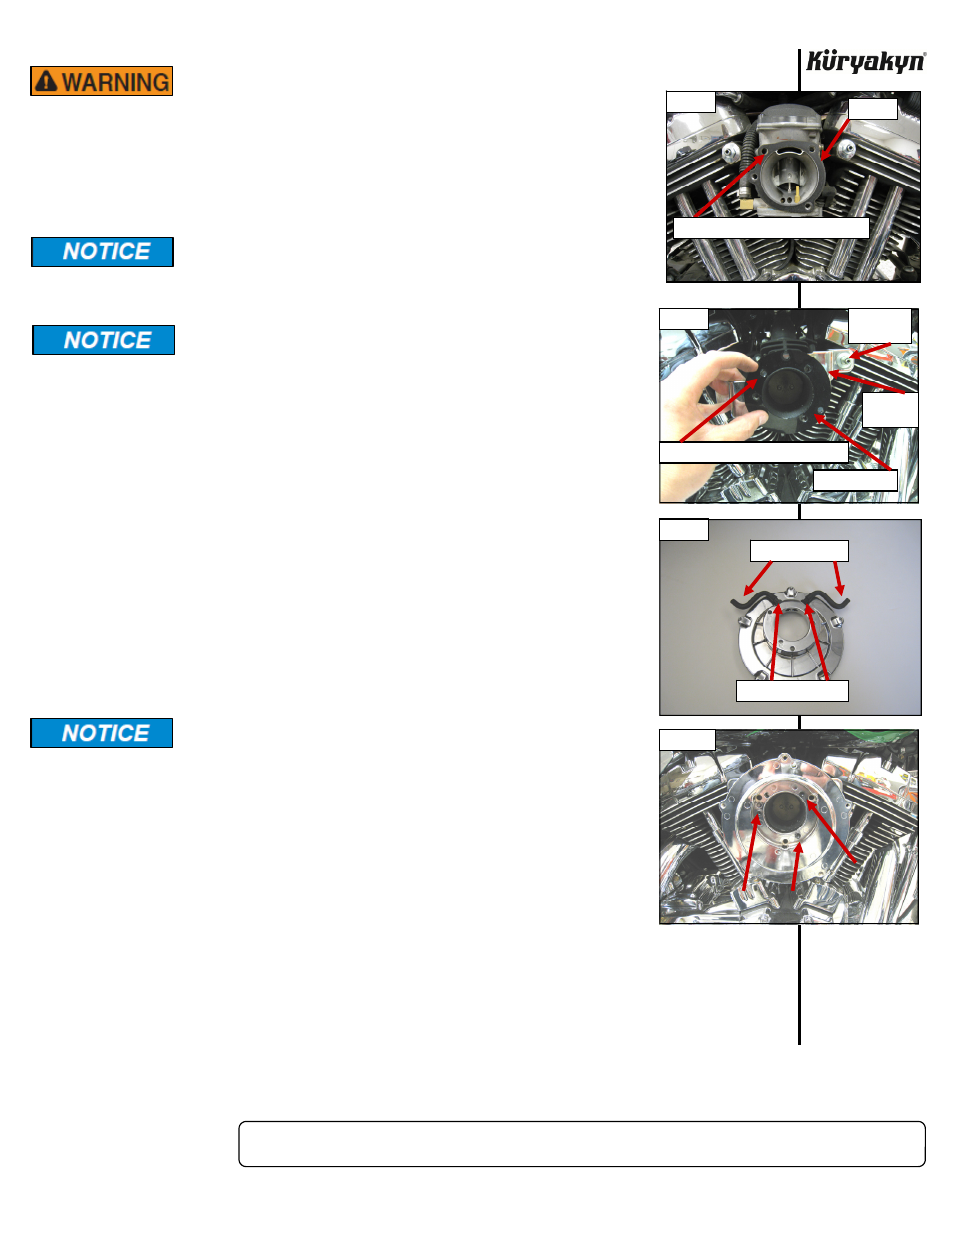
STEP 2
Remove the stock air cleaner so that the carburetor is completely exposed. Be
sure to scrape any gasket material that may be left on the carburetor flange.
STEP 3
Locate the gasket. Hold the gasket (as shown in PIC 1) to the flange of the air
intake, make sure you line up the holes of the gasket with those on the air
intake.
STEP 4
As shown in PIC 2, mount the chrome support bracket in place and secure using
the breather bolts provided. Make sure the gasket is between the mounting
bracket and the carb. Make sure the holes on the carburetor flange are in the
center of the slots of the chrome bracket and tighten breather bolts.
Be sure the support bracket contacts each head when it is in place
across the front of the carb. If there is a gap between the heads
and the support bracket, push the carb inward to eliminate this
gap. Tightening the breather bolts when a gap is present here will
likely result in a broken bracket within a short period of time.
STEP 5
Install the straight fittings to the backing plate as shown in PIC 3, connect the
formed breather hoses to the straight fittings on the Mach 2 backing plate.
STEP 6
As shown in PIC 2, hold the flat air lock ring in place against the mounting
bracket. Line up the holes from the air lock ring with the threaded holes in the
carburetor
flange.
STEP 7
Using the 1/4”-20 x 1-1/4" Socket Head Cap Screws, secure the backing plate to the carburetor
flange as shown in PIC 4. Be sure that the air lock ring is in place between the backing plate and
the carburetor flange. Tighten the hardware.
MACH 2 CO-AX AIR CLEANER
INSTALLATION
-cont.-
PIC 4
PIC 2
PIC 3
BREATHER
BOLT
AIR LOCK RING
THIS HOLE FOR CARB MODELS ONLY
STRAIGHT FITTINGS
BREATHER HOSES
SUPPORT
BRACKET
PIC 1
GASKET
THIS HOLE FOR CARB MODELS ONLY