Ride on, Black and chrome xl fork skins, Installation – Kuryakyn 7227 BLACK/CHROME FORK SKINS FOR XL User Manual
Page 2
PAGE
2
STEP 2
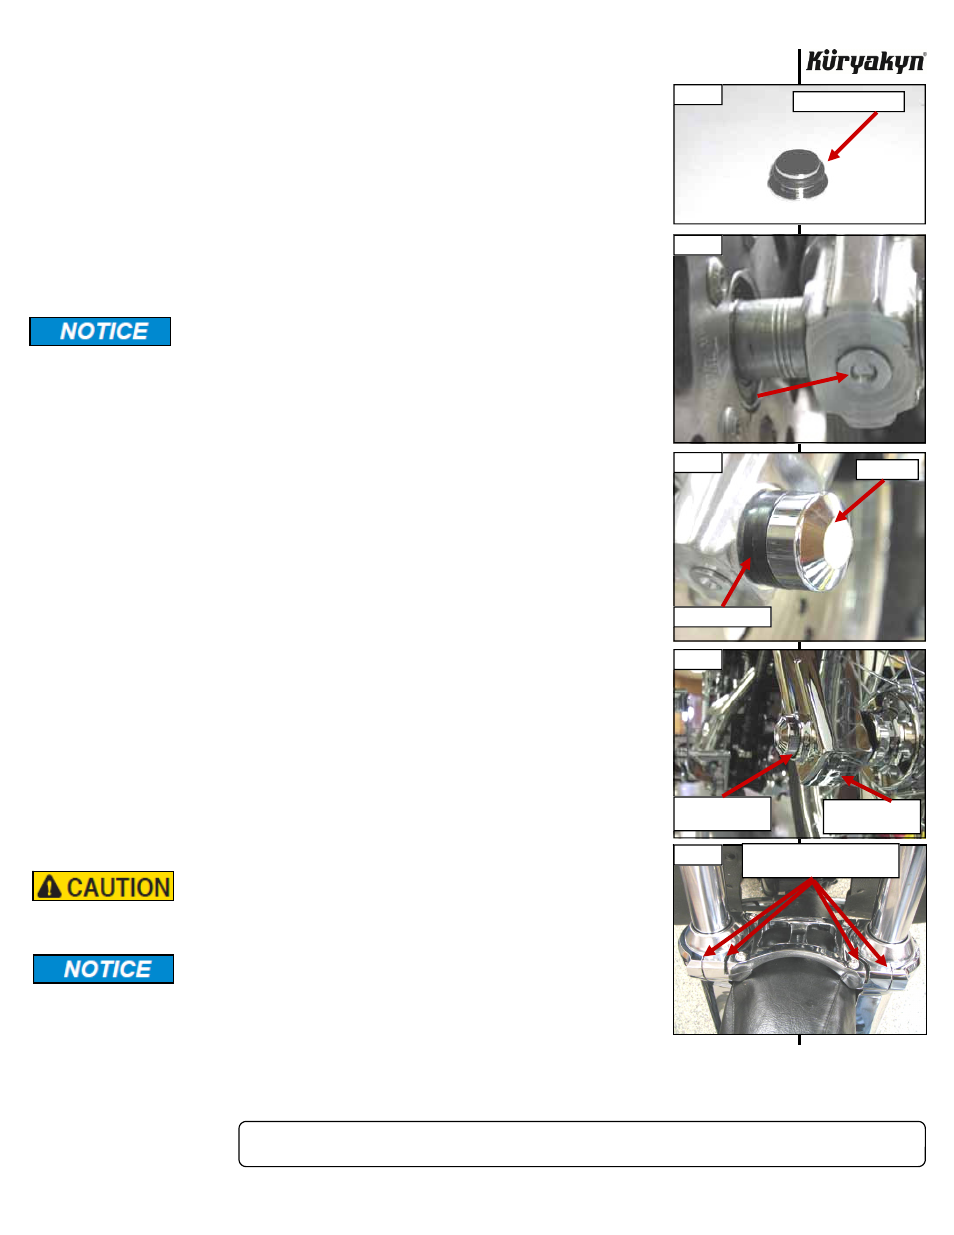
Place the O-ring in the groove on the chrome centering inserts. PIC 1 Slide the inserts into the
holes in the bottom of the fork sliders. PIC 2 The O-ring serves only to keep the
insert
in
place
during
installation.
STEP 3
On ‘04-’07 Models: Remove the front axle nut, split lock washer, and flat washer
from the front axle. Replace these three components with the flanged, prevailing
torque lock nut included in the kit. This nut provides all of the functions of the
three OEM components, but allows more thread to protrude through the nut.
Torque the new axle nut to 50 foot-pounds. Install the chrome axle caps with the
plastic carriers in place. PIC 3 The right side simply slides on, and the left side
screws on. Both are held in place with the #8–32 setscrews.
On
‘08
and
Later
Models:
Install two of the included #8-32 setscrews into each
axle cap without a black plastic carrier. Install the axle cap with the hex hole to
the axle nut side and the axle cap with the round hole to the axle side. Tighten
securely.
Avoid damage to the motorcycle. Protect painted surfaces with a soft
cloth or blanket.
STEP 4
Place a soft cloth on top of the front fender between the fork tubes to guard
against scratching. Slightly loosen the four button head cap screws securing the
inner clamp halves to the fork brace. Carefully insert this fork brace assembly
between the fork sliders and hold it in place.
STEP 5
Set one of the fork covers into position on the slider. The axle cap should protrude
through the Fork Skin on the bottom. PIC 4 Secure the fork brace to the top of the
Fork Skin with two 1/4”–20 x 1” socket head cap screws, loosely for now. Repeat
for the other side.
STEP 6
At the very bottom of each Fork Skin, insert one of the 1/4”–20 x 5/8” setscrews,
but do not tighten yet.
STEP 7
Adjust the height of the fork brace on each side. The fork brace should clamp on
to the fork slider in the same position on each side. The hole at the bottom of the
Fork Skin should be centered as closely as possible around the axle caps. Tighten
the clamps to the sliders on each side, snug only for now.
STEP 8
Tighten the button socket cap screws securing the fork brace to the inner clamp
halves to 7-8 foot-pounds. Be sure the Fork Skin clamps are in line with the fork
brace.
STEP 9
Tighten the socket head cap screws securing the Fork Skins to the inner clamp
halves to 7-8 foot-pounds. Make sure the gaps in the front and rear of the clamp
are
equal.
PIC
5
STEP 10
Tighten the set screws in the bottom of the fork skins so they index into the
centering devices on the bottom of each fork slider. PIC 4 DO NOT over tighten
these setscrews — TIGHTEN TO SNUG ONLY!
Ensure that the installation of this product does not interfere
with the proper operation of the motorcycle before riding.
It is the installer’s responsibility to ensure that all of the fasteners
(including pre-assembled) are tightened before operation of the
motorcycle. Küryakyn will not provide warranty coverage on
products or components lost due to improper installation or lack of
maintenance. Periodic inspection and maintenance are required on
all fasteners.
Ride On!
BLACK and CHROME XL FORK SKINS
INSTALLATION
PIC 1
PIC 2
PIC 3
PIC 4
O-RING IN GROOVE
PLASTIC CARRIER
AXLE CAP
CENTER AXLE CAP
IN OPENING
PIC 5
MAKE SURE ALL SPACES ARE
EQUAL FRONT AND REAR
TIGHTEN SET
SCREW SNUGGLY