Ride on, Lighted side trim/tour-pak, Installation – Kuryakyn 7265 LIGHTED SIDE TRIM for TOUR-PAK User Manual
Page 2
PAGE
2
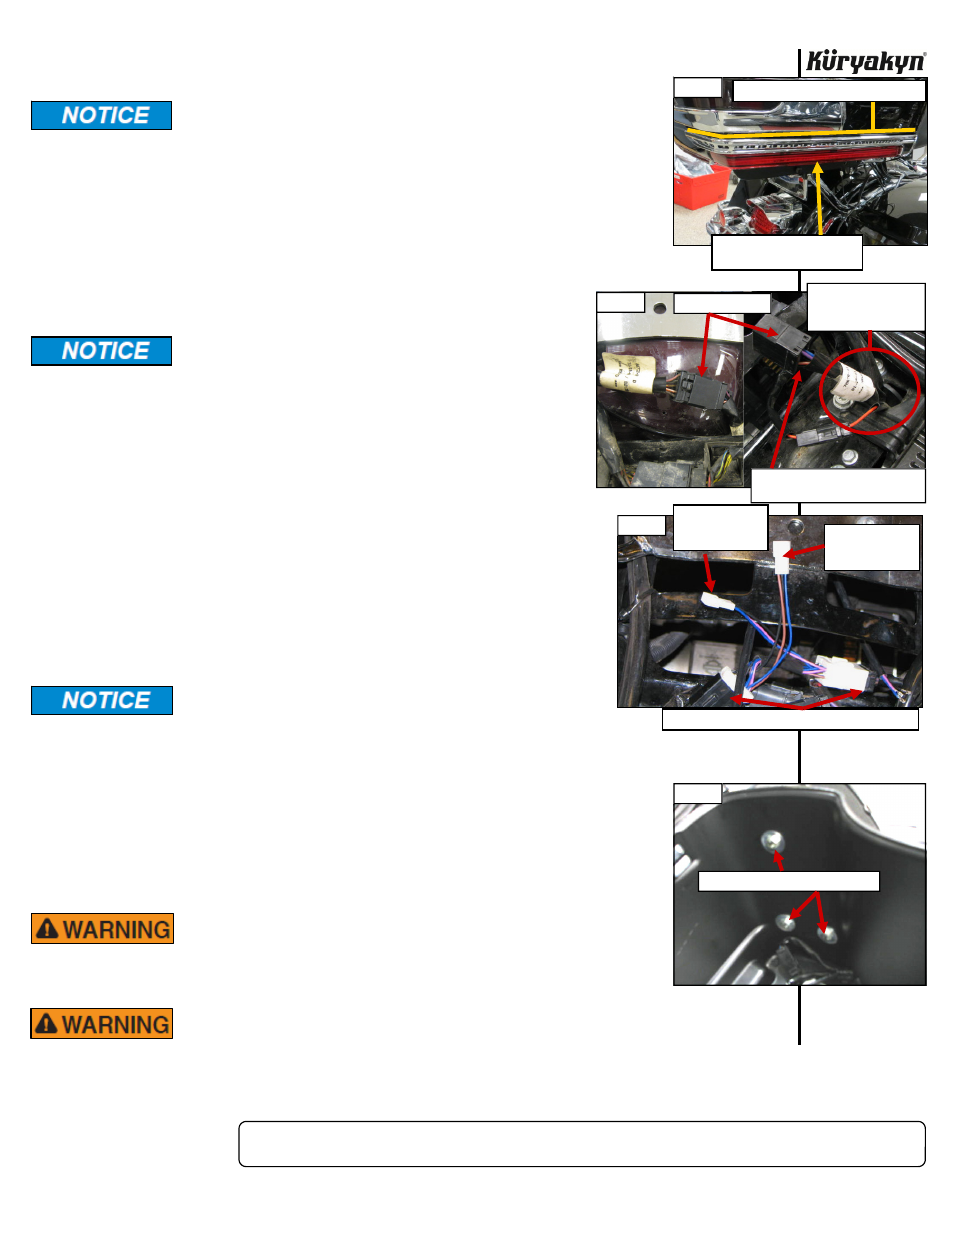
STEP 3
Test fit the right side Trim. Line it up to the body line above the side light or chrome trim of the
of the Tour-Pak (PIC 2) making any reference marks with a non-permanent marker or masking
tape.
The adhesive will not bond correctly if applied at temperatures less
than 50°F. Do not attempt this installation in temperatures less than
50°F.
STEP 4
Rub the backing of the adhesive with the back of your fingernail to activate the
adhesive. Remove the backing. Using any reference marks made in Step 3, attach
the Trim to the right side. Press in place for one minute. Full bonding will occur in
24
hours.
NOTE:
If the motorcycle is to be operated before the 24 hour cure time has
expired, use a good quality masking or painter’s tape over the Trim to assist in
holding the Trim in place until the cure time is over.
STEP 5
Repeat Steps 3 and 4 for the left side.
Küryakyn recommends the use of dielectric grease on
electrical connections.
STEP 6
Remove the seat and locate the H-D main wiring harness. PIC 3 (On
trike models, locate the 8-pin connector from the main harness to the
run-turn–brake
controller.
This
is
the input side of the controller and
the 8-pin connector will have a RED wire with a YELLOW stripe. It
should be located on the left side under the passenger handrail.
PIC 3) Separate this connector, place some of the included dielectric
grease in each half, and plug the 8-Pin Run-Turn wiring adapter into
each
end.
PIC
4
STEP 7
Remove the Tour-Pak liner from the bottom of the Tour-Pak. Locate the
three fasteners that attach each speaker housing to the Tour-Pak. PIC 5
Loosen all six fasteners to allow enough room for the wire harness from
each trim to be routed between the speaker housing and the Tour-Pak.
STEP 8
Route the wire harnesses from each Lighted Trim behind each speaker
housing to the wiring adapter just installed. Secure the harnesses out of
harms way using the included cable ties. Tighten the fasteners making
sure the wires are not pinched.
Secure all wiring away from any moving parts, pinch points
or extreme heat. Küryakyn WILL NOT issue a warranty on
any electrical component that fails due to pinched, crimped, broken,
abraded, melted or frayed wires.
STEP 9
Place some of the included dielectric grease on each connector. Connect the three
pin connector on the wire harness from the LEFT lighted Trim to three pin
connector on the 8-Pin adapter with the PURPLE-BLACK-BLUE wires. Connect
the three pin connector on the wire harness from the RIGHT Lighted Trim to the
three pin connector on the 8-Pin adapter with the BROWN-BLACK-BLUE wires.
PIC 4
STEP 10
Turn the bike on and test that all lights function correctly. Replace the seat.
ENSURE PROPER LIGHT OPERATION BEFORE RIDING THE
MOTORCYCLE. VISIBILITY IS A MAJOR CONCERN FOR
MOTORCYCLISTS. A LIGHT MALFUNCTION COULD RESULT IN
DEATH OR SERIOUS INJURY.
AFTER INSTALLING THE SEAT, PULL UP ON IT TO ENSURE IT IS LOCKED
INTO PLACE. A LOOSE SEAT CAN SHIFT AND CAUSE LOSS OF CONTROL
RESULTING IN SERIOUS INJURY OR DEATH.
Ride On!
LIGHTED SIDE TRIM/TOUR-PAK
INSTALLATION
PIC 3
WIRING HARNESS
WIRING HARNESS
COMES UP THROUGH
FRAME
CONNECTOR ON TRIKES HAS RED
WITH YELLOW STRIPE WIRE
PIC 4
BROWN-BLUE-
BLACK WIRES TO
RIGHT LIGHT
PURPLE-BLUE-
BLACK WIRES TO
LEFT LIGHT
REMOVE THESE THREE FASTENERS
PIC 5
PIC 2
USE THIS BODY LINE TO ALIGN TRIM
WIRING ADAPTER CONNECTED TO MAIN HARNESS
THIS LOCATION HAS A SIDE
LIGHT OR CHROME TRIM