El calibre de garfios de klein, Gaff inspection procedures, Procedimientos de inspección de los garfios – Klein Tools Gaff Sharpening User Manual
Page 2
(El calibre tiene aberturas y marcas de calibración
para medir con precisión la anchura, el grosor y el
perfil de la punta de los garfios (vea la Figura 3 en
la pagina 1).
A. Ranura para medir el grosor a 1 pulgada (25,4
mm) de la punta (garfios para postes solamente).
B. Ranura para medir el grosor a 1/2 pulgada (12,7
mm) de la punta.
C. Ranura para medir la anchura a 1/2 pulgada
(12,7 mm) de la punta.
D. Ranura para medir la anchura a 1 pulgada (25,4
mm) de la punta (garfios para postes solamente).
E. Marcas de límite de longitud apropiada cuando
se mide el grosor o la anchura a 1 pulgada (25,4 mm)
de la punta.
F. Marcas de límite de longitud apropiada cuando
se mide el grosor o la anchura a 1/2 pulgada (12,7
mm) de la punta.
G. Plantilla para determinar el perfil apropiado de la
punta.
Carefully inspect the entire gaff before each use.
1.
Check gaffs.
Check that gaffs are free of dents, gouges, or
scratches.
2.
Check gaff thickness with Klein Gaff Gauge.
For
pole gaffs only, insert the gaff as far as
possible through the large opening in the gauge
marked “TH” (Figure 4). Make sure the top ridge is
flush against the gauge base. The point of the gaff
should fall within the limits formed by the last line and
the edge of the gauge, as shown. If it does, the gaff
is the proper thickness, as measured approximately
1" (25.4 mm) from the point.
For
pole and tree gaffs, insert the gaff as far as
possible through the small opening in the gauge
marked “TH” (Figure 5). Make sure the top ridge
is flush against the gauge base. The point should
fall within the center two lines, as shown. If it does,
the gaff is the proper thickness, as measured
approximately 1/2" (12.7 mm) from the point.
3.
Check gaff width with Klein Gaff Gauge.
For
pole gaffs only, insert gaff as far as possible
through the large square opening in the gauge
marked “W” (Figure 6). Make sure the top ridge is
flush against the gauge base. The point should fall
within the limits formed by the last line and the edge
of the gauge, as shown. If it does, the gaff is the
proper width, as measured approximately 1" (25.4
mm) from the point.
For
pole and tree gaffs, insert gaff as far as possible
through small opening in the gauge marked “W”
(Figure 7). Make sure the top ridge is flush against
the gauge base. The point should fall within the
center two lines, as shown. If it does, the gaff is the
proper width, as measured approximately 1/2" (12.7
mm) from the point.
4.
Check gaff profile/contour with Klein Gaff
Gauge.
For
pole and tree gaffs,
For
For
place the
side of gaff along the front edge of
the gauge with gaff point resting in
the notch. The point should follow the
configuration of the gauge to assure
proper “rounding off” of the tip within
1/4" (6.4 mm) of the point (see Fig. 8).
Minimum safe length for a pole-climbing gaff is
1-7/16" (37.5 mm), measured on the underside of
gaff. Minimum safe length for a tree-climbing gaff
is the greater of the following: (a) 2-1/4" (57 mm),
measured on the underside of the gaff, or (b) long
enough to penetrate the core of the tree. Before
climbing, always test the penetration of tree gaffs at
the base of the tree to be sure gaffs extend through
the bark and properly penetrate the wood.
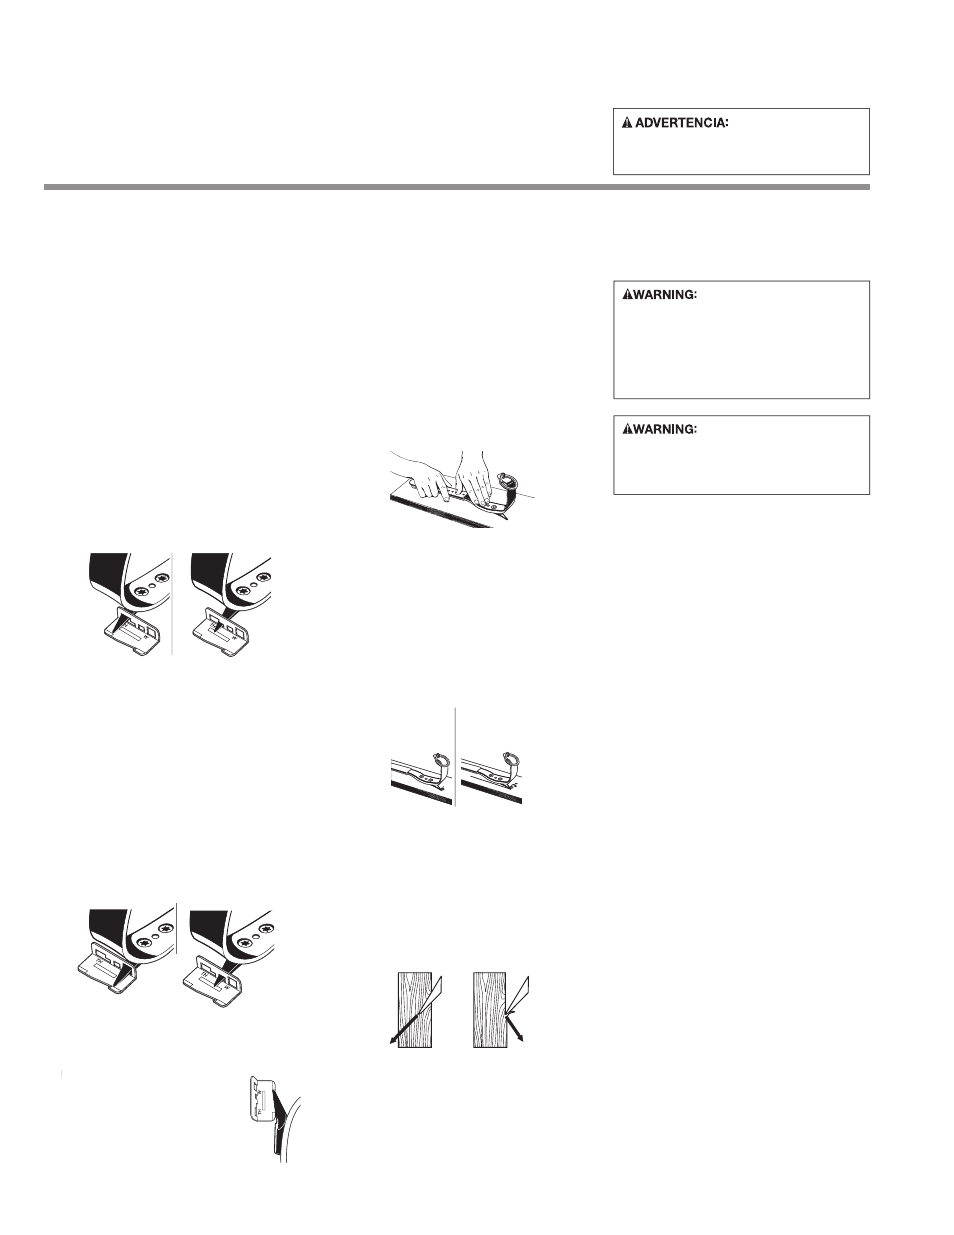
5.
Check gaff sharpness with the “plane test”.
Step 1: Place climber with gaff pointing downward
and upper strap loop resting against a horizontal
board or pole. Hold the leg iron parallel to the wood
surface, with the stirrup vertical. Push the climber
horizontally in the direction of the gaff without any
downward pressure except the weight of the climber
(see Figure 9).
Step 2: The gaff is properly sharpened if it buries
itself in the wood within a few inches of its starting
position and can no longer be moved forward (see
Figure 10). The gaff is not properly sharpened if it
merely slips, slides, or plows a shallow groove in the
wood (see Figure 11). In this case, either replace
the gaff following the “Gaff Assembly and Ordering
Instructions” or resharpen the gaff following the
“Gaff Sharpening Instructions”, both contained in
this booklet. A resharpened gaff must be tested for
proper width, thickness, and point profile, and it must
also pass the “plane test” before use.
The “plane test” reveals possible penetration
problems not noticeable to the naked eye. Figure
12 shows how a properly sharpened gaff cuts its
way into the pole for proper support. Figure 13
shows how an improperly sharpened gaff can
“cut-out”.
6.
Destroy and replace all worn or damaged OPE
equipment.
If evidence of excessive wear, deterioration, or
mechanical malfunction is observed, replace the
equipment immediately.
Never work with worn or
damaged OPE equipment. Using damaged or worn
equipment can cause serious injury or death.
7.
The inspector is the most important part of
any inspection procedure.
Check all equipment thoroughly and follow all safety
procedures and guidelines. Do not take shortcuts.
Inspeccione minuciosamente todo el garfio antes
de cada uso.
1.
Compruebe los garfios.
Asegúrese de que los garfios no tengan
indentaciones, acanaladuras ni arañazos.
2.
Compruebe el grosor de los garfios con el
calibre de garfios de Klein.
En el caso de
garfios de poste solamente,
introduzca el garfio tanto como sea posible a través
de la abertura grande que está en el calibre marcada
con las letras “TH” (Vea la figura 4). Asegúrese de
que la cresta superior esté al ras contra la base
del calibre. La punta del garfio debe caer dentro
de los límites formados por la última línea y el
borde del calibre, de la manera que se muestra en
la ilustración. Si lo hace, el garfio tiene el grosor
adecuado, según se mide aproximadamente a 1
pulgada (25,4 mm) de la punta.
En el caso de
garfios de poste y de árbol,
introduzca el garfio tanto como sea posible a través
de la abertura pequeña que está en el calibre
marcada con las letras “TH” (Vea la figura 5).
Asegúrese de que la cresta superior esté al ras
contra la base del calibre. La punta debe caer dentro
de las dos líneas centrales, de la manera que se
muestra en la ilustración. Si lo hace, el garfio tiene el
grosor adecuado, según se mide aproximadamente
a 1/2 pulgada (12,7 mm) de la punta.
3.
Compruebe la anchura de los garfios con el
calibre de garfios de Klein.
En el caso de
garfios de poste solamente,
introduzca el garfio tanto como sea posible a través
de la abertura cuadrada grande que está en el
calibre marcada con la letra “W” (Vea la figura 6).
Asegúrese de que la cresta superior esté al ras
contra la base del calibre. La punta debe caer
dentro de los límites formados por la última línea y
el borde del calibre, de la manera que se muestra
en la ilustración. Si lo hace, el garfio tiene el grosor
Para su protección, Klein
recomienda que los trepadores se reemplacen
cuando el garfio original y dos garfios de repuesto
se hayan utilizado en los trepadores.
El calibre de garfios de Klein
(continuacion)
Gaff Inspection Procedures
Y
Fig. 8
X
Fig. 6
Fig. 7
W
Fig. 4
Fig. 5
z
Fig. 9
AA
Fig. 10 - Right
- Correcto
Fig. 11 - Wrong
- Incorrecto
BB
Fig. 12 - Right
- Correcto
Fig. 13 - Wrong
- Incorrecto
Procedimientos de inspección
de los garfios
2
OSHA specifies that all employers
covered by the Occupational Safety and Health
Act are responsible for inspecting and maintaining
all tools and equipment used by employees —
whether owned by the employees or by the
company. Personal-protective equipment should
be inspected before each use and removed from
service if signs of wear or damage are found.
Should any unusual conditions
be noted during inspection that are not specified
here, do not use the suspect equipment until an
individual considered by OSHA to be qualified
makes a decision on its usability.