Data acquisition software instructions – Control Company 4136 DATA ACQUISITION User Manual
Page 2
Browse Symbol Table - Not Used
Browse Model Confi guration - Not Used
Browse Model Detail - Not Used
MODEL SELECTION – Not Used
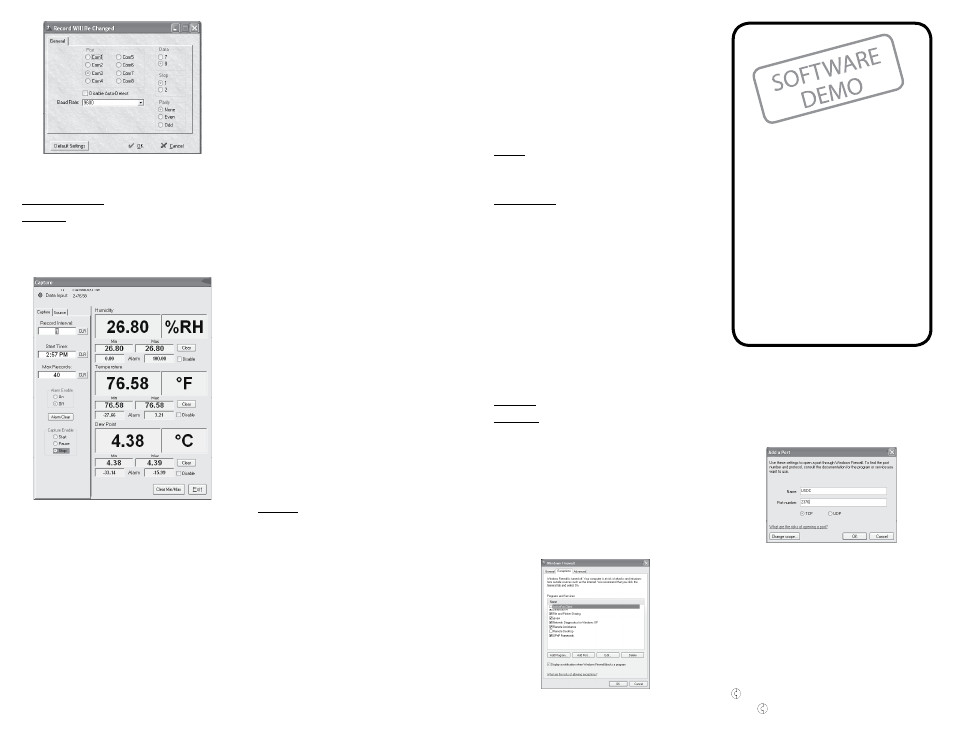
CAPTURE –
This is the main user interface (See Figure)
After pressing Capture, the window will not open instantly.
This is because the program is currently searching for the
correct COM port. If a message box instructs you to set
your device to a speci c setting do so then press OK.
*NOTE: After editing any eld, press the tab key to save
changes and move to the next eld.
Data Input
• Displays the raw data being output by the device.
Clear Min/Max button
• Press this button to reset all the minimum and
maximum values to the current reading.
Individual Clear buttons
• Press one of these to reset the minimum and maximum
values for the adjacent elds only.
Alarm
• Enter values in these elds for the minimum and
maximum alarm set points. When the alarm system is
enabled, if the input value is outside the range de ned
by the alarm set points, the current reading will ash
red, and a bell will sound every minute until the Alarm
Clear button is pressed.
Record Interval
• This is the number of seconds between each captured
reading.
• The minimum record interval is 1 second.
Start Time
• Enter the time you wish for the program to begin
capturing data.
• If the time entered has already passed for the present
day it will begin at that time tomorrow.
• If blank this function is disabled.
Max Records
• This is the maximum number of records captured while
capturing data.
• Example- if you wish to take a reading every ten
minutes for three hours you would set Record interval
to 600 (60 seconds/min * 10 min = 600 seconds) and
you would set Max Records to 30 (10 records/hour * 3
hours = 30 records)
• If Max Records is set to zero, records will be taken until
the program is manually stopped.
Alarm Enable
• This must be set to ON if you wish to use the alarm.
• If set to OFF the alarm will not activate.
Alarm Clear button
• Press to clear an active alarm state. The bell will stop
sounding and the display will stop ashing.
• If the alarm has been activated and the button has not
been pressed the current reading will continue to ash
and the bell will continue to sound every minute until
the Alarm Clear button is pressed even if the data input
is within range.
Individual Disable buttons
• If you wish to set alarms for some but not all the data
elds, check the disable checkboxes for the individual
alarms you wish to disable.
Capture Enable
• Start: The program will begin capturing data instantly
unless a start time has been set that has not been
reached.
• Pause: Press pause if you wish to temporarily stop
taking readings. Max records will not be affected by
pressing this button.
• Stop: Press if you wish to stop saving captured data.
Will automatically be selected when Max Records is
met. Resets the number of Max Records, so if you
wish to take another set of data with the same criteria
you simply select start again.
SOURCE –
Data Logger
• If you wish to take the logged data off of your meter,
rst ensure that capture enable is set to Stop and Start
Time is cleared.
• Prepare your unit to send data by turning on the
transfer mode.
• Click the Data Logger Yes button.
• Set Capture enable to Start.
• Press the button on your meter which begins the data
transfer.
• Capture Enable will change to Stop when transfer is
complete.
Networking
• Server mode outputs incoming data for other instances
of the program running on a LAN to receive. In order
to use this feature the data eld labeled “My Network
ID:” in the Networking window must be lled out.
Therefore, if multiple data capture programs are running
DATA
ACQUISITION
SOFTWARE
INSTRUCTIONS
(SEE ORDERING INFORMATION)
Control Company Cat. No. 4136 - SOFTWARE DEMO
©
2009
Control Company. 92-4136-88 Rev. 2 04062009
on a single LAN, this will allow the client to differentiate
between them.
• Client mode allows the program to receive data from
another program running on the LAN. In order to use
this feature the data eld labeled “Network Server ID:” in
the Networking window must be lled out. This is where
you enter the name given to the server (i.e. “My Network
ID:” for the server) from which you wish to receive data.
• None should be selected if networking is not used.
Exit
• Closes the Program and saves changes.
DEMO –
Simulates the data capture program described above
without an actual device input. The demo mode will
generate random but lifelike data.
NETWORKING –
See Firewall Con guration documentation below
The email functionality allows an email to be sent to a
given address updating the recipient with data capture
events or statistics.
• Required entry elds are from address, to address, and
server address.
• Check the Enable Email Alarm Support checkbox to
receive an email when an alarm becomes active.
• The Update Period eld can be set if the user wishes to
be emailed periodically the current data readings being
captured by the program. The unit of time entered is
minutes.
• Network Server ID is required if this program will be
receiving data from another program on the LAN.
• My Network ID is required if this program will be
outputting data on a LAN for other instances of the
program to receive.
WINDOW – Not Used
REPORTS –
Data Capture report
Prints out the data stored in the capture le in a report
format.
FIREWALL CONFIGURATION
If Windows Firewall is enabled on your PC, the rewall
must be con gured to allow the program to output data to
the LAN. Follow the steps below to do this.
1. Open the Control Panel window inside Windows.
2. Double click the icon labeled Windows Firewall to
open the rewall con guration utility.
3. Click the Exceptions tab located at the top of the window.
4. Click the button labeled Add Port…
5. Inside the entry eld labeled “Name:” insert the name
of the program (ex. USDC). Insert the correct port
number depending upon the number of instances of
the program you are running. Select the option
labeled TCP.
Instance
1
2
3
4
5
Default Streamed (TCP) Port Numbers 2376 2377 2378 2379 2380
6. Click OK to save the information and exit the program.
THESE INSTRUCTIONS ARE ALSO AVAILABLE
IN LARGER TYPE, “PDF” FORMAT--
ONCE THE SOFTWARE HAS BEEN INSTALLED,
OPEN THE PROGRAM AND SIMPLY CLICK
HELP.
THESE INSTRUCTIONS ARE ALSO AVAILABLE IN
LARGER TYPE, “PDF” FORMAT--
ONCE THE SOFTWARE HAS BEEN INSTALLED,
OPEN THE PROGRAM AND SIMPLY CLICK HELP.