Installation procedure, Removal procedure – Condux Reusable Power Eye User Manual
Page 2
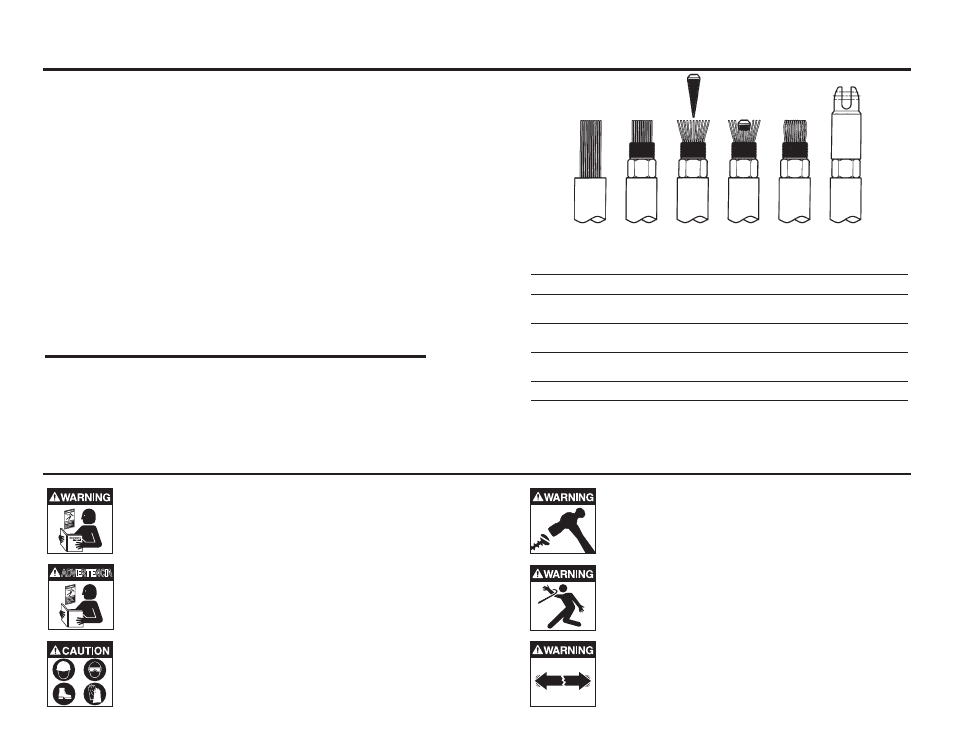
1. Remove the specified length of cable jacket, insulation, etc. (See Table 1).
CAUTION: Do not cut into the wire conductors or the pulling eye may fail
prematurely. (Figure 1.)
2. Slide the sleeve nut over the exposed wire conductors as far as possible.
(Figure 2.)
3. Spread the wire conductors apart, and insert the tapered plug into the
center. (Figure 3.)
4. Use an Allen Wrench to screw the tapered plug into the wire conductors,
until it is flush with the ends of the conductors. (Figure 4.)
5. Use a hammer to close the wire conductors around the tapered plug.
(Figure 5.)
6. Thread the swivel head, eye socket, or clevis socket firmly onto the sleeve
nut. Attach the pulling eye to a multiple pulling harness or winch line.
(Figure 6.)
Installation Procedure
!WARNING: Read and understand all procedure
and safety instructions before using any Condux
®
Reusable Power Pulling Eye. Failure to do so may
result in personal injury or property damage. Save
this user’s guide for future reference.
!WARNING: The Condux Reusable Power Pulling
Eye is for cable stringing or pulling only. Do not
use it for any other purpose or severe personal
injury and property damage could result.
!CAUTION: Wear personal protective equipment:
hard hat, safety glasses, safety shoes, and leather
work gloves. Failure to do this could result in
personal injury
!WARNING: Do not stand directly behind the pull
string. If any component breaks, severe personal
injury or property damage could result.
!WARNING: Do not exceed the load capacity of the
Condux Reusable Power Pulling Eye or any
element in the pull string. Severe personal injury or
property damage could result.
!ADVERTENCIA: Favor de leer y comprender todas
las instrucciones de operación y seguridad antes
de usar el Condux
®
Reusable Power Pulling Eye.
Si Ud. no comprende las instrucciones favor de
consultarle a su jefe.
ADVERTENCIA
Instrucciones
de Operación
Removal Procedure
1. Use a hacksaw to cut through the wire conductors directly behind the
sleeve nut.
2. Use a hammer to drive the wire conductors through the sleeve nut and
back into the swivel head, eye socket, or clevis socket.
3. Remove the swivel head, eye socket, or clevis socket from the sleeve nut
and remove the tapered plug from the wire conductors.
Figure 1. Figure 2. Figure 3. Figure 4. Figure 5. Figure 6.
Conductor
Pulling Eye
Remove this
Allen Wrench
Size
Color
Amount of Jacket
Size
2500 kcmil
Green
5
1
⁄
4
”
133 mm
5
⁄
16
”
2000 kcmil
Red
5”
127 mm
5
⁄
16
”
1750 kcmil
Yellow
4
3
⁄
4
”
121 mm
5
⁄
16
”
1500 kcmil
Black
4
5
⁄
8
”
117 mm
5
⁄
16
”
1250 kcmil
Blue
4
1
⁄
2
”
114 mm
5
⁄
16
”
1000 kcmil
Orange
4
1
⁄
2
”
114 mm
5
⁄
16
”
750 kcmil
Brown
4
1
⁄
4
”
108 mm
5
⁄
16
”
700 kcmil
Gray
3
3
⁄
4
”
95 mm
5
⁄
16
”
600 kcmil
Green
3
1
⁄
2
”
89 mm
5
⁄
16
”
500 kcmil
Yellow
3
3
⁄
8
”
86 mm
1
⁄
4
”
400 kcmil
Black
3
1
⁄
8
”
79 mm
1
⁄
4
”
350 kcmil
White
3”
76 mm
1
⁄
4
”
250 kcmil
Blue
2
7
⁄
8
”
73 mm
3
⁄
16
”
4/0 AWG
Green
2
1
⁄
2
”
64 mm
3
⁄
16
”
2/0 AWG
Black
2
1
⁄
2
”
64 mm
3
⁄
16
”
1/0 AWG
Red
2
1
⁄
4
”
57 mm
N/A
Table 1.