Gel slider instructions, A. unpacking, B. assembly – C.B.S. Scientific GSL-1001 User Manual
Page 2: C. set-up of unit for sequencing gel casting, D. maintenance
Gel Slider Instructions
A. Unpacking
Please verify that your Gel Slider comes complete with the following:
• 2 side panels EACH with the following components:
a) 2 black leveling feet (4 total)
b) 1 attached adjustment panels marked with 1/8” and 3/16” held in place with 2 white thumb screws (2 total)
c) glass plate stop with nylon thumb screw (2 total)
• 2 slotted end assemblies each with 2 black thumb screws (4 total)
• 8 ea flathead screws
• 8ea white spring clamps
• Bubble level
B. Assembly
1. Place on level surface
2. Using a phillip’s head screwdriver screw cross bars
into side panels with the 8 flathead screws as shown
in figure 1.
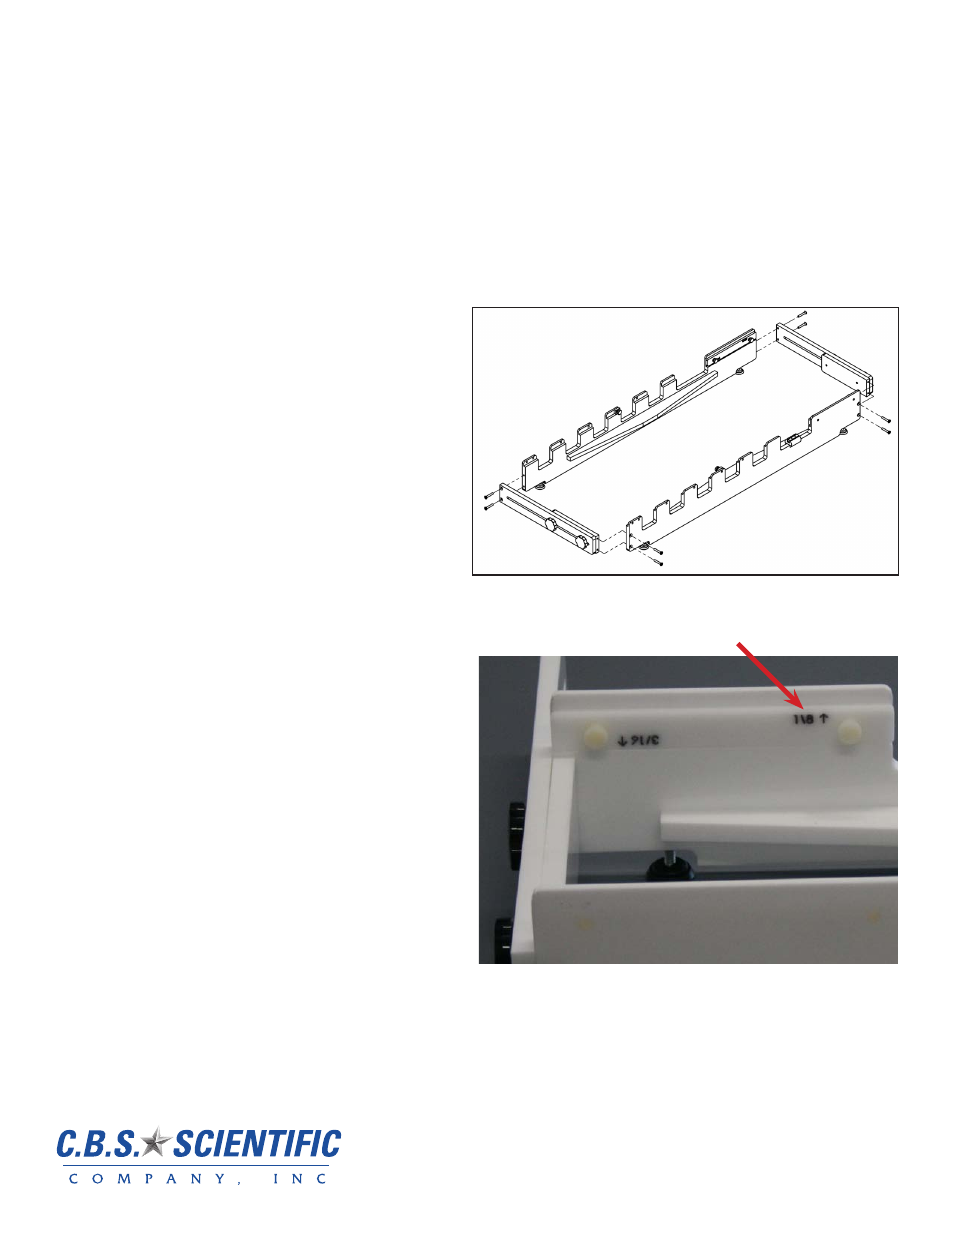
C. Set-up of Unit for Sequencing Gel Casting
1. Side panels with black numbers depicting back plate
thickness must be screwed in so either the 1/8”
or 3/16” arrow points up. (in photo at right the
correct position for a back plate width of 1/8” is
shown.). This important step assures there is the
proper offset on your glass plate assembly for opti-
mal gel casting. (Note: Gel Slider is shipped in the
3/16” position). If your back glass plate thickness
is 1/8”, unscrew white thumb screws and place 1/8”
arrow pointing up and re-tighten screws (as shown
by red arrow). If your back glass plate is 3/16”
unscrew white thumb screws and place 3/16” arrow
pointing up.
2. Level Gel Slider by using level provided and adjust-
ing leveling feet.
D. Maintenance
1. Keep Gel Slider clean by rinsing with de-ionized water.
figure 1.
P h o n e : ( 8 5 8 ) 7 5 5 - 4 9 5 9 U S T o l l F r e e : ( 8 0 0 ) 2 4 3 - 4 9 5 9
w w w . c b s s c i e n t i f i c . c o m