How to use – Black & Decker UCM200WG User Manual
Page 11
19
20
How to Use
This appliance is intended for household use only.
BEFORE FIRST USE
Caution: To protect against electric shock, do not immerse the coffeemaker
or allow AC cord to come into contact with water or other liquids.
1. Carefully unpack your coffeemaker. remove any labels from the outer
surfaces.
2. Clean the carafe, carafe lid, mill basket and mill basket lid in warm, soapy
water. rinse thoroughly and dry.
3. Fill the water reservoir to the 10-cup mark with cold water. Place carafe
onto the warming plate.
4. Insert the mill basket and mill basket lid into the coffeemaker, taking care
to replace it properly.
DO NOT USE COFFEE WHEN CLEANING. USE
WATER ONLy. Close the mill assembly lid.
Note: The mill lid must be closed securely in order for the brew cycle to begin.
5. Plug the coffeemaker into an outlet.
6. Press the mill button
to turn the grinding blades off. The mill indicator
light will appear.
7. To start the cleaning cycle, press the power button
and the water will
begin to flow the coffeemaker.
8. When the carafe is full, press the power button
to turn the unit OFF.
Discard the water in the carafe. Allow the unit to cool for 15 minutes.
9. refill the water reservoir and repeat steps 6-8 one more time.
10. After the second pot of water has cooled, discard the water and thoroughly
wash the carafe, carafe lid, mill basket and mill basket lid in warm, soapy
water. rinse thoroughly and dry.
SETTING THE CLOCK
1. Plug the coffeemaker into an outlet. Display will show 12:00 and will continue
to flash until the time is set.
2. Press and hold the hour button
until the LED display begins to flash.
The unit is now in the clock-setting mode.
3. Press the hour and minute buttons,
and
, to set the correct time. A
small dot will appear in the upper left corner of the display to signify A.M. No
visible dot indicates P.M. The clock display will flash 5 times, then stop. The
time is now set.
BREWING COFFEE - IMMEDIATE START
1. Plug the appliance into an electrical outlet.
2. Markings on the carafe indicate the level of water required to brew the desired
number of cups. Fill the carafe with cold tap water. Close the lid back into
position.
Note: Brewing less than 4 cups is not recommended.
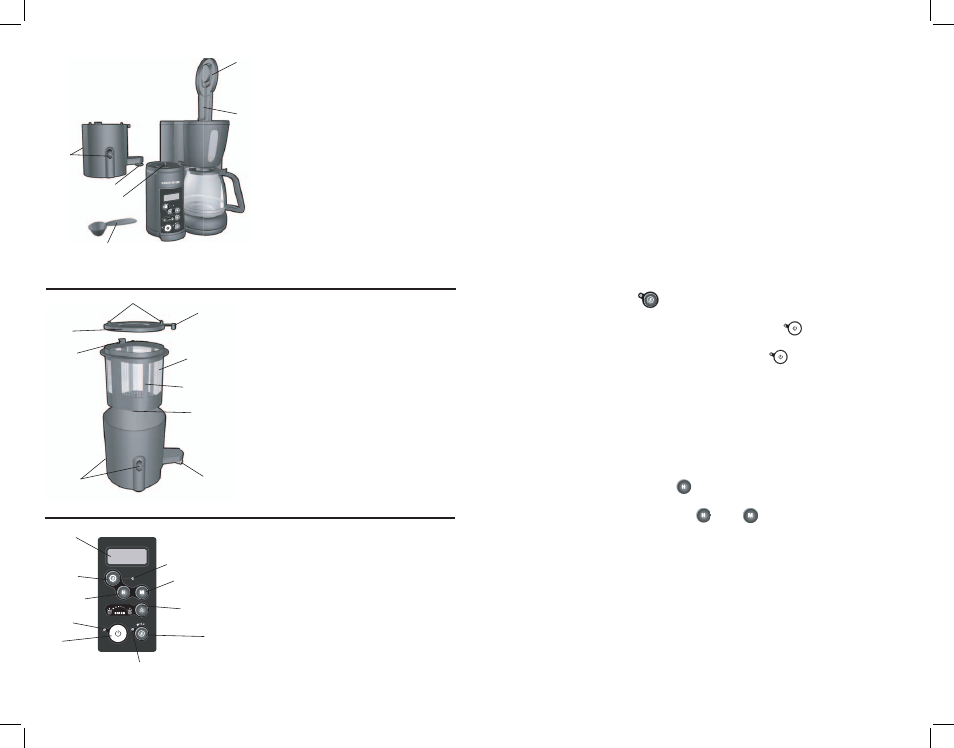
1. Assembly lid
2. Spreader tube
3. Locking buttons
4. Sneak-A-Cup®
5. Grinding motor pin
6. Measuring spoon
-10-
-8-
-6-
-4-
-2-
B
1. Safety interlock switch
2. Mill basket
3. Maximum fill level
4. Blades
5. Sneak-A-Cup®
6. Lock buttons
7. Basket tabs
8. Mill basket lid
9. Mill basket tabs
C
C
12:30
D
1. Timer Indicador Light
2. Minute
3. Grind Select
4. Mill
5. Mill Indicator Light
6. Power
7. Power Light
8. Hour
9. Timer
10. LED Display