Features & controls – Echo CH911DH Owners Manual v.4 User Manual
Page 13
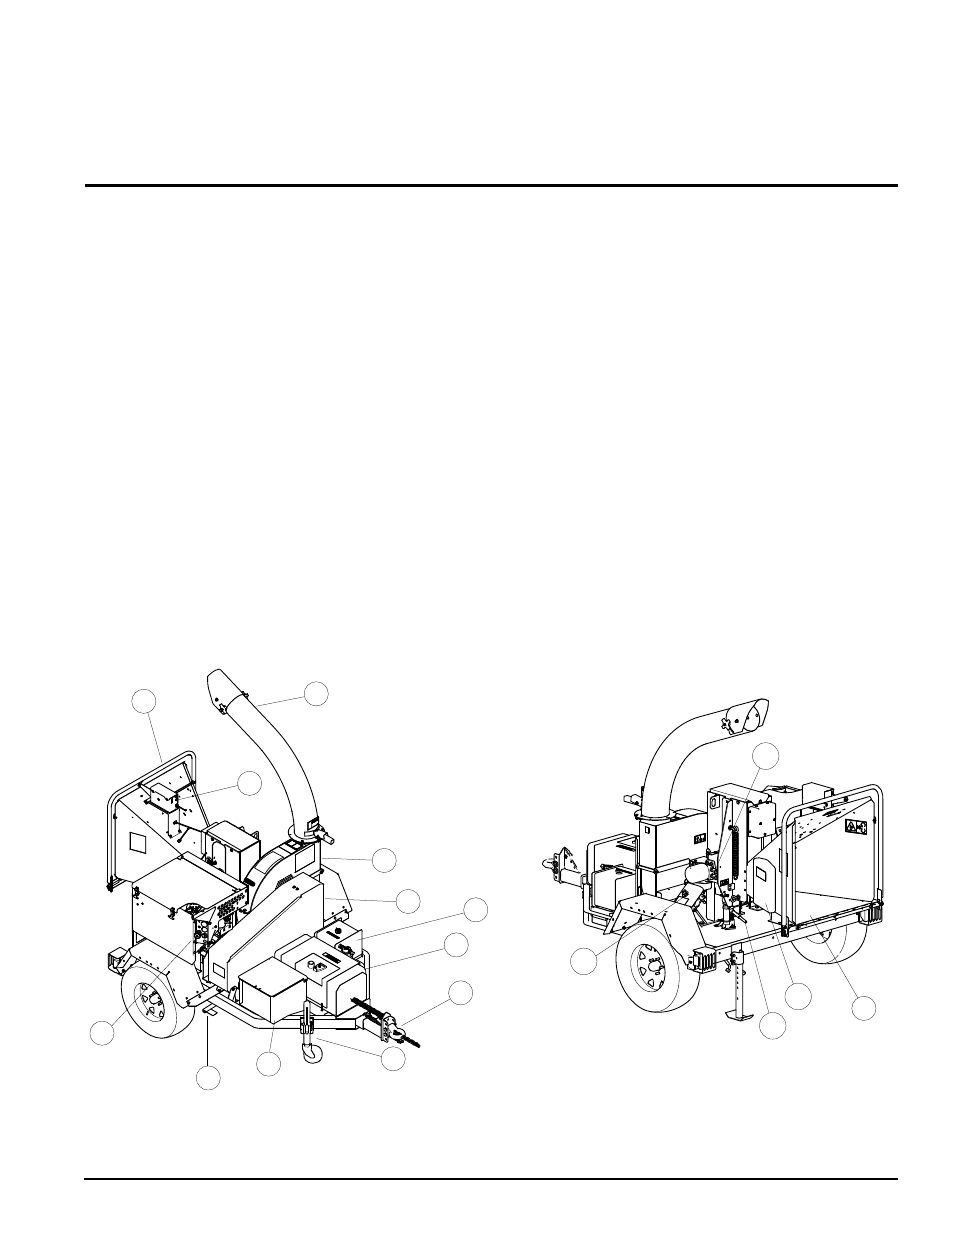
9 INCH CHIPPER
9
Chipper Chute:
1.
Feeds materials to the chipper blades
for chipping.
Discharge Tube:
2.
Chipped material exits through this
tube. It is adjustable 360 degrees.
rotor access Cover:
3.
Tilts up to expose rotor.
Drive belt shield:
4.
Never remove shields when in
use.
fuel Tank:
5.
Fuel level indicator is located on top.
Pintle Hitch:
6.
Always use safety chains when towing.
Pivoting Tongue Jack:
7.
Always have in uP position
and clear from ground when moving. When in use,
place in DOWN position on a level surface. Turn handle
to raise or lower wheel.
battery box:
8.
Use group 22F 300 CCA min.
belt engagement Pedal:
9.
Used to disengage rotor
assembly drive belt.
Figure 3.1, 9 inch chipper controls
Section
feaTures & ConTrols
3
Control Panel:
10.
Contains the key switch, throttle
control, Murphy switch and gauges.
Hydraulic fluid Tank:
11.
Check level of hydraulic fluid
before each use.
Controller light:
12.
When the light is flashing green,
increase RPM. The feed roller can be shifted into
Forward when the controller light is steady green. See
Section 6 for more information.
feed roller Jack:
13.
use the jack to raise the feed roller
for service or maintenance. See Sec. 5.6.
manual Container:
14.
Conveniently holds your
manuals.
Disk lock and Pin:
15.
Use the disk lock to hold the
chipper disk in place when doing any maintenance
work on it. See Sec. 5.2.
feed roller Control bar:
16.
Move the feed roller control
bar to begin feeding materials into the chipper.
feed roller speed Control:
17.
Turn clockwise to
increase feed roller speed and counterclockwise to
decrease.
7
2
3
8
4
6
5
9
10
11
12
16
14
17
15
13
1