How to use – Black & Decker DE791B User Manual
Page 8
1
1
How to Use
This appliance is intended for household use only.
GETTING STARTED
1. Remove all stickers and packing materials attached to the coffeemaker.
2. Wash all parts as instructed in the “Care and Cleaning”section.
Note: Coffeemaker works without having to set the clock.
3. Before using your coffeemaker for the first time, brew water through it as instructed
in the “BREWING” section without adding grounded coffee.
4. Once brewing is complete the coffeemaker and the brewing indicator light
automatically shut off.
5. Discard the water from the thermal carafe and rinse it.
Important: Do not place the thermal carafe on or near a gas or electric burner, in a
heated oven or in a microwave oven. Avoid rough handling and sharp blows.
BREWING
1. To fill the water reservoir, lift the cover and fill it with water up to your desired level.
Note: Maximum capacity is 8-cups of water. Do not overfill.
2. Place a filter into the brew basket. Fill the filter with the desired amount of coffee.
Note: We recommend 1-2 tablespoons (5-10 grams) of grounded
coffee for every 6 oz. (180ml.) of water. If brewed coffee is too strong
for your taste just add a little bit of hot water to your cup of brewed
coffee.
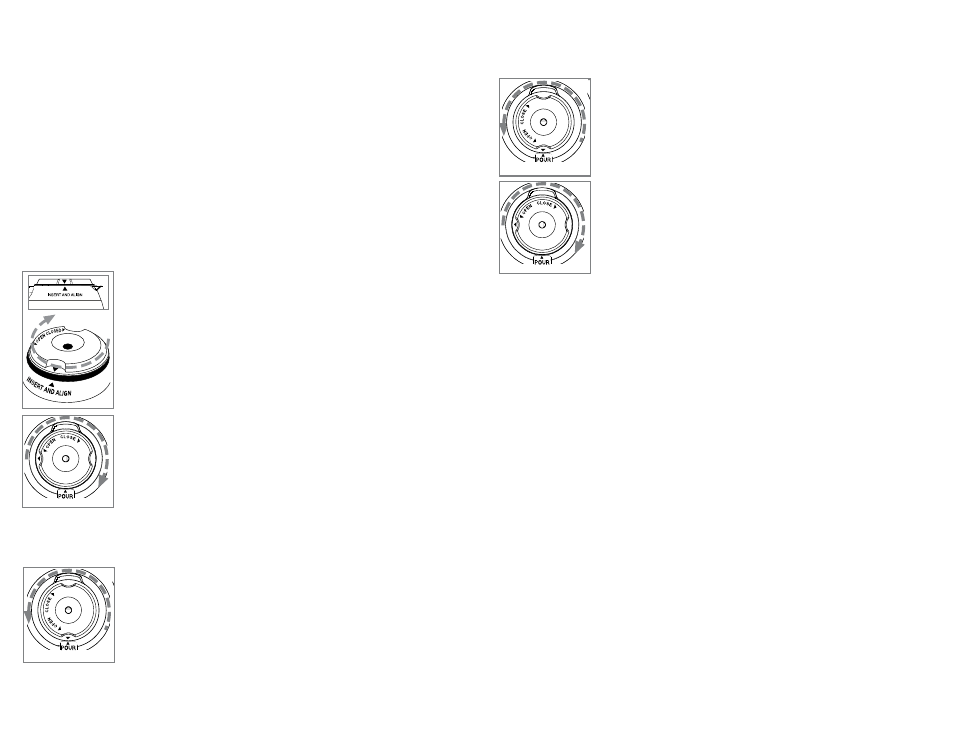
3. To insert brew-thru lid into thermal carafe, align the brew-thru lid
arrow with the “Insert and Align” arrow on the thermal carafe and
twist clockwise (B).
4. Turn the brew-thru lid clockwise until it is in the “Close” position
to brew your coffee (C).
Note: Coffee may overflow if the brew-thru lid is not properly in
place.
5. Place the thermal carafe on the carafe plate and plug in the unit.
6. Press the “ON” button to start the brewing cycle. Once the brewing
indicator light lights up, the brewing cycle begins.
Note: For delay brewing, see “Setting the Clock/Timer & Auto-Brew.”
7. Once the brewing cycle is complete the coffeemaker and the brewing indicator light
automatically shut off.
8. Remove the thermal carafe from the carafe plate.
9. To pour coffee, align the arrow on the brew-thru lid with the
“Pour” arrow on the handle of the thermal carafe by turning
the lid counterclockwise (D).
Note: Make sure the brew-thru lid is secure before you pour the
coffee.
10. Proceed to serve the coffee.
11. Once you finish serving the coffee, close the lid again by turning
it clockwise.
C
D
B
12. Put the thermal carafe back on the carafe plate.
Note: The thermal carafe keeps the coffee hot. Make sure the brew-thru lid is always in
the close position after every use. This allows the coffee to stay hot longer.
Sneak-A-Cup® Interrupt Feature
1. This feature enables you to pour a cup of coffee while the coffee is
brewing before the brewing cycle is complete.
2. To pour coffee, align the arrow on the brew-thru lid with the
“Pour” arrow on the handle of the thermal carafe by turning the lid
counterclockwise (E).
Note: Make sure the brew-thru lid is secure before you pour the
coffee.
3. When you are finished pouring the coffee, turn the brew-thru lid
clockwise until it is in the “Close” position (F).
4. Immediately replace the thermal carafe back on the carafe plate
so that brewing can continue.
Important: To avoid possible overflow after removing the
carafe, be sure to replace the carafe under the brew basket
within 30 seconds to prevent the basket from overflowing.
SETTING THE CLOCk/TIMER AND AUTO-BREW
Clock/Timer
1. Plug in unit, the clock flashes 12:00 a.m. until time is set.
2. To set current time of day: Press the “HOUR” button until the digital display shows
the correct hour.
3. The light on the top left hand corner of the digital display indicates “P.M.” time.
4. Then press the “MIN” button until the display shows the correct minutes.
5. Once the time is set, the clock continues to keep time unless coffeemaker is
unplugged or a power failure occurs.
6. To reset the time again follow steps 1-4.
Auto-Brew
1. Press the “PROG” button and the auto brew indicator light on the upper right hand
corner of the digital display starts flashing, indicating it is being programmed.
2. Press the “HOUR”, then the “MIN” button until the digital display shows the correct
time.
Note: Make sure the “P.M.” indicator light on the top left hand corner of the digital
display is off if you would like your coffee to be brewed in the morning.
3. Then press the “AUTO” button and the auto brew indicator light on the upper right
hand corner of the digital display lights up (see fig. A)
Note: If you take too long to press the correct hour and minutes after you have pressed
the “PROG” button, the clock will return to the time setting. To program auto-brew again
just follow steps 1-3.
4. When the brewing cycle begins the auto brew indicator light turns off and the
brewing indicator light turns on.
5. When the brewing cycle is complete the coffeemaker and the brewing indicator light
automatically shut off.
Note: The thermal carafe will keep your coffee hot.
6. To check your pre-set auto time, press the “PROG” button and the auto brewing time
will display.
E
F