Boston Acoustics VSi S8W2 User Manual
Page 8
– 8 –
All Installations
1. Strip
1
/
2
-inch of insulation from the
wire and twist the wire strands
together. The VSi Subwoofer jack
will accept either bare wire up to
12-gauge or single banana plugs.
2. Connect the wire to the subwoofer.
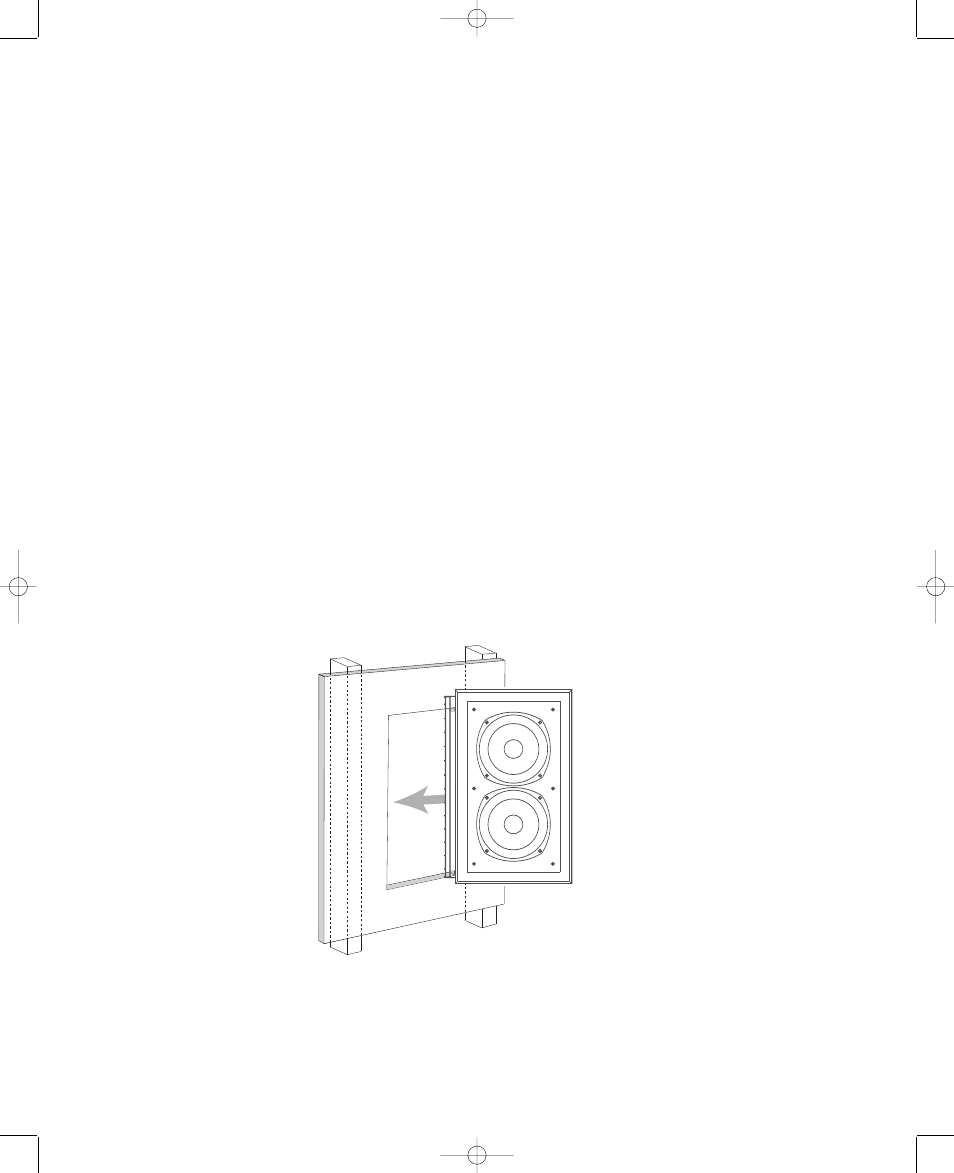
3. Slide the subwoofer into the cutout
as shown. The VSi S8W2must slide
into the wall long side first. [See
diagram below.]
4. Tighten the Phillips mounting
screws. Important: Do not over
tighten the screws.
If you wish to paint your speakers or
grilles, it should be done prior to instal-
lation of the grille. Please see the
Painting instructions.
5. If the subwoofer has been mount-
ed in a horizontal position, remove
the “tie tack” logo and reinstall
along the long axis of the grille.
6. Insert the grille into the slots in the
baffle by gently applying pressure
along the edge.
Para todas las instalaciones
1. Pele 1.5 cm del aislante del cable y
retuerza el extremo para agrupar los
hilos. El conector del altavoz VSi
admite tanto alambre calibre 12
como con clavijas sencillas tipo
banana.
2. Conecte el cable al altavoz.
3. Introduzca el altavoz en el agujero
como se indica en la figura. Debe
introducir el VSi S8W2 en el muro
empezando por el lado más largo.
4. Apriete los tornillos tipo estrella o
cruz de montaje. Importante: no
apriete demasiado los tornilllo
oss..
Si quiere pintar los altavoces o las rejil-
las debe hacerlo antes de la instalación
de la rejilla. Consulte las instrucciones de
pintado.
5. Si el altavoz se ha instalado en una
posición horizontal retire el logotipo
del sistema de inserción y reinstále-
lo en el lado más largo de la rejilla.
6. Inserte la rejilla en las ranuras del
bafle presionando ligeramente en
los extremos.
Alle Installationen
1. 13 mm Isolierung vom Kabel ent-
manteln, und die Drahtlitzen
zusammendrehen. Der VSi-
Subwooferanschluss nimmt
entweder blanken Draht bis zu
AWG 12 oder einfache
Gabelschuhstecker auf.
2. Das Kabel an den Subwoofer
anschließen.
3. Den Subwoofer wie dargestellt in
den Ausschnitt schieben. Der VSi
S8W2 muss mit der langen Seite
voran in die Wand geschoben wer-
den.
4. Die Kreuzschlitz-
Befestigungsschrauben festziehen.
Wichtig: Die Schrauben nicht zu
fest anziehen.
Wenn die Lautsprecher oder Ziergitter
lackiert werden sollen, muss dies vor der
Installation des Ziergitters geschehen.
Siehe dazu die Anweisungen zum
Lackieren.
5. Wenn der Subwoofer in horizontaler
Position montiert wurde, das Logo
entfernen und es mit dem Bindestift
entlang der Längsachse des
Ziergitters wieder befestigen.
6. Das Ziergitter in die Schlitze in der
Schallwand einfügen, indem ent-
lang der Kante vorsichtig ange-
drückt wird.
Toutes installations
1. Dénudez 13 mm de câble et tor-
sadez les brins ensemble. La fiche
du subwoofer VSi accepte les câbles
dénudés de calibre 12 ou inférieur,
ainsi que les fiches bananes simples.
2. Connectez le câble au subwoofer.
3. Introduisez le subwoofer dans l’orifice
découpé comme indiqué sur la fig-
ure, en commençant par le bord
longitudinal.
4. Serrez les vis de montage.
Important : Ne pas trop serrer
les vis.
Si vous souhaitez peindre les
enceintes ou les grilles, faites-le avant
l’installation de ces dernières. Veuillez
consulter les instructions de peinture ci-
après.
5. Si le subwoofer a été monté en posi-
tion horizontale, retirez le logo en
épingle à cravate pour le réinstaller
le long de l’axe de la grille.
6. Insérez la grille dans les fentes de la
baffle en appuyant légèrement sur
ses bords.
[Installation of VSi S8W2]
Installationsanweisungen (Forts.)
Instructions d’installation (suite)
Instrucciones de montaje (cont.)
I
nstallation Instructions (cont.
)
142-003571-0_VSi_S8W2_OM.qxd 11/24/08 5:09 PM Page 8