Ronto, Emote, Ontrol and – Philips 64PP9751 User Manual
Page 3: Peration, Pronto, Controls operations
P
RONTO
R
EMOTE
C
ONTROL AND
O
PERATION
PRONTO
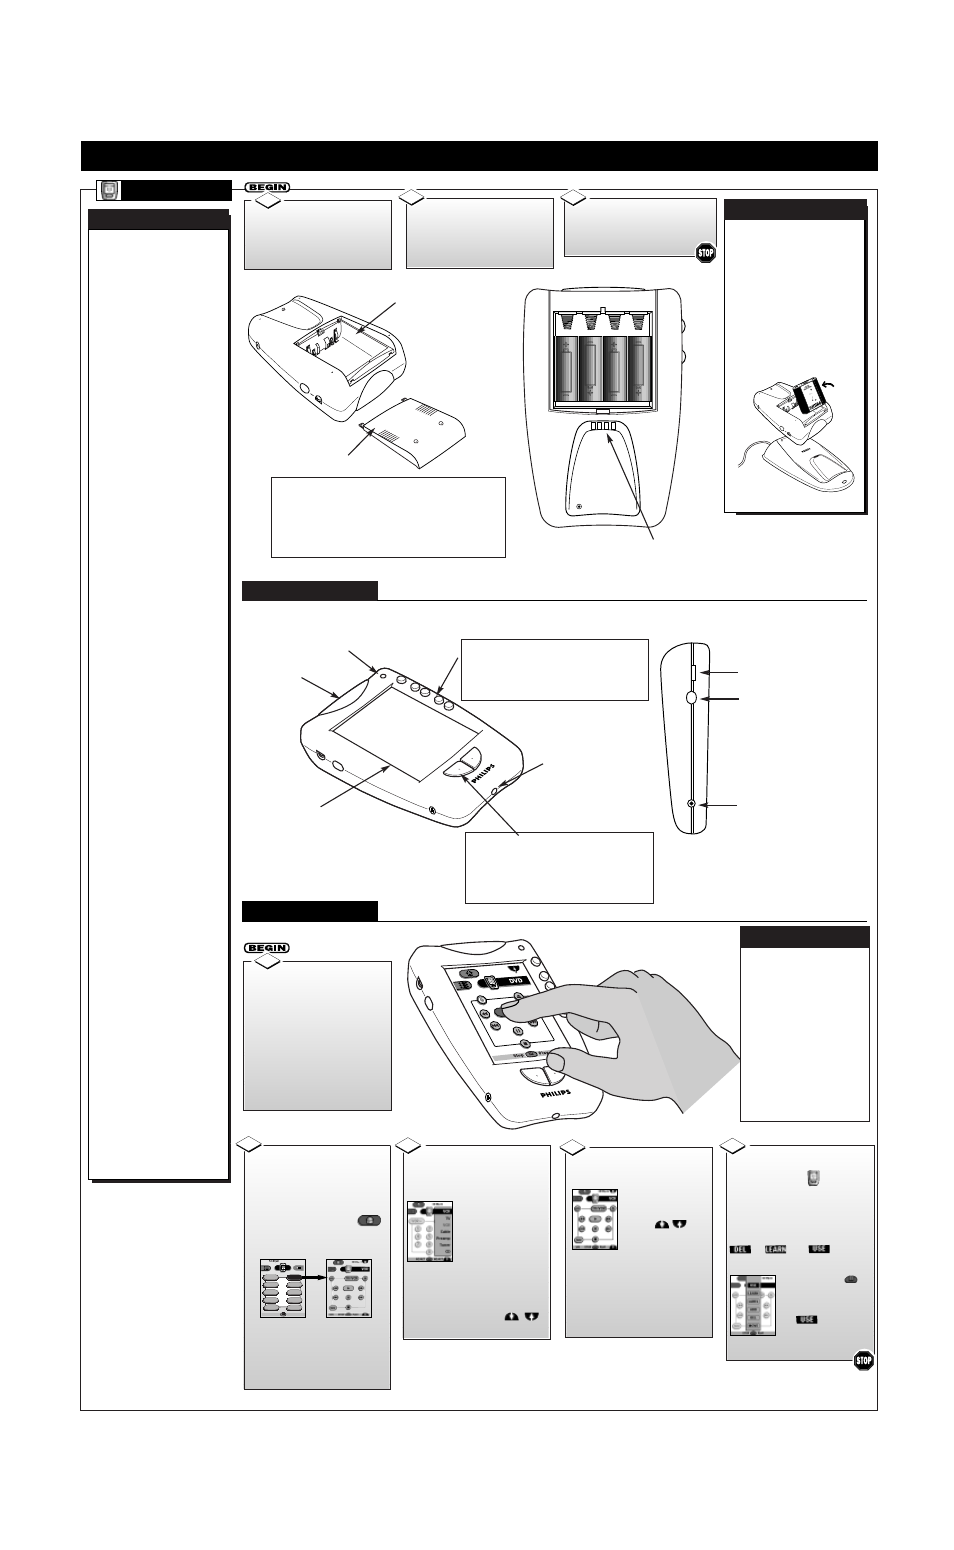
To install the four
supplied AA batteries:
Slide the battery cover
off the
back of the Pronto remote.
Reattach the battery
cover when completed. The
Pronto should now be ready for
use.
3
1
IR Transmitter
(Sending Eye)
Insert (4-AA) batteries
into the battery compartment.
Be sure the (+) and (-) ends of
the batteries line up correctly
(inside of case is marked.)
An optional recharging
dock and rechargeable bat-
tery pack are also available
for the Pronto remote.
A light on the front of the
Battery Dock will indicate
when the batteries are fully
charged. Depending upon the
condition of the battery pack
a complete recharge could
take 2-3 hours.
B
ATTERY
R
ECHARGING
Light Sensor
- Direct Access Buttons -
• The Mute, Channel (+,-), and Volume (+,-) buttons
will operate even when the LCD touchscreen is off.
They can also be programmed to operate a dedicated
component, such as the PTV, or different devices at
different times.
LCD Touchscreen
- Left/Right Buttons -
• Function of the Left and Right buttons change depend
ing on the device the Pronto is controlling.
• The LCD touchscreen display will show the Left and
Right buttons current control function labels.
For example: A/CH (Alternate Channel) for the two
channel program selection feature, etc.
Learning Eye
Contrast Dial (+,-)
Backlight Button
Serial Port
(for future upgrades)
Battery Cover
LCD DISPLAY REMOTE
T
he PRONTO is a
LCD touchscreen
universal, learn remote
that combines flexibility
of use with maximum
adaptability. Set to auto-
matically work with your
Philips 64PP9751 TV
and all its integrated
Menu system features,
the Pronto also has pre-
set “Device” operations
for a variety of Audio
and Video accessory
products (such as VCR,
DVD, CD, Tape, etc.)
Although the Pronto
remote’s prepro-
grammed operating
codes (RC5/6) were set
to work with Philips and
Marantz branded prod-
ucts, other manufactur-
er’s equipment can easi-
ly be controlled through
the Pronto’s “Learn”
mode capability. Even
the Pronto’s keypress
buttons and Device
select list can be cus-
tomized or rearranged to
better match the order
and commands for your
specific in-home elec-
tronics.
The Pronto can also
memorize select key but-
ton sequences in order to
automate, or “short-
cut”, a feature function
selection or process.
Once created and placed
in memory the recorded
“macros” will execute
the desired commands to
the various components
in order to complete, for
example, a VCR movie
playback on the HDR
PTV or other similar
procedure.
Due to the amount of
optional components
available within the
Pronto’s Device
Reference and Learn
Code Lists, please refer
to the separate full-use
Pronto Owner’s Manual
for complete details on
its functions and opera-
tions.
Rechargeable Battery Pack and Dock
- Battery Life Note -
• Use only AA alkaline or lithium batteries for best results.
• Never mix worn and fresh batteries.
• When battery power is running low a Low Battery icon blinks at
the top of the Pronto LCD display.
• Certain features may continue to operate when battery power is
low, but you won’t be able to use the Pronto’s learn or customizing
features.
Battery Compartment
Recharging Contacts
To turn the Pronto
display screen ON,
touch the
screen with your finger, then let
go.
Pressing the Backlight button
(on the left side of the remote)
also turns the display ON.
Turn the Contrast dial (on the
left side of the remote) to
adjust the screen’s brightness.
1
• Tap the touchscreen gently when
using the Pronto. Never use force.
• Do not use pens, or any sharp
object to tap the screen. You might
damage the surface.
• Keep the touchscreen dry. Wipe
off any spills immediately. Never
immerse the Pronto in water or any
liquid.
• Do not drop the Pronto on hard
surfaces (or drop anything on the
LCD touchscreen itself.)
• Do not expose the Pronto to
extreme temperatures.
• Clean the touchscreen with a soft
cloth (dampened slightly if needed.)
Never use abrasives or cleaning
solutions.
The Pronto will display
the last device screen used (or
the Home screen for all of the
devices the Pronto is set to
operate.)
Press the Home button
at any time to return to the
Pronto’s components menu list.
2
DTV
TV
INFO
A/CH
1/1
Pre Amp
VCR
DVD
Tuner
DBS
LD
CDR
Tape
CD
Press the button for the
desired device to display a
control panel screen for the
device.
Home Screen
Control Panel
A Device menu can also
be used to select components
from a currently opened con-
trol screen.
Press the Device
tab on the touch-
screen and a Device
list will appear. Just
tap the name of the
device you want to operate.
You can also scroll the Device
list by pressing the Arrow but-
ton to move down or
up the list.
3
Press a button on the
control panel to send a remote
command to the selected
“active” device.
Use the scroll
arrows
to move to the next
(or previous) page
of controls. The touchscreen
will display the current control
screen’s page number, and the
total number of pages available
for the device (1/3; 2/3; etc.)
4
The Pronto is ready to
send device commands when
the Pronto icon is shown
(at the center top of the touch-
screen display.)
If another mode label is cover-
ing the Pronto icon, such as
or , the mode
will need to be reselected.
Tap the Mode
button on the touch-
screen, and reselect
the mode to
return the Pronto to
its normal operating mode.
5
2
Side View
CONTROLS
OPERATIONS
3
T
OUCHSCREEN
U
SE
/C
ARE